Set up the Apollo mmWave dashboard for the R PRO-1
A new Apollo radar sensor detects presence out of the box, but every room is different: a ceiling fan or a moving curtain can make it trigger with nobody there, and someone sitting still can be missed. The Apollo mmWave dashboard is where you fix that. On an Apollo MSR-1, MSR-2, or R PRO-1 with the LD2412 addon, one button, Calibrate with empty room, sets the radar's thresholds for your room in about a minute and a half. On an Apollo MTR-1 or R PRO-1, the same dashboard is where you draw zones over the radar's live targets.
The Apollo mmWave integration gives every Apollo radar sensor in your home its own workspace in Home Assistant. Install it once and it adds an Apollo mmWave dashboard to your sidebar with one tab per radar, built from the devices Home Assistant already knows about. Add a sensor later and its tab appears on its own; remove one and its tab goes away.
What each tab holds depends on the radar inside the sensor:
| Sensor | Radar chip | What its tab shows |
|---|---|---|
| Apollo MSR-1, Apollo MSR-2 | LD2410 | Radar tuning: auto-calibration, distance and gate energy charts, thresholds, detection range, and occupancy |
| Apollo R PRO-1 | LD2450, plus the optional LD2412 addon | The same radar tuning cards for the LD2412, plus a zone map for drawing occupancy zones over the LD2450's live targets |
| Apollo MTR-1 | LD2450 | A zone map |
LD2410, LD2412, and LD2450 are the model numbers of the radar chips, and the card titles use them.
If you built the MSR-2 tuning dashboard by hand, this replaces it. The integration ships its own cards and updates them along with itself, so Streamline Card, Plotly Graph Card, and the YAML generator are no longer needed.
Before you start
- You're running Home Assistant 2026.8.1 or newer. Settings → About shows your version.
- HACS 2.0.5 or newer is installed and set up. HACS is a community store for Home Assistant that installs and updates custom integrations like this one. If you don't have it yet, follow the HACS download guide and then the initial configuration guide. Setup asks you to sign in with a free GitHub account.
- Your Apollo sensor is already in Home Assistant through the ESPHome integration. If it isn't, work through getting started first.
Install Apollo mmWave through HACS
Apollo mmWave installs from its GitHub repository, so you add that repository to HACS once as a custom repository. From then on HACS tracks updates for it like any other integration.
- Open HACS from your Home Assistant sidebar.
- Click the three-dot menu in the upper right corner and choose Custom repositories.
- Paste
https://github.com/ApolloAutomation/apollo-mmwave-maininto the Repository field. - Set Type to Integration and click Add. The repository shows up in the list; close the dialog.
- Search HACS for Apollo mmWave and open it.
- Click Download, then confirm with Download in the dialog that opens.
- Restart Home Assistant: go to Settings → System, click the power icon in the upper right corner, and choose Restart Home Assistant. Wait for it to come back.
Home Assistant only loads a new integration when it starts, so the restart is what makes Apollo mmWave available to add in the next step.
Add the integration
This is the step that builds your dashboard. You add Apollo mmWave once and it covers every Apollo radar you own, so there's no need to repeat it per sensor. Adding it a second time stops with This entry is already configured.
- Go to Settings → Devices & services and click Add integration. You can also open the setup dialog directly.
- Search for Apollo mmWave and select it. If it isn't in the list, refresh the browser page (your browser may still hold the list from before the restart) and search again.
- Leave Add an 'Apollo mmWave' dashboard to the sidebar turned on (it's on by default) to get the dashboard this guide describes. The dialog notes that the integration serves its own cards and dashboard, with nothing else to download. Turn the option off only if you'd rather place the cards on your own dashboards; you can change it later in the integration options.
- Click Submit, then Finish on the success message.
Apollo mmWave now appears under Settings → Devices & services, and a new Apollo mmWave entry with a radar icon sits in your sidebar. The integration registers its cards with Home Assistant itself, so they load in browser tabs that were already open without a refresh.
Open the dashboard
Click Apollo mmWave in the sidebar. With two or more radars you'll see one tab per radar along the top, each named after the device the way it appears in Home Assistant. With one radar, Home Assistant shows the dashboard title instead of a tab bar, and that radar's cards fill the page. The tabs keep themselves current: add a sensor and its tab appears, no page reload needed.
The cards on each tab are laid out in columns that stack into one on a phone. Here's what a working first load looks like for each sensor. A row only appears when its entity is enabled in Home Assistant, so some cards can be shorter than described.
MSR-2 and MSR-1 tabs
Both sensors use the LD2410 radar chip, so their tabs look the same, and the tuning card titles start with LD2410.
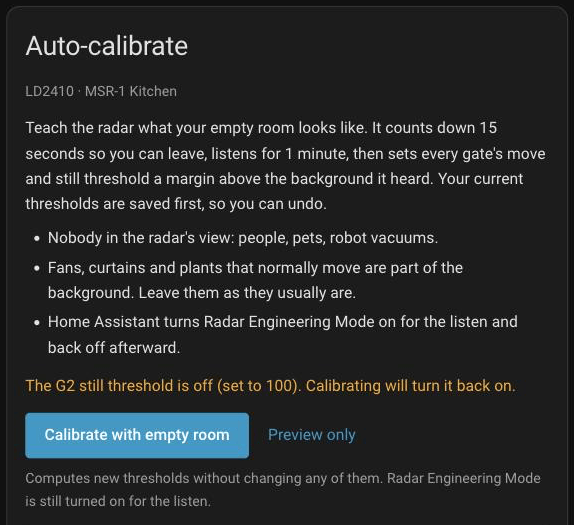
- Auto-calibrate sits at the top, with the Calibrate with empty room and Preview only buttons. If your sensor still has its factory thresholds and has never been calibrated, the card adds These look like factory thresholds. Calibrating sets them for your room.
- Under it, a help card names your sensor and gives a four-step Start here list.
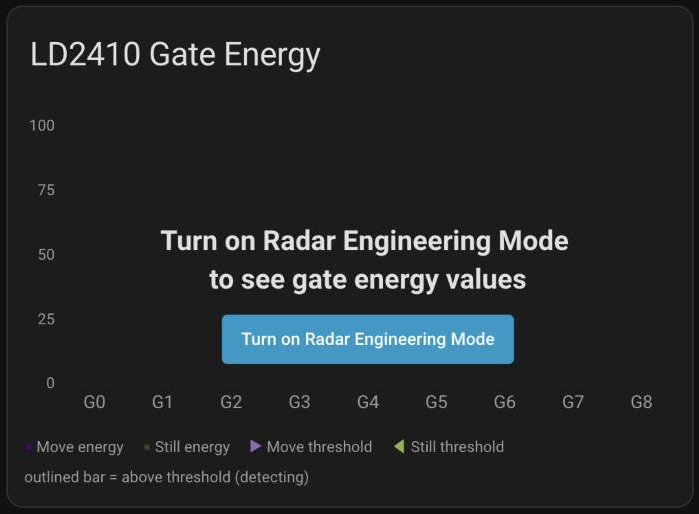
- The LD2410 Gate Energy chart is dimmed behind Turn on Radar Engineering Mode to see gate energy values, with a Turn on Radar Engineering Mode button below. That's expected: the radar only reports gate energy while Radar Engineering Mode, a diagnostic setting, is on. You don't need to press the button before calibrating; the calibration turns the mode on for its listen and puts it back the way it was afterward.
- The other cards hold the radar's settings and live readings: controls, distances, detection range, occupancy, a threshold for each gate (G0 to G8), and an hour of occupancy history. The tour of the radar tab explains each one.
R PRO-1 tabs
The R PRO-1 tab starts with the same tuning cards, titled LD2412 instead of LD2410, for the optional LD2412 radar addon, and adds a zone map for its LD2450 radar. Without the addon, the LD2412 cards still appear but have no radar behind them, so skip to the zone map at the end of the tab. The differences from an MSR-2 tab:
- LD2412 Controls adds Start Dynamic Background Correction and Background Correction Running. The Auto-calibrate card reminds you to run background correction first, with the room empty, and wait for its status to turn off before you calibrate.
- LD2412 Detection Range holds Radar Timeout, Max Gate, and Min Gate, plus Distance Resolution if you've enabled that entity (it's hidden on a new sensor).
- The thresholds cards and the Gate Energy chart cover 14 gates, G0 to G13.
- There's no Zone Config card, and the LD2412 Distances chart shows the gates and your Max Gate and Min Gate limits without distance bars.
- At the end of the tab, a Zone Map heading introduces the zone map card for the LD2450, described below.
MTR-1 tabs
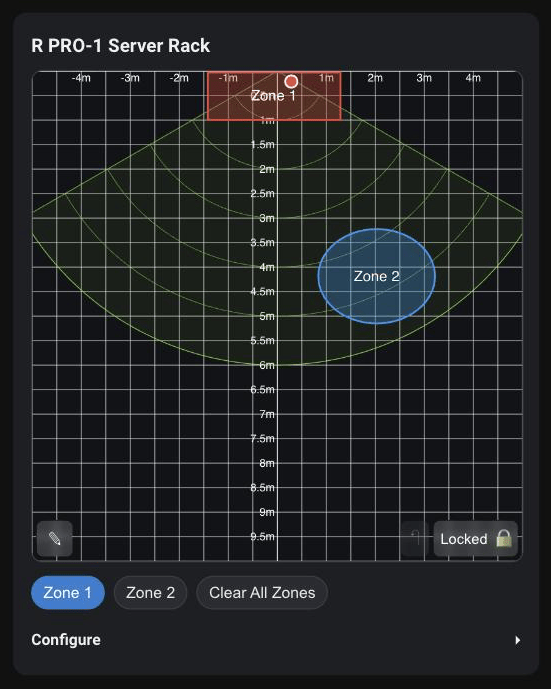
An MTR-1 tab holds one card: the zone map, titled with your sensor's name. It shows a square grid marked with distances, the sensor's field of view drawn as a cone, and a dot for each target the LD2450 is tracking. A pencil button in the lower left opens the drawing tools, the lower right holds undo and lock buttons, and a collapsed Configure section under the grid holds the cone rotation slider and the zone list. The integration finds the sensor's target entities itself, so there's nothing to pick before you start drawing.
The R PRO-1 zone map works the same way.
What to do first
Your dashboard is working. On an MSR-1, MSR-2, or R PRO-1 tab, the first thing to do is press Calibrate with empty room on the Auto-calibrate card and leave the room for about a minute and a half. You don't need to change a setting or turn anything on first. The tuning guide walks you through it. On an MTR-1 tab, or an R PRO-1 without the LD2412, go straight to drawing zones. The rest of this page covers options, upgrading from an older setup, and troubleshooting, so come back to it when you need it.
Change the integration options
The options let you turn the dashboard off, or choose exactly which sensors get a tab. Open Settings → Devices & services → Apollo mmWave → Configure to reach the Apollo mmWave options dialog. Changes take effect as soon as you click Submit, with no restart, and an open dashboard picks up a new device selection without a reload.
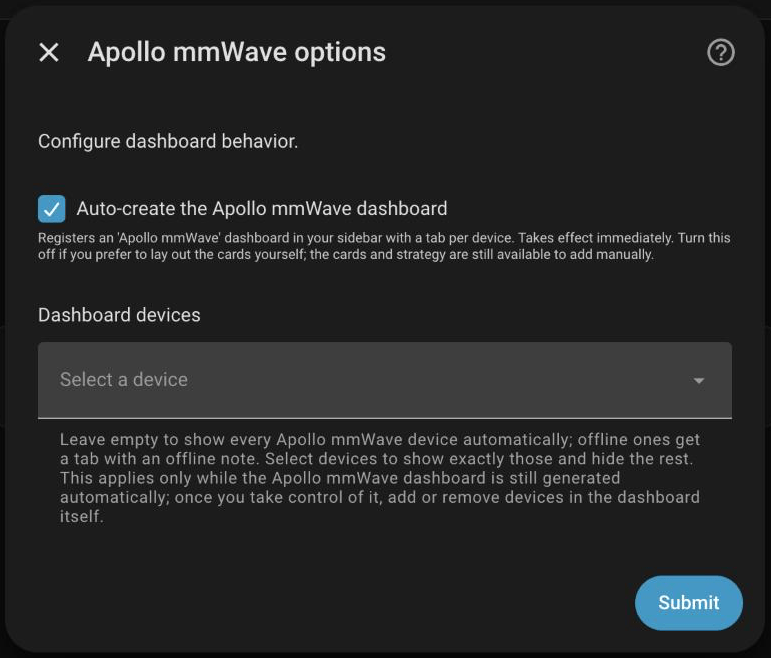
- Auto-create the Apollo mmWave dashboard is on by default. Turn it off to remove the dashboard from your sidebar. The cards stay available for your own dashboards: in the card picker they're listed as Apollo Radar Auto-Calibrate, Apollo Radar Distance Chart, Apollo Radar Gate Energy Chart, and Apollo Zone Map. The Apollo mmWave configuration guide has the YAML for placing them.
- Dashboard devices is empty by default, which shows every Apollo mmWave device Home Assistant knows about, online or not. Select one or more devices to show exactly those and hide the rest; a selected device keeps its tab even while it's offline. Clear the selection to go back to automatic detection. The picker only lists Apollo MSR-1, MSR-2, MTR-1, and R PRO-1 sensors added through ESPHome.
The auto-create option is what decides whether the dashboard exists. If you delete the dashboard under Settings → Dashboards while the option is on, it comes back the next time the integration loads. To remove it for good, turn the option off.
Want to rearrange the cards? Click the pencil icon in the upper right corner of the dashboard and choose Take control in the dialog that opens. From then on the layout is yours: the integration never writes over it, turning off the auto-create option leaves it in place, and it stops adding and removing tabs as sensors come and go. Changed your mind? With the auto-create option on, delete the dashboard under Settings → Dashboards, and the auto-built version comes back the next time the integration loads: restart Home Assistant, or open Settings → Devices & services → Apollo mmWave and choose Reload from the three-dot menu. If you add the Apollo tabs to a dashboard of your own, take control of that dashboard before you edit them; editing an auto-built tab directly discards its cards.
Upgrade from an older setup
If this is your first Apollo dashboard, skip this section and calibrate your radar. Troubleshooting is at the end of this page if something didn't load.
From the MSR-2 tuning dashboard
Your thresholds, detection range, and every other setting live on the sensor itself, and the new dashboard reads the same entities. There's nothing to migrate: once your MSR-2 tab works in the Apollo mmWave dashboard, you can delete the old view.
Back up before you edit raw YAML
The raw configuration editor holds your whole dashboard. Copy its contents somewhere safe before you delete anything, so you can paste it back if a cut goes wrong.
- Open the dashboard you pasted the old YAML into, click Edit dashboard, open the three-dot menu, and choose Raw configuration editor.
-
Find the old view. It starts like this:
-
Delete that view, from its
- type: sectionsline down to the line before the next view (or beforestreamline_templates:). If you ran the generator for more than one MSR-2, repeat for each MSR-2 Configuration view. - At the bottom, delete the
ld2410_templates understreamline_templates:. If nothing else on your dashboards uses Streamline Card, delete the wholestreamline_templates:block. - Click Save.
If no other cards use them, you can also remove Streamline Card and Plotly Graph Card from HACS. Apollo mmWave doesn't need either.
From Apollo mmWave 1.x zone mapping
Most of the move to 2.x happens on its own the first time the integration starts. If you wrote cards or automations by hand, change these yourself:
- Card name. A hand-written zone card set to
custom:zone-mapper-cardnow shows as a missing card. Change it tocustom:apollo-radar-zone-map-cardand give it the radar'sdevice_id(plus an optionaltitle) in place oflocation. - The
apollo_mmwave.update_zoneaction. Passdevice_id.locationstill works as a deprecated alias, logs a warning once per restart, and will be removed in a later release. - Zone change triggers. The
apollo_mmwave_zone_updatedevent now carriesdevice_idwhere it used to carrylocation, so a trigger readingtrigger.event.data.locationstops matching. - Empty
entitieslists. In anupdate_zonecall, an emptyentitieslist now leaves the tracked targets alone instead of erasing them. To empty the list on purpose, passclear_entities: true. dark_mode. The zone map follows your Home Assistant theme now, anddark_modein the card config is an override. Remove it if you want the card to track your theme.
And here's what changes without you doing anything:
- Target sensors are found automatically. The old Device and Targets picker is gone; the integration locates each radar's LD2450 target sensors itself.
- Zone entities move onto the radar's device page. Your entity IDs, custom names, and area assignments are kept, and you can rename the entities freely.
- Renaming a radar no longer loses its zones, because zones are stored per device rather than per display name. If you renamed a radar before upgrading, its zones are kept but not shown: the card comes up empty and the zone entities read as unavailable. Rename the radar back to its old name and reload the integration to bring them back, or keep the new name and redraw the zones.
- Zones from the standalone Zone Mapper integration are imported when Apollo mmWave has no zone data of its own yet: on a fresh install, or when upgrading from a version before 1.2.0. The import only reads; nothing belonging to Zone Mapper is renamed or removed. Upgrading from 1.2.0 or later, the import is skipped and your existing Apollo mmWave zones are kept. Redraw any Zone Mapper zones you want on the zone map, then remove the old integration once you're happy with them.
Keep Zone Mapper until your zones have moved over
Don't uninstall the standalone Zone Mapper integration until you've confirmed your zones moved over. Its restore data is the only copy, and it goes away with its entities.
If a zone you expected is missing, search your Home Assistant log for apollo_mmwave. When the same zone number exists both on a device and in leftover pre-2.0 data, the copy already on the device wins, and the dropped copy is written to the log.
Troubleshooting
The Apollo mmWave dashboard isn't in the sidebar
Work through these in order:
- Check that Auto-create the Apollo mmWave dashboard is on in the integration options.
- Look under Settings → Dashboards. Apollo mmWave is listed there even when it's hidden. If you find it, check that its Show in sidebar setting is on and that you haven't hidden it from your own sidebar in your profile.
- If you already had a dashboard of your own at the
apollo-mmwaveaddress, the integration leaves that one alone and doesn't create its own. - Open Settings → System → Logs and look for a warning that starts with Apollo mmWave:. You'll also see a warning there that
apollo_mmwaveis a custom integration Home Assistant hasn't tested. Every custom integration installed through HACS logs that one, so you can ignore it. - If the integration couldn't create the dashboard, add it yourself: go to Settings → Dashboards, click Add dashboard, and choose Apollo Radar Tuning from the community dashboards. A dashboard you add this way always shows every detected device; the Dashboard devices option does not apply to it.
The dashboard shows no devices
The dashboard starts with No Apollo mmWave devices found. It found no radar to build a tab for. Confirm your sensor shows up under Settings → Devices & services → ESPHome, and check that Dashboard devices in the integration options is empty or lists your current devices.
One sensor has no tab
Work through these in order:
- If Dashboard devices has any devices selected, the dashboard shows only those. Add the missing sensor, or clear the selection to go back to automatic detection.
- The dashboard only picks up radars added through the ESPHome integration. A copy of the same sensor that another integration created (a network integration tracking it by its MAC address, for example) doesn't get a tab.
- A sensor you added a moment ago gets its tab once Home Assistant has registered its entities. It appears on its own, without a page reload.
- DIY builds that don't report an Apollo model only get a tab while one of their radar entities is live.
A tab says the sensor is offline
On an MSR-1, MSR-2, or R PRO-1 tab, the help card adds Offline right now. and the Auto-calibrate card reads Radar is offline. Calibration needs the radar online and its gate entities enabled. with its buttons disabled. An MTR-1 tab adds a card with the sensor's name and the same Offline right now. note, and its zone map shows no targets until the sensor reconnects. The tab stays so the sensor isn't silently missing, and the cards fill in once it reconnects. Check its power and Wi-Fi, and that it shows as online on the ESPHome integration page. If you replaced or reflashed the sensor under a new name, the old device entry is what's showing as offline: delete the old device under Settings → Devices & services and its tab goes away.
An Apollo card shows an error after an update
After you update Apollo mmWave through HACS and restart, a browser that still holds the previous version's files can show the Apollo cards as error boxes that read Custom element doesn't exist. Refresh the page. Each release loads its cards under a new versioned address, so a fresh page load picks up the current version. If the error is still there, do a hard refresh with Ctrl+Shift+R (Cmd+Shift+R on a Mac). If that doesn't clear it either, check Settings → System → Logs for a warning that starts with Apollo mmWave: about Lovelace resources. On a system that manages its dashboard resources in YAML, the warning lists the two resource addresses to add by hand.
If the element named in the error is zone-mapper-card, a refresh won't help: that's the old card name, so update the card as described in From Apollo mmWave 1.x zone mapping.
The Auto-calibrate card is still loading
The card reads Apollo mmWave is still loading... right after a restart while the integration starts, and clears on its own. If it changes to Apollo mmWave is not loaded, so calibration is unavailable., check that Apollo mmWave is enabled under Settings → Devices & services, then click Retry on the card.
Next step: calibrate your radar or draw zones
Your dashboard is up and every sensor has its tab. Now put it to work: the usage guide walks you through calibrating with an empty room, reading the charts, adjusting thresholds by hand, and drawing zones on the zone map.