Using secrets
When you set up your kit in First Steps, the Device Builder saved the Wi-Fi name and password you typed in to secrets.yaml. That same file can hold every other sensitive value your device needs, from your Home Assistant API key to your MQTT password. This tutorial walks through what to put in there and how to reference it from your device YAML.
New to secrets.yaml?
Read What is secrets.yaml? first for a quick conceptual overview, then come back here when you're ready to set yours up.
Open Secrets
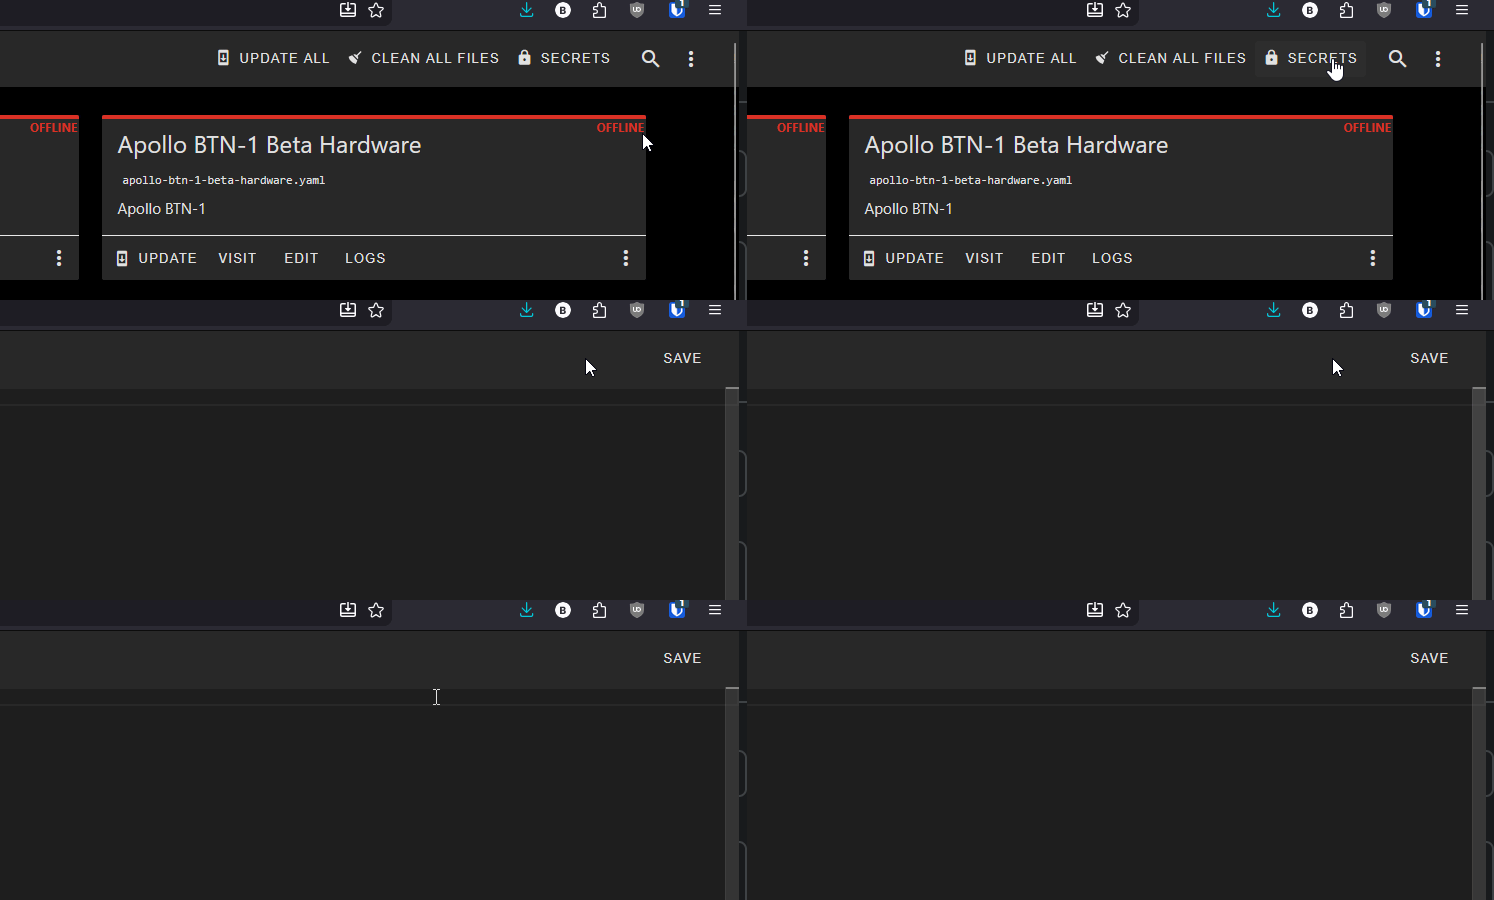
In the ESPHome Device Builder dashboard, click the 3 dots menu in the top right then Secrets. (1)
- You'll see a table of your secrets, one name and value per row, with an Add secret button below it. If you followed First Steps you should already see
wifi_ssidandwifi_passwordhere.
Syntax
Each entry is a key: "value" pair:
In your device YAML, reference it with !secret followed by the key name:
When the device compiles, ESPHome substitutes the value from secrets.yaml in place of the !secret tag.
The key has to exist
If you reference !secret some_name in a device config but some_name isn't defined in secrets.yaml, the build will fail. Spelling counts.
Make a secret in the GUI
The Device Builder can turn a value into a secret for you, no hand editing required. The API encryption key is the perfect first candidate:
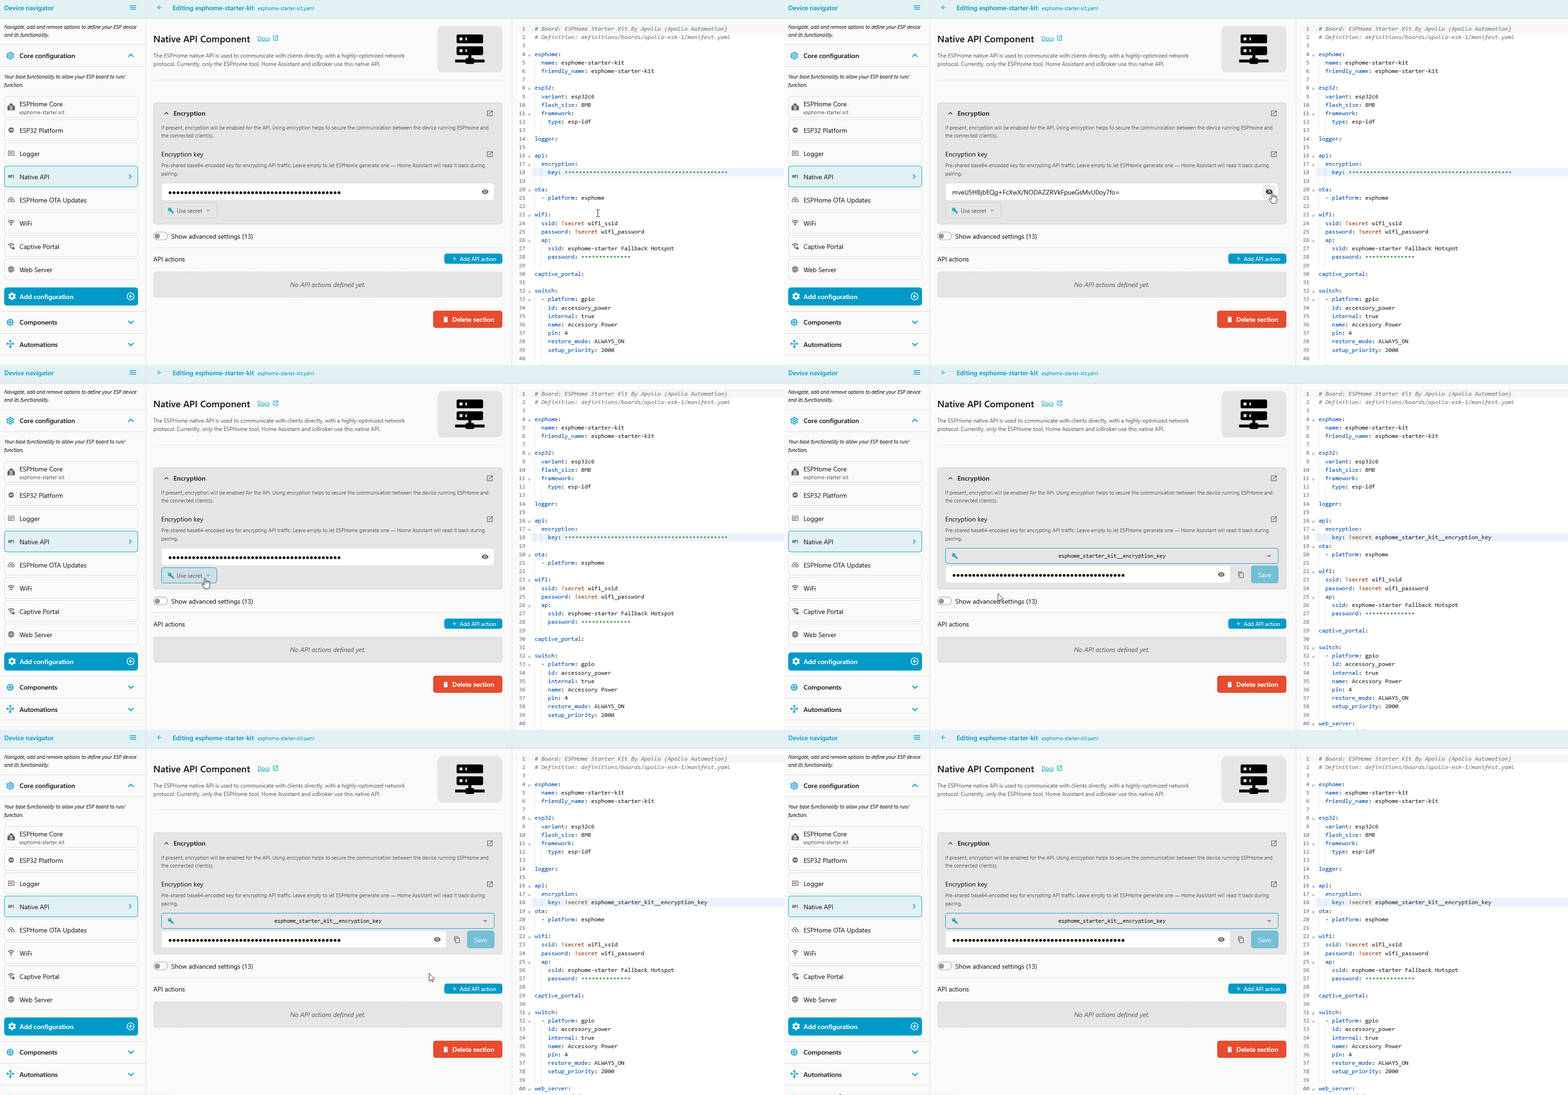
- Open your device in the ESPHome Device Builder and click the Core configuration tab.
- Click Native API. Your device's API key is shown here. Click the eye icon to reveal it.
- Click Use secret, then select Make secret esphome_starter_kit__encryption_key. (1)
- The secret is named after your device, so if you named your kit something else, the entry will match that name instead.
The Device Builder moves the key into secrets.yaml and swaps the device YAML over to a !secret reference. You can now share your device YAML without exposing the key.
What to store
Each section below shows the line you add to secrets.yaml and the line in your device YAML that references it.
Wi-Fi credentials
You set these up in First Steps. They're the baseline every device needs.
In secrets.yaml:
In your device YAML:
Fallback hotspot password
If you want the device's fallback hotspot to require a password instead of being open, store that here too.
In secrets.yaml:
In your device YAML:
wifi:
ssid: !secret wifi_ssid
password: !secret wifi_password
ap:
ssid: "Apollo ESK-1 Hotspot"
password: !secret ap_password
Home Assistant API encryption key
ESPHome encrypts the connection between your device and Home Assistant. The key is a 32-byte base64 string, and the Device Builder generates one for every new device. The easiest way to make it a secret is the Use secret button covered in Make a Secret in the GUI above, which names the entry after your device. If you'd rather add it by hand, it looks like this:
In secrets.yaml:
In your device YAML:
Reuse the same key across devices
Using the same api_encryption_key for every Apollo device on your network is fine and keeps your secrets file short. Home Assistant prompts for the key the first time it discovers a device, then remembers it.
OTA password
OTA (over-the-air) updates let you re-flash a device wirelessly after the first USB flash. The password protects that endpoint so a stranger on your network can't push software to your device. (1)
- We say software because it's the friendlier word. The technically correct term is firmware: code that runs directly on the chip instead of on a computer. That's the word ESPHome's own docs use.
In secrets.yaml:
In your device YAML:
Web server username and password
If you enable the optional web_server: component to access your device at http://device-name.local/, you can require a login.
In secrets.yaml:
In your device YAML:
web_server:
port: 80
auth:
username: !secret web_server_username
password: !secret web_server_password
MQTT broker, username, and password
If you publish to an MQTT broker instead of (or in addition to) the Home Assistant API, all three of these belong in secrets.yaml.
In secrets.yaml:
In your device YAML:
Complete example
Putting it all together, a fully loaded secrets.yaml looks like this:
# Wi-Fi
wifi_ssid: "your-wifi-ssid-here"
wifi_password: "your-wifi-password-here"
ap_password: "fallback-hotspot-password"
# Home Assistant API
api_encryption_key: "your-32-byte-base64-key-here"
# OTA updates
ota_password: "a-long-random-string"
# Web server auth
web_server_username: "admin"
web_server_password: "a-strong-password"
# MQTT
mqtt_broker: "192.168.1.50"
mqtt_username: "esphome"
mqtt_password: "broker-password"
You don't have to include every entry. If a device doesn't use MQTT, leave those lines out (or leave them in for the next device, the unused ones are harmless).
Good practice
Treat secrets.yaml like a password manager
- Don't share or post the file. Share device YAMLs instead, the
!secretreferences are safe. - Keep a backup somewhere safe (a password manager works well). If you reinstall ESPHome Device Builder you'll need to recreate it.
- Rotating a credential is a one-line edit here, then re-flash anything that uses it.
New to ESPHome? We're here to help.
Stuck on a step or want to show off what you built? Ask questions and share projects with the Apollo community.