Play a Tune with the Button
Difficulty: Level 1
This tutorial uses the Button module and the LED & Buzzer module connected to the ESP32-C6. When you click the button, the piezo buzzer plays a short tune. It's the same trigger-then-action pattern as the Button Controlled LEDs automation, swapping the light action for a buzzer action.
Before you start
Work through these pages first. This tutorial assumes your device is flashed and both modules are connected:
- First Steps to create your starter kit device in ESPHome Device Builder.
- Adding the Button Module to wire up the input.
- Adding the LED & Buzzer Module to wire up the buzzer output.
How the buzzer plays tunes
The buzzer plays songs written in RTTTL (Ring Tone Text Transfer Language), the same compact text format old phones used for ringtones. A tune is a single line that names the song, sets the tempo and default note length, then lists the notes:
When you added the LED & Buzzer module, Device Builder created an rtttl component with the id rtttl_player wired to the buzzer output. The automation below hands that component a tune string to play.
Build the automation
ESPHome Device Builder has a GUI for building automations, so you can wire a trigger to an action without hand-writing YAML. The trigger is the when, the thing that makes it fire. The action is the then do, what happens when it fires.
- Open your starter kit device in ESPHome Device Builder and click Edit. If you need a refresher on the editor, see the Device Builder Tour.
-
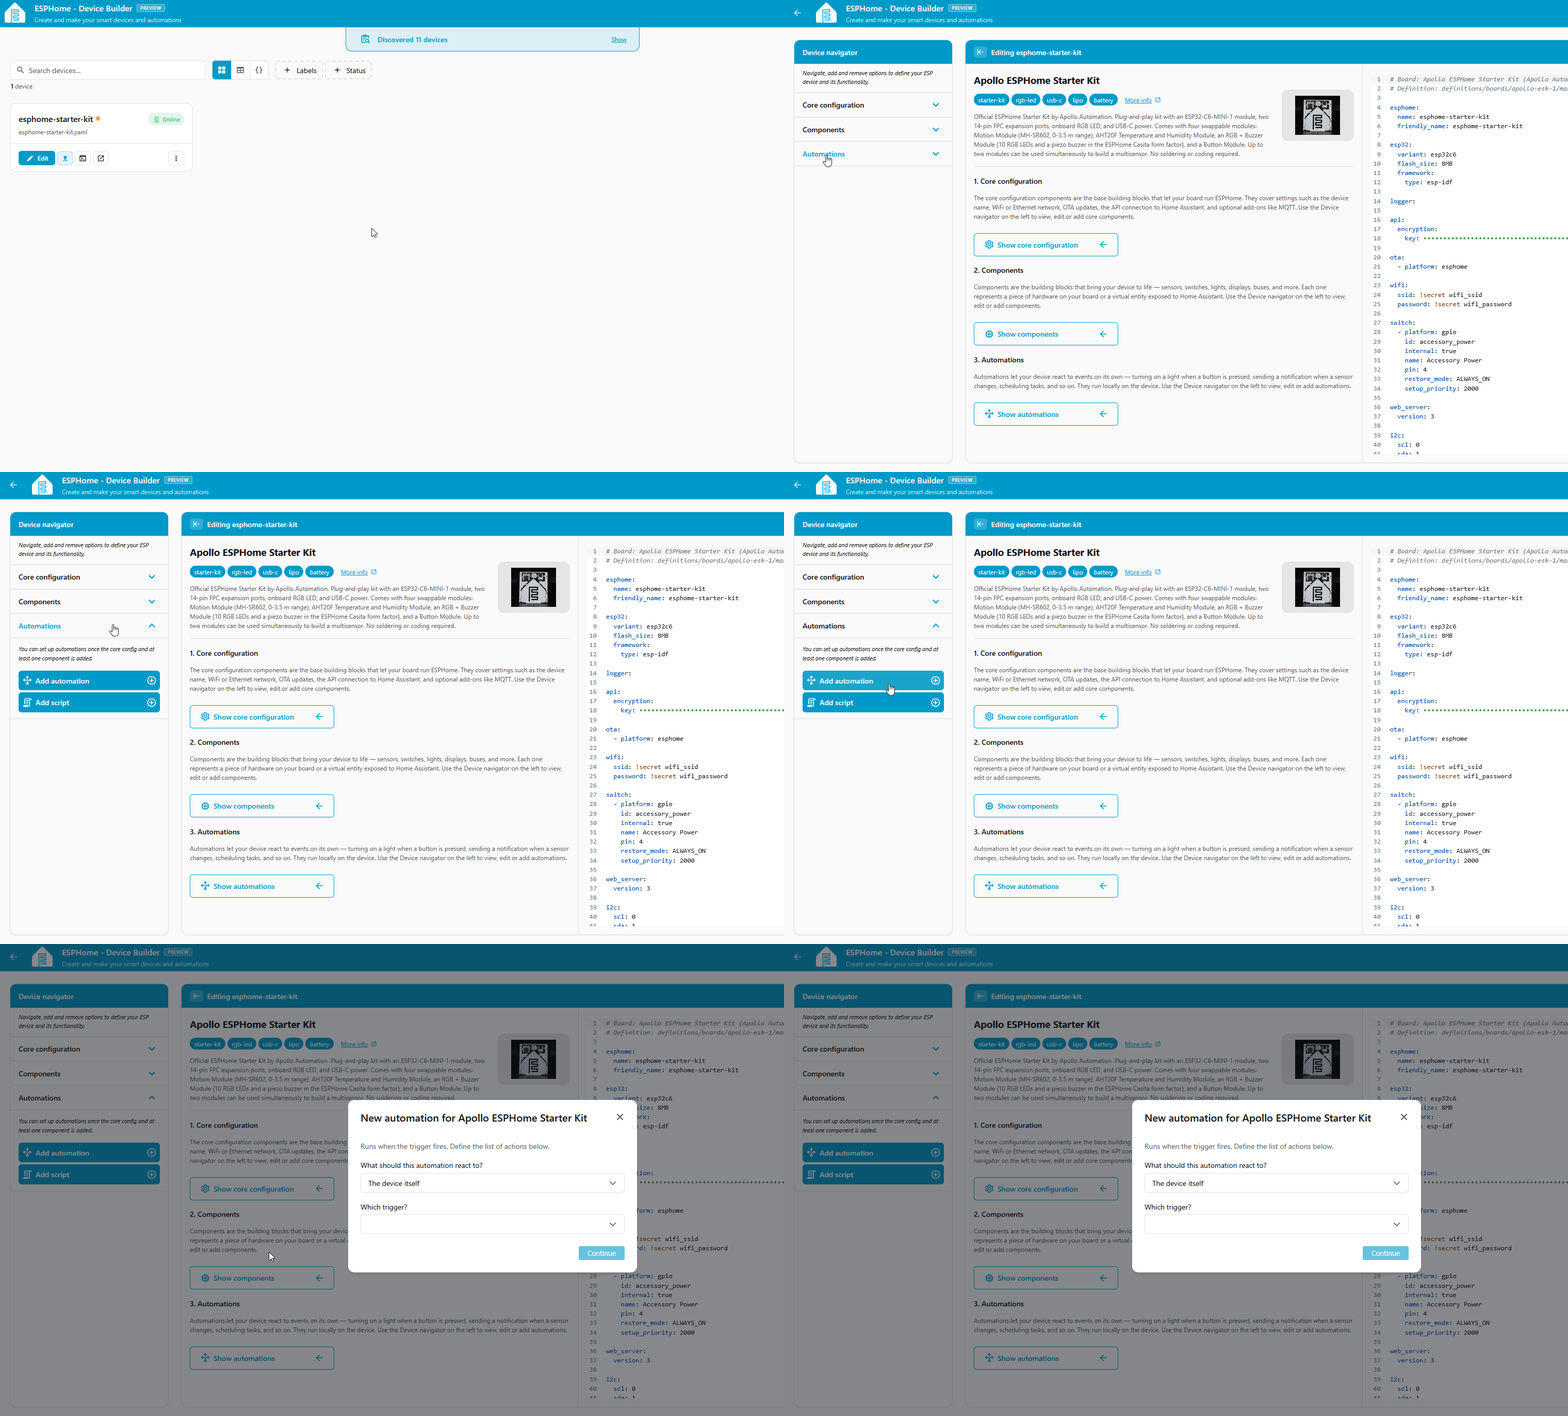
In the editor's left pane, expand the Automations dropdown and click Add Automation.
-
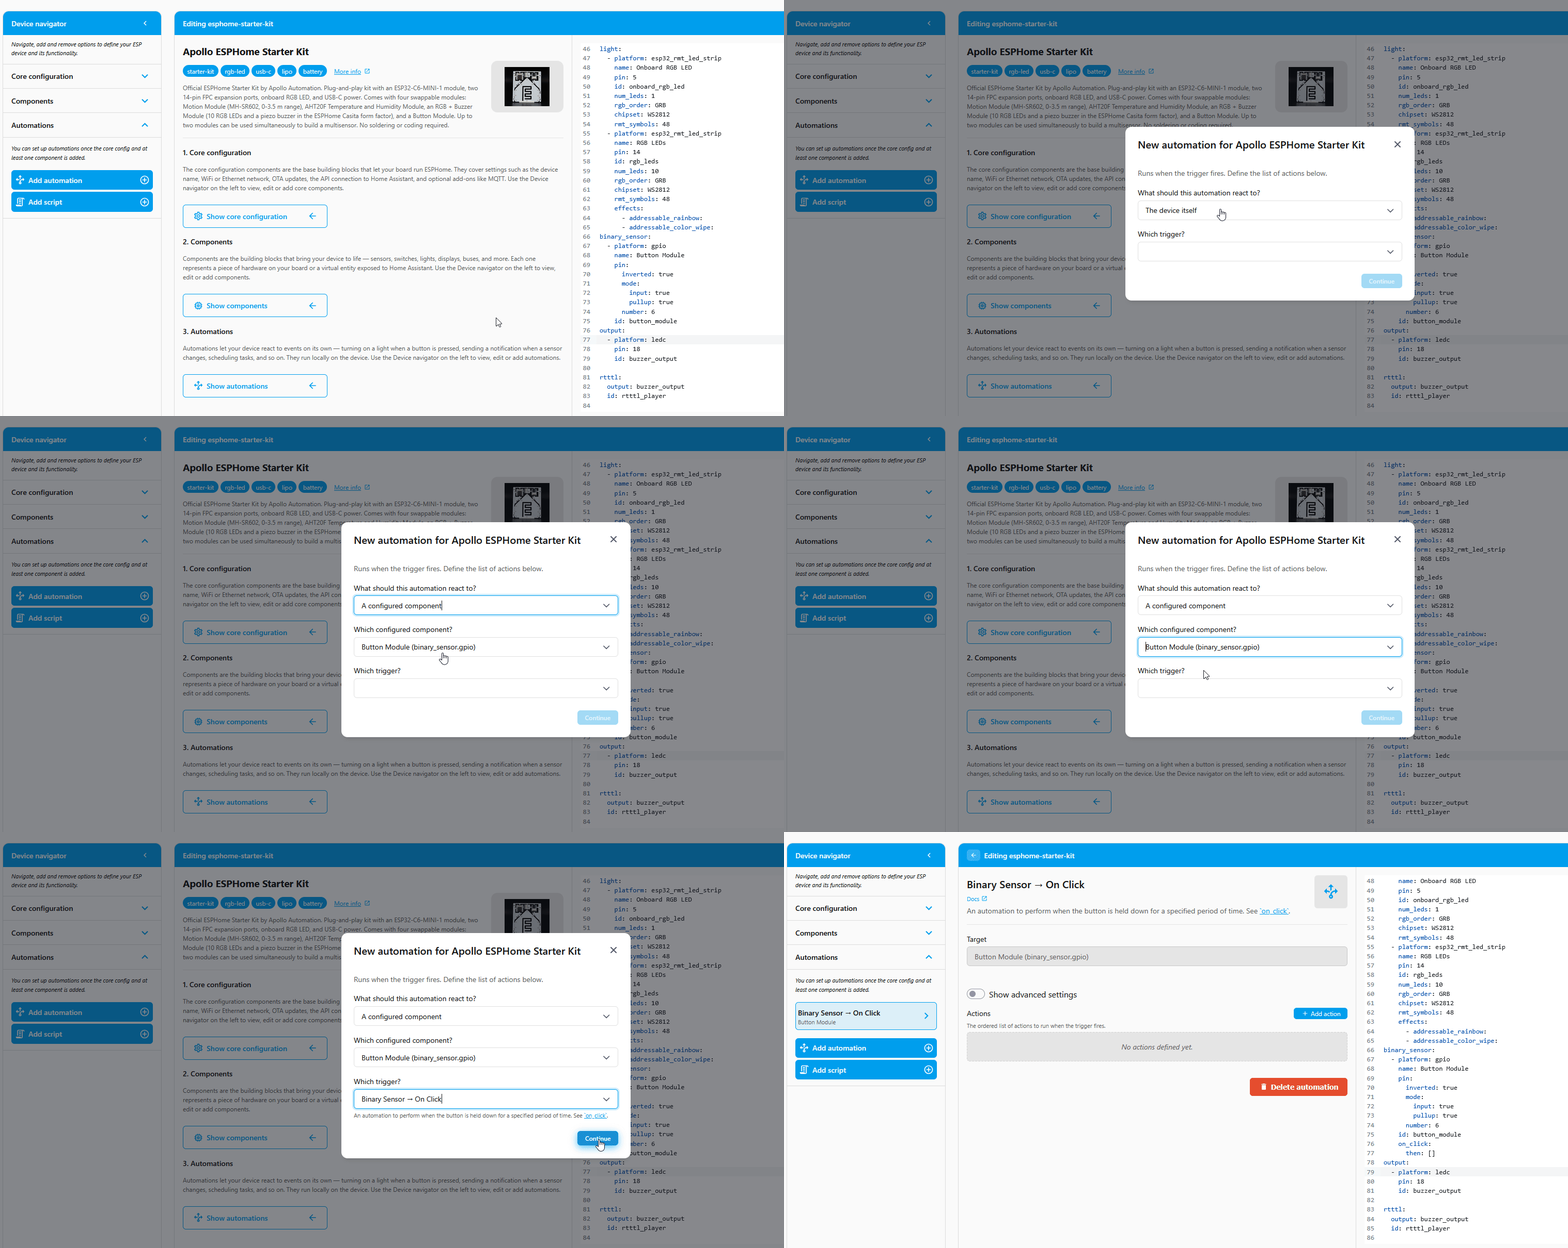
Set up the trigger:
- What should this automation react to? → A configured component
- Which configured component? → Button Module (binary_sensor.gpio)
- Which trigger? → Binary Sensor → On Click (1)
- The trigger dropdown also offers On Double Click, On Multi Click, On Press, On Release, On State, and On State Change for other button gestures. Swap any of these in once you're comfortable with the On Click flow.
-
Click Continue. You land on the Binary Sensor → On Click editor with the Target already set to your Button module.
-
Set up the action:
- Under Actions, click + Add action.
- In the Add action dialog, click By type then search Rtttl and choose Rtttl → Play.
- In the Rtttl (tune) field, paste an RTTTL string. Copy the one below to get started, or use one of the examples below. (1)
- If your device has more than one
rtttlcomponent, set the ID to rtttl_player. With a single buzzer it's already selected.
Copy this tune and paste it into the Rtttl field:
The Simpsons:d=4,o=5,b=160:c.,e,f#,8a,g.,e,c,8a4,8f#4,8f#4,8f#4,2g4,8p,8p,8f#4,8f#4,8f#4,8g4,a4.,8c,16p,8c,16p,8c,2c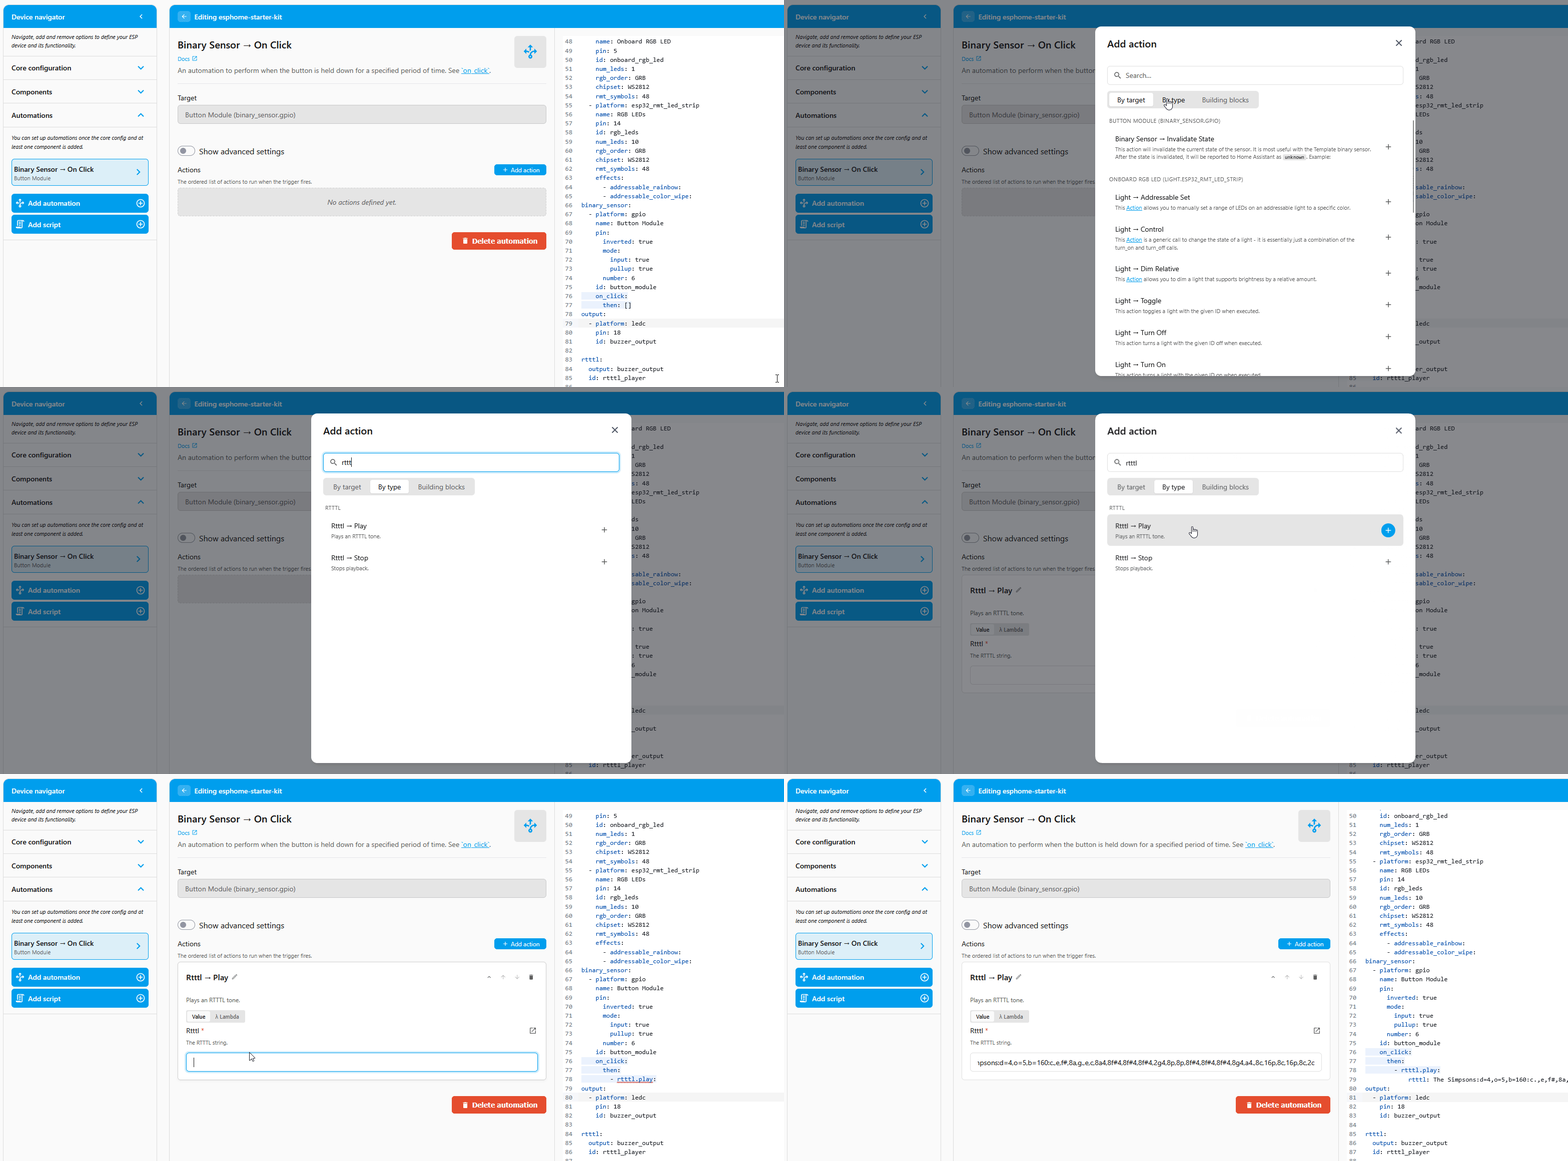
What the GUI built in YAML
The form pane and the YAML editor on the right of the editor stay in sync. Your button section now grows an on_click trigger with an rtttl.play action:
binary_sensor:
  - platform: gpio
    name: Button Module
    pin:
      inverted: true
      mode:
        input: true
        pullup: true
      number: 6
    id: button_module
    on_click:
      then:
        - rtttl.play: "The Simpsons:d=4,o=5,b=160:c.,e,f#,8a,g.,e,c,8a4,8f#4,8f#4,8f#4,2g4,8p,8p,8f#4,8f#4,8f#4,8g4,a4.,8c,16p,8c,16p,8c,2c"
See Device Builder Tour → YAML editor (right) for the full breakdown of the YAML pane.
Install the software
Your automation is saved in Device Builder, but the device is still running its old software. Compile and install the new code to push the change.
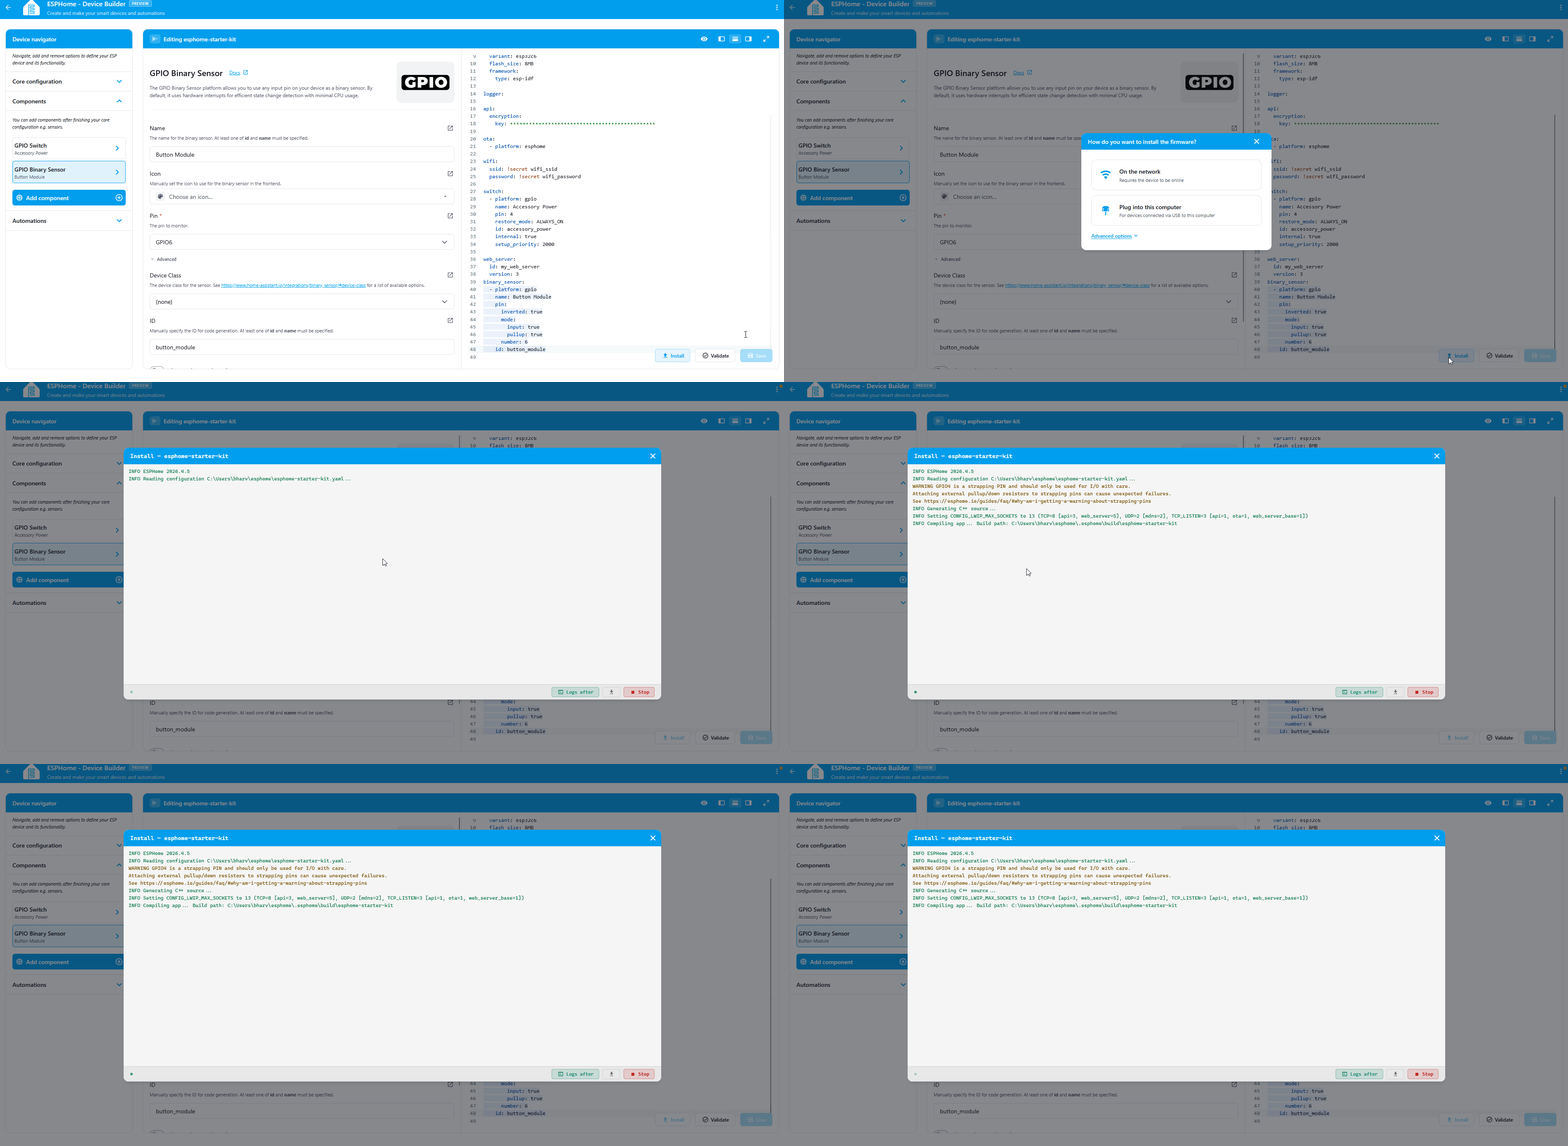
- Click Save in the bottom right of the editor.
-
Click Install, then pick On the Network to push the new software over Wi-Fi. (1)
- We say software because it's the friendlier word. The technically correct term is firmware: code that runs directly on the chip instead of on a computer. That's the word ESPHome's own docs use.
-
Wait for the compile and flash to finish. The device reboots once the install is done.
Test the automation
With the device back online, press the button on the Button module. You should hear the buzzer play your tune. Press it again to replay it.
No sound?
The buzzer is an output, not a switch, so it has no web server control of its own. The only way to hear it is to trigger it, like the button click above. If it stays silent, confirm the LED & Buzzer module is connected and that the install finished without errors.
Find more tunes
Swap the tune string in your action for any valid RTTTL line. Here are a few to get started, copy the whole line into the Rtttl field:
Mario
smb:d=4,o=5,b=100:16e6,16e6,32p,8e6,16c6,8e6,8g6,8p,8g,8p,8c6,16p,8g,16p,8e,16p,8a,8b,16a#,8a,16g.,16e6,16g6,8a6,16f6,8g6,8e6,16c6,16d6,8b,16p,8c6,16p,8g,16p,8e,16p,8a,8b,16a#,8a,16g.,16e6,16g6,8a6,16f6,8g6,8e6,16c6,16d6,8b,8p,16g6,16f#6,16f6,16d#6,16p,16e6,16p,16g#,16a,16c6,16p,16a,16c6,16d6,8p,16g6,16f#6,16f6,16d#6,16p,16e6,16p,16c7,16p,16c7,16c7,p,16g6,16f#6,16f6,16d#6,16p,16e6,16p,16g#,16a,16c6,16p,16a,16c6,16d6,8p,16d#6,8p,16d6,8p,16c6
Cantina
Star Wars Imperial Death March
Want more? Browse a big list of RTTTL ringtones here, and preview any tune in your browser here before pasting it in. Paste the song into the Rtttl field of your action, then Save and Install again to hear the new tune.
You've built a button-triggered buzzer!
Same trigger-then-action pattern, new action. Swap the trigger (motion, a temperature threshold, a schedule) or the tune, and you have a new automation.
The trigger here is a button press on the device. To play tunes from a Home Assistant automation, script, or the Developer Tools page instead, see Play a Tune from Home Assistant.
Check out these Holiday themed buzzer examples too!
New to ESPHome? We're here to help.
Stuck on a step or want to show off what you built? Ask questions and share projects with the Apollo community.