M-1 LED Matrix - Multiple Panels
Prerequisites needed for multiple panels
To use multiple panels you will need one M-1 LED Matrix Controller, at least two M-1 Matrix panels with a maximum of four, at least one of the data cables with a max of three, and at least one of the Power Modules (with a max of three). You will also need up to four usb-c cables to power each panel including the usb-c of the m-1 led matrix which will power the panel it is connected to.
Using panels you sourced yourself rather than Apollo ones? They need to match the M-1's own: 64x64 half scan, sometimes written 1/32. Indoor P2.5 and P3 64x64 panels usually qualify. Quarter-scan panels, often sold as outdoor, do not work.
Power
A 64x64 panel can pull about 3A at 5V at full white. The M-1's onboard 5V rail passes roughly 3A, which is one panel's worth, so every panel beyond the first needs its own feed from a Matrix Power Module. Skipping it gives you dim output, color shifts, and random reboots on bright content.
Hardware Setup
Wiring is the same whichever firmware you run. Choose the number of panels you are using below to get started!


1. Set both of your M-1 panels face down - the M-1 controller panel should be on the far left. Start by connecting the data cable (ribbon cable) to the "JOUT" port on the far left panel into the "JIN" port on the second panel.
2. Gently press the Matrix Power Module over the 4 pin header on the second panel as shown below. Make sure the USB-C port is facing to the right!

3. Plug in the USB-C cable into the M-1 LED Controller and the second Panel.

1. Set all three of your M-1 panels face down - the M-1 controller panel should be on the far left. Start by connecting the data cable (ribbon cable) to the "JOUT" port on the far left panel into the "JIN" port on the second panel. Repeat for connecting the third panel.

2. Gently press the Matrix Power Module over the 4 pin header on the second panel as shown below. Make sure the USB-C port is facing to the right! Repeat for connecting the third panel.

3. Plug in the USB-C cable into the M-1 LED Controller, the second panel power module, and the third panel power module.

1. Set all four of your M-1 panels face down - the M-1 controller panel should be on the far left. Start by connecting the data cable (ribbon cable) to the "JOUT" port on the far left panel into the "JIN" port on the second panel. Repeat for connecting the third and fourth panel.

2. Gently press the Matrix Power Module over the 4 pin header on the second panel as shown below. Make sure the USB-C port is facing to the right! Repeat for connecting the third and fourth panels.

3. Plug in the USB-C cable into the M-1 LED Controller and all three additional panels via the power module USB-C port.
WLED only
WLED-MM can only chain panels into a single row. You will need WLED 16.0.1 or newer for a 2x2 grid.
A 2x2 square is 128x128 and 16384 pixels. The ribbon cables are short, so the bottom two panels mount upside down, rotated 180 degrees, which puts their ports next to the top row's ports and lets the cables reach.
1. Lay the four panels face down in a 2x2 square. Rotate the bottom two panels 180 degrees.
2. Chain them in a serpentine: top-left JOUT to top-right JIN, top-right JOUT to bottom-right JIN, bottom-right JOUT to bottom-left JIN. The controller is on the top-left panel.
3. Press a Matrix Power Module onto each of the other three panels and give each one its own USB-C feed.
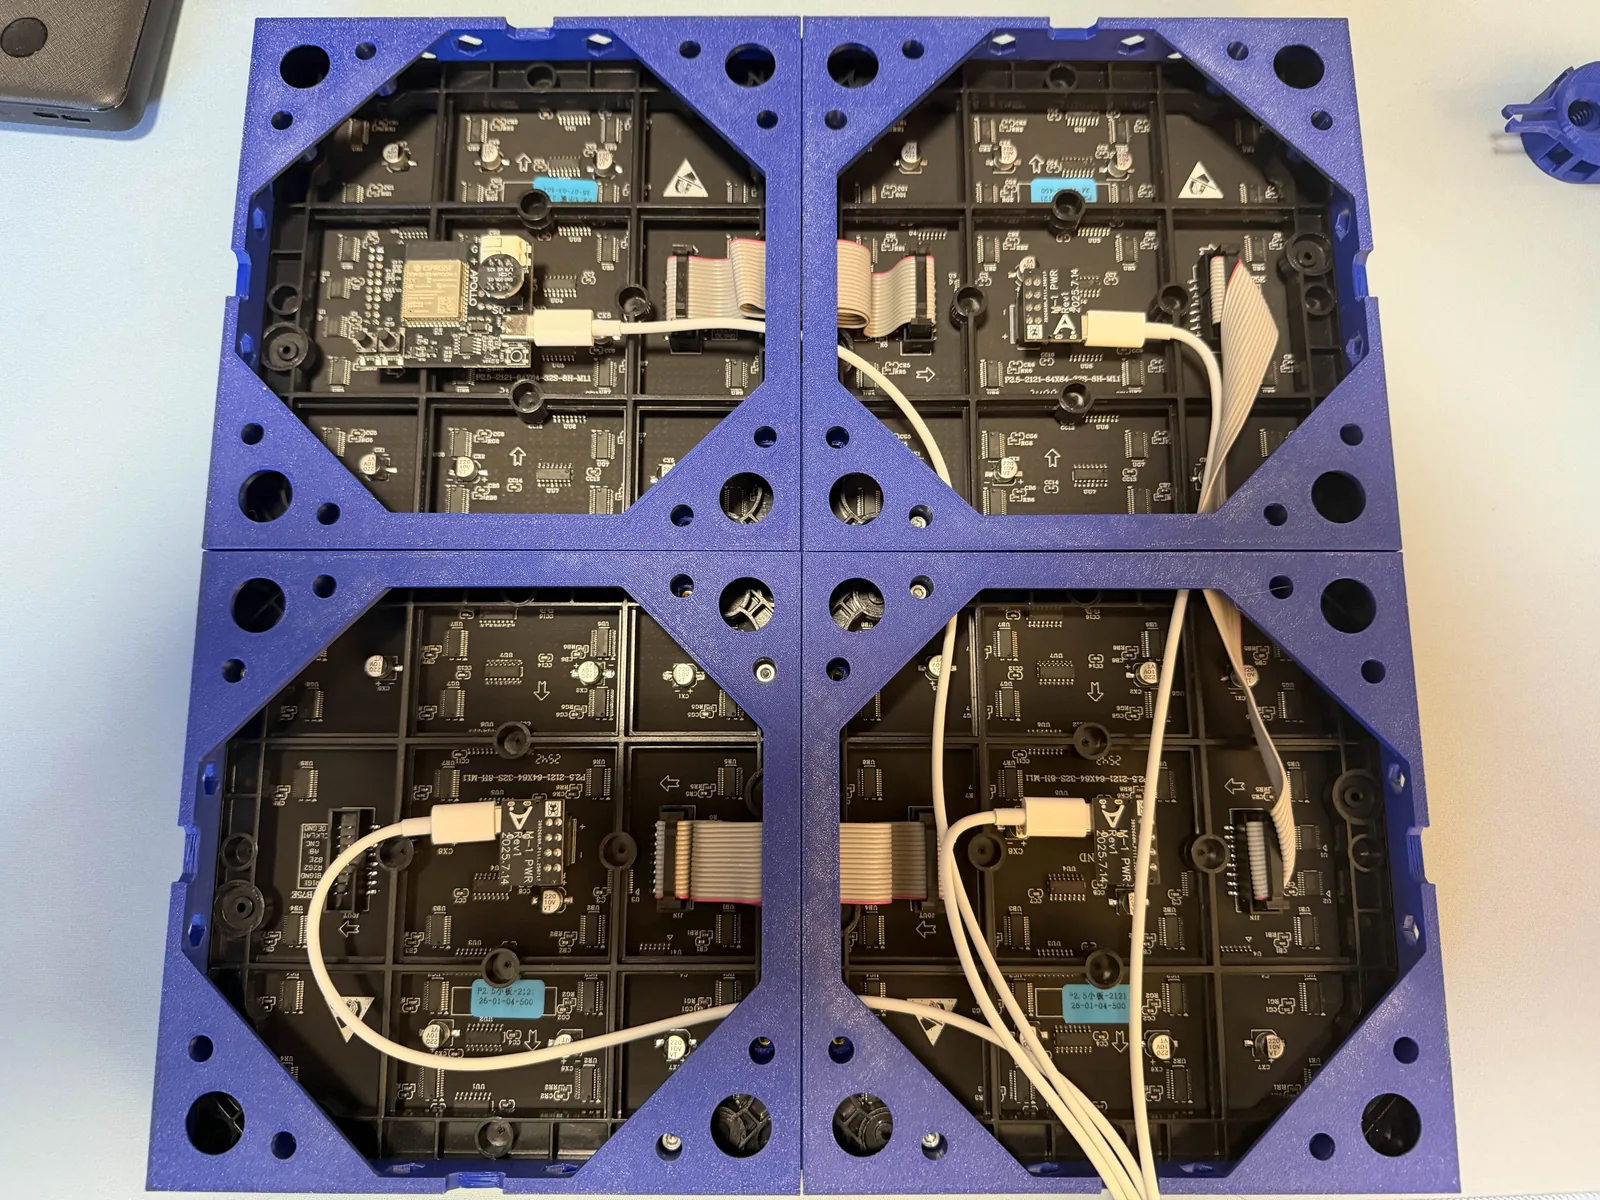
A 3D printable wall mount system is available on Printables.
Software Setup
Click Config, then LED Preferences. Set Type to HUB75 (Half Scan) and Panel (width x height) to 64 x 64, leave Reversed unchecked, then fill in the rest from your layout and click Save.
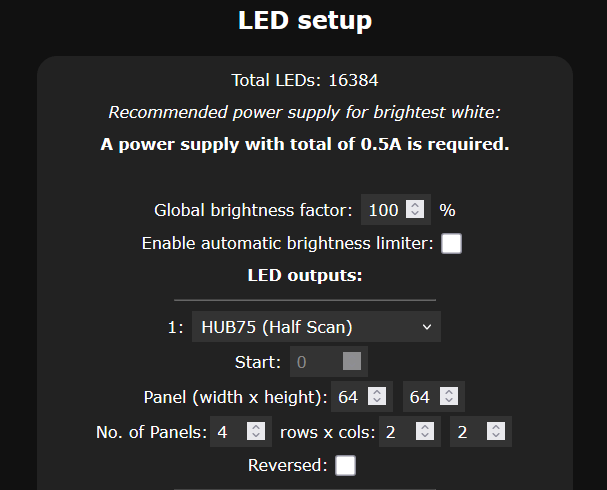
rows x cols means what it says. The first box is how many panels down, the second is how many across, so a row of four panels is 1 then 4.
| Layout | No. of Panels | rows x cols | Total LEDs |
|---|---|---|---|
| Two panels | 2 | 1 and 2 | 8192 |
| Three panels | 3 | 1 and 3 | 12288 |
| Four panels in a row | 4 | 1 and 4 | 16384 |
| 2x2 grid | 4 | 2 and 2 | 16384 |
On a 2x2, do not add a software flip for the upside-down bottom row. The 2 x 2 mapping already assumes the serpentine-with-rotated-bottom-row build described above.
Next, click Config, then 2D Configuration. Leave Number of panels at 1 and describe your whole chain as that one panel, with 1st LED at Top/Left, Horizontal orientation, and Serpentine off. (1)
- Set it to four panels here and your content repeats on every panel instead of spanning them.
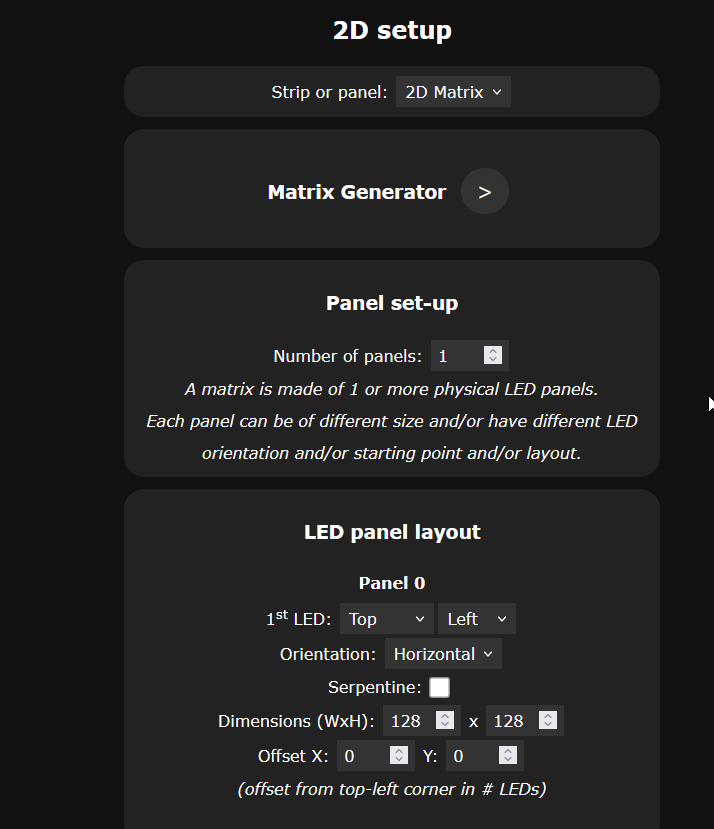
Set Dimensions (WxH) to the combined size of your layout. This field is width first, unlike rows x cols above. (1)
- 2D Configuration does not follow the HUB75 change automatically, so this is the step people miss.
| Layout | Dimensions (WxH) |
|---|---|
| Two panels | 128 x 64 |
| Three panels | 192 x 64 |
| Four panels in a row | 256 x 64 |
| 2x2 grid | 128 x 128 |
Finally, tap Info, scroll down, select Reboot WLED, and confirm. The display stays black until you do.
1. Navigate to your WLED instance in a browser or using the WLED-native app on your phone. You can use http://your-hostname-here.local or its IP address. Click here if you need to find your IP or hostname.
2. Click on Config, then LED Preferences. set Chain Length to 2 then Save.
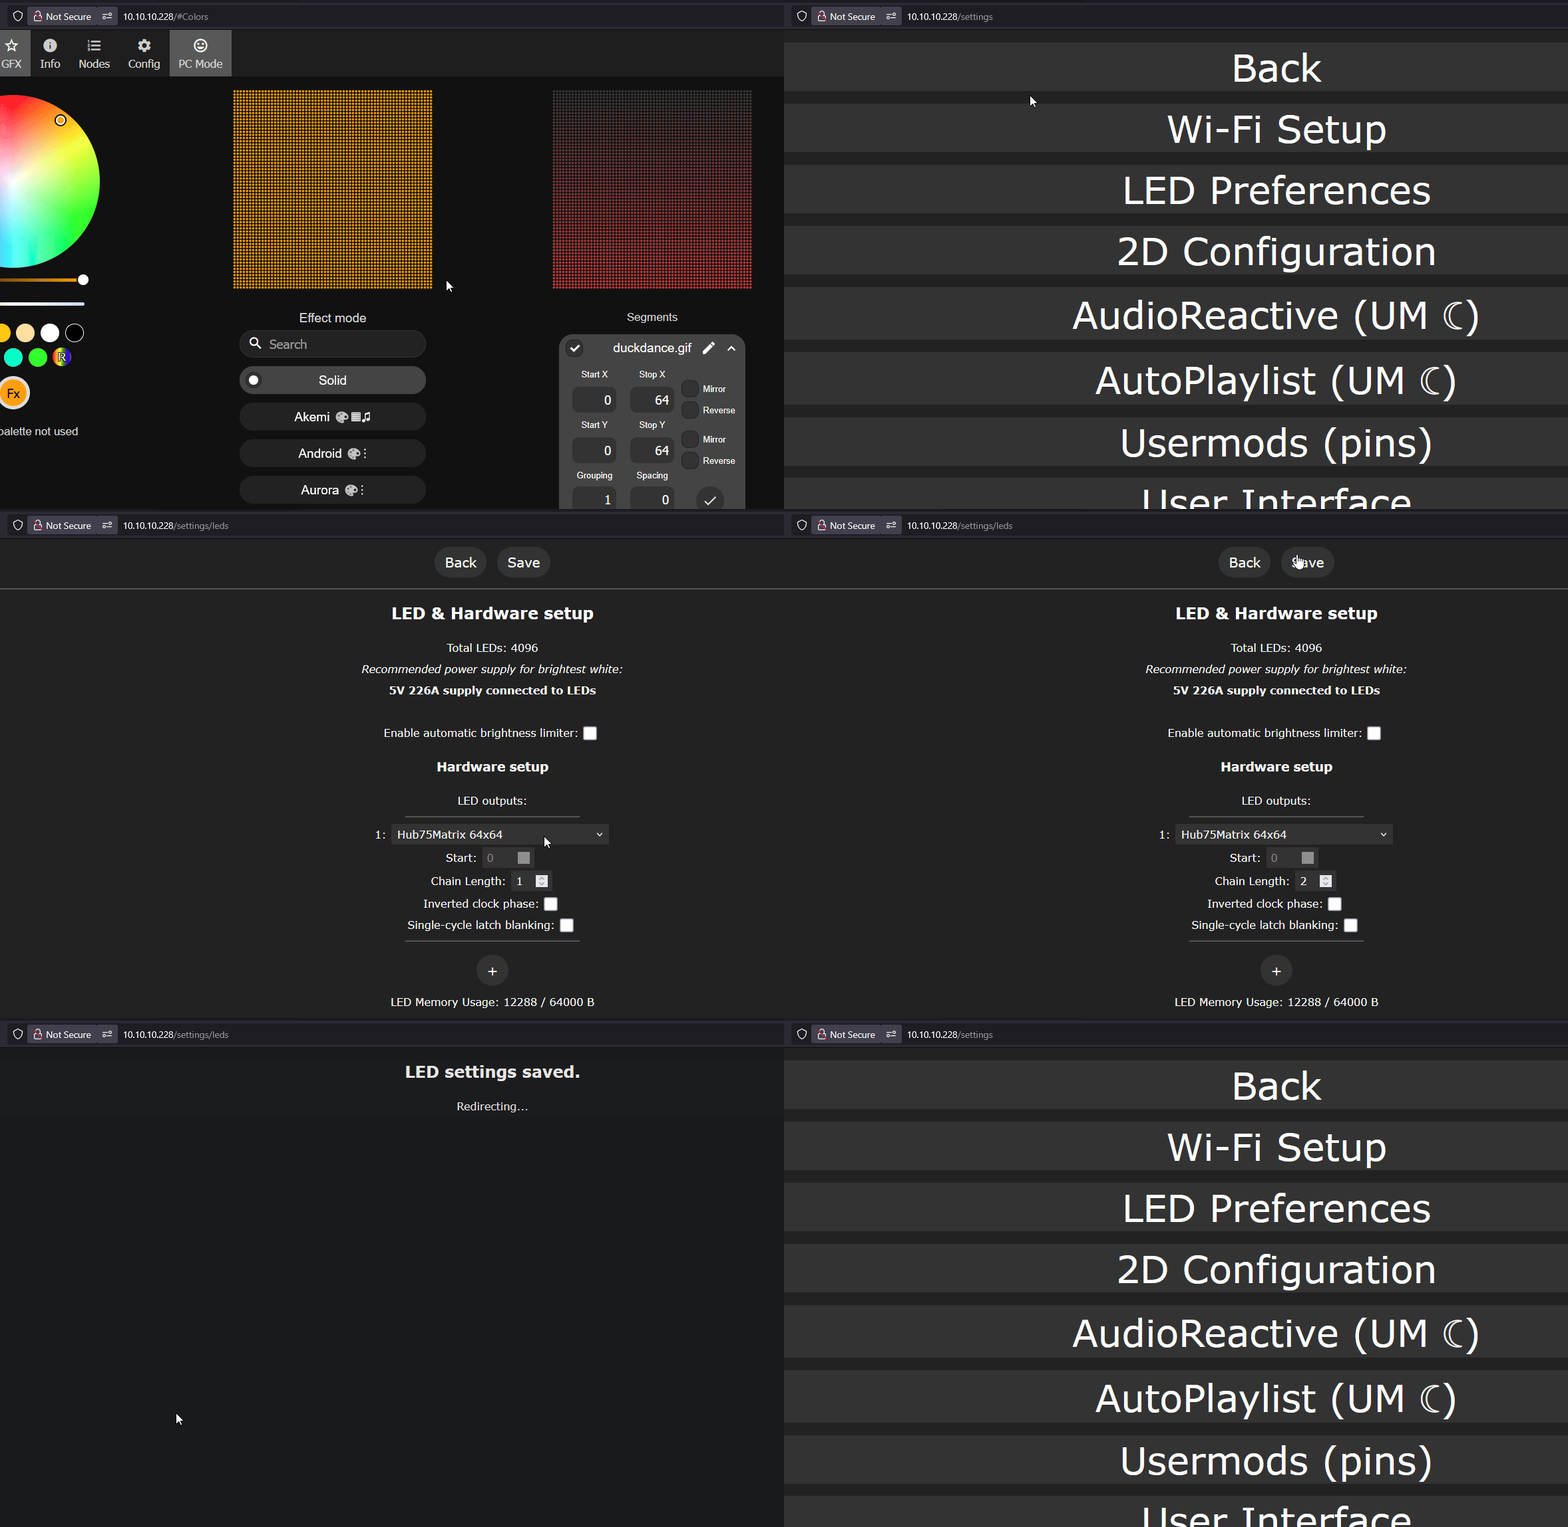
3. Click on Config, then 2D Configuration and change the Panel dimensions (WxH) to 128 x 64 and click Save.
Leave Horizontal panels and Vertical panels at 1. The combined size goes in the panel dimensions, not the panel counts. Matrix Dimensions below should confirm your new total.
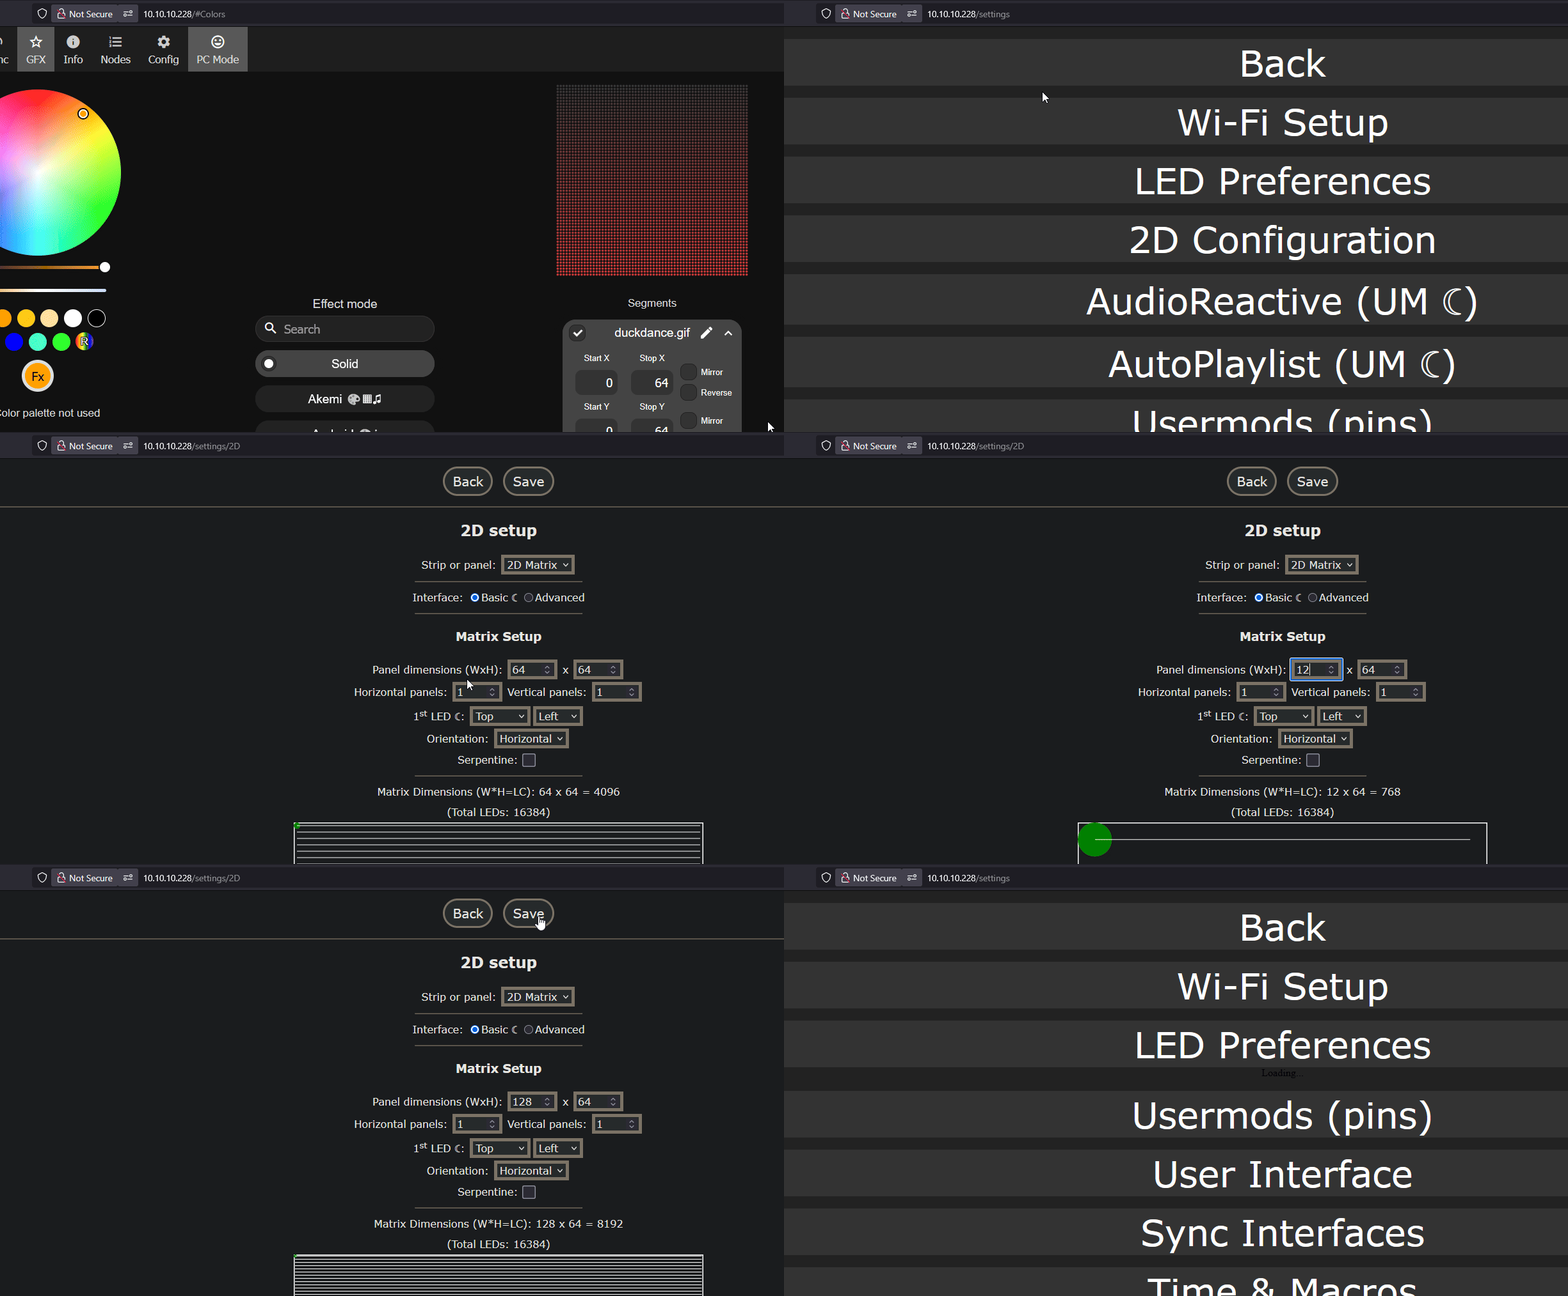
4. Reboot WLED before proceeding. Tap Info at the top, scroll down, and select Reboot WLED. When prompted, tap again to confirm the reboot.
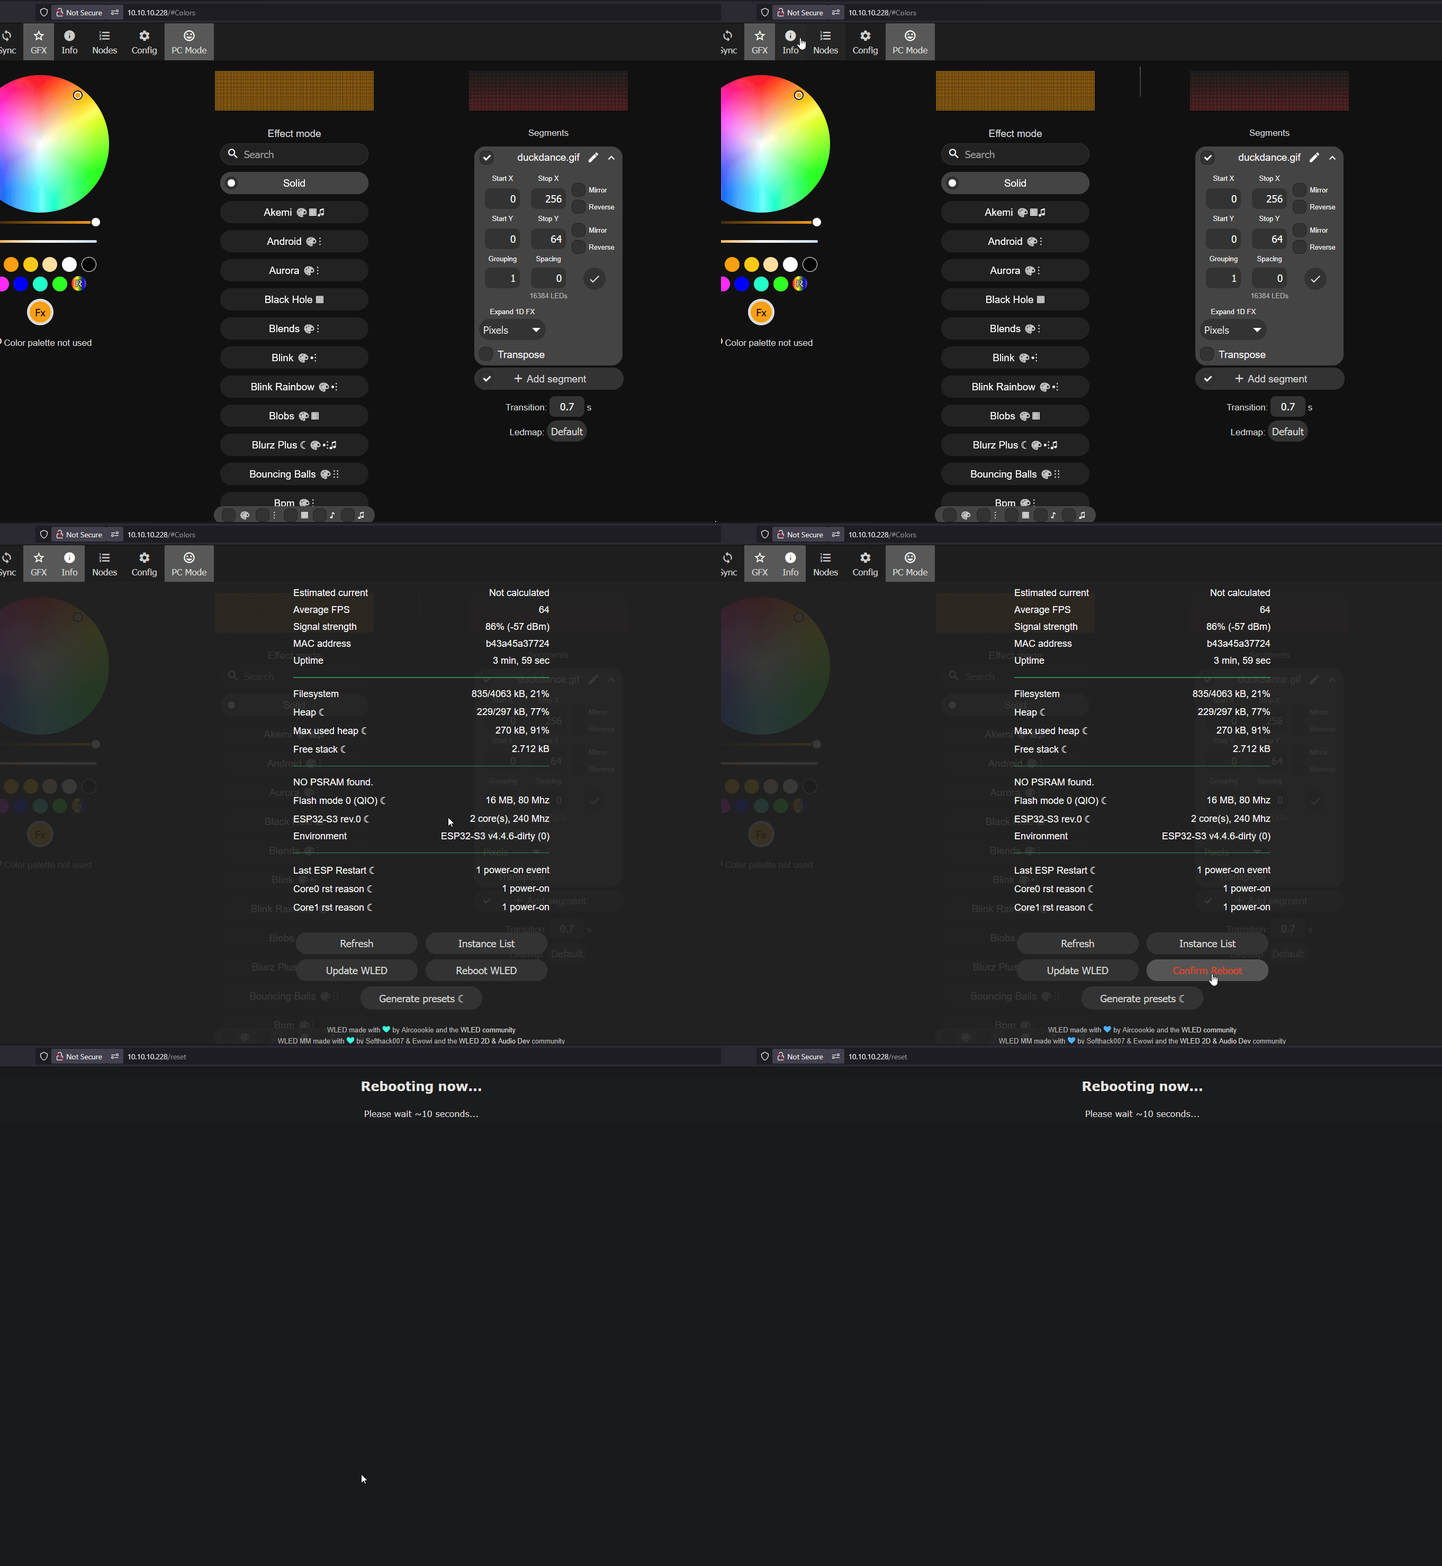
1. Navigate to your WLED instance in a browser or using the WLED-native app on your phone. You can use http://your-hostname-here.local or its IP address. Click here if you need to find your IP or hostname.
2. Click on Config, then LED Preferences. set Chain Length to 3 then Save.
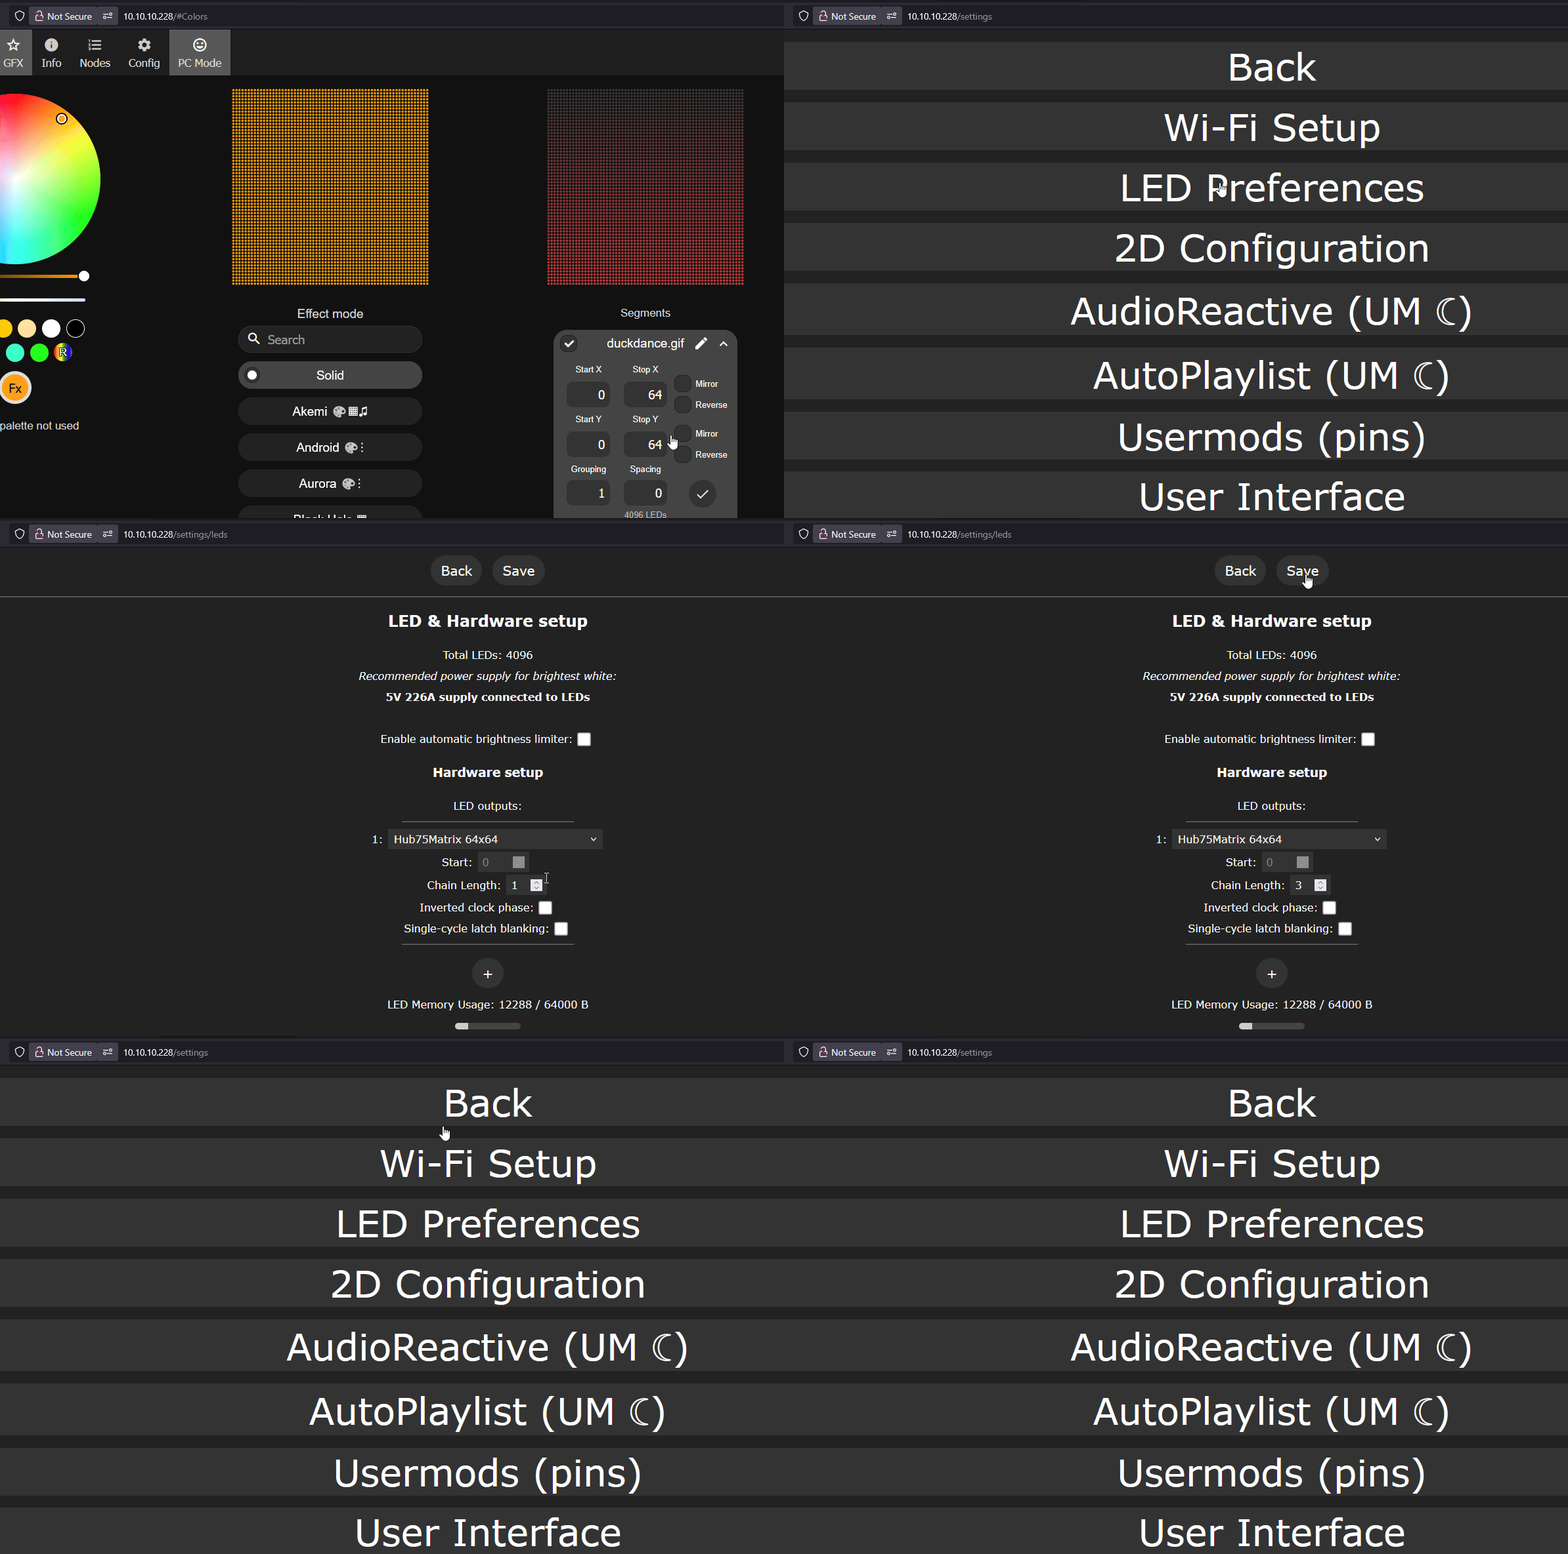
3. Click on Config, then 2D Configuration and change the Panel dimensions (WxH) to 192 x 64 and click Save.
Leave Horizontal panels and Vertical panels at 1. The combined size goes in the panel dimensions, not the panel counts. Matrix Dimensions below should confirm your new total.
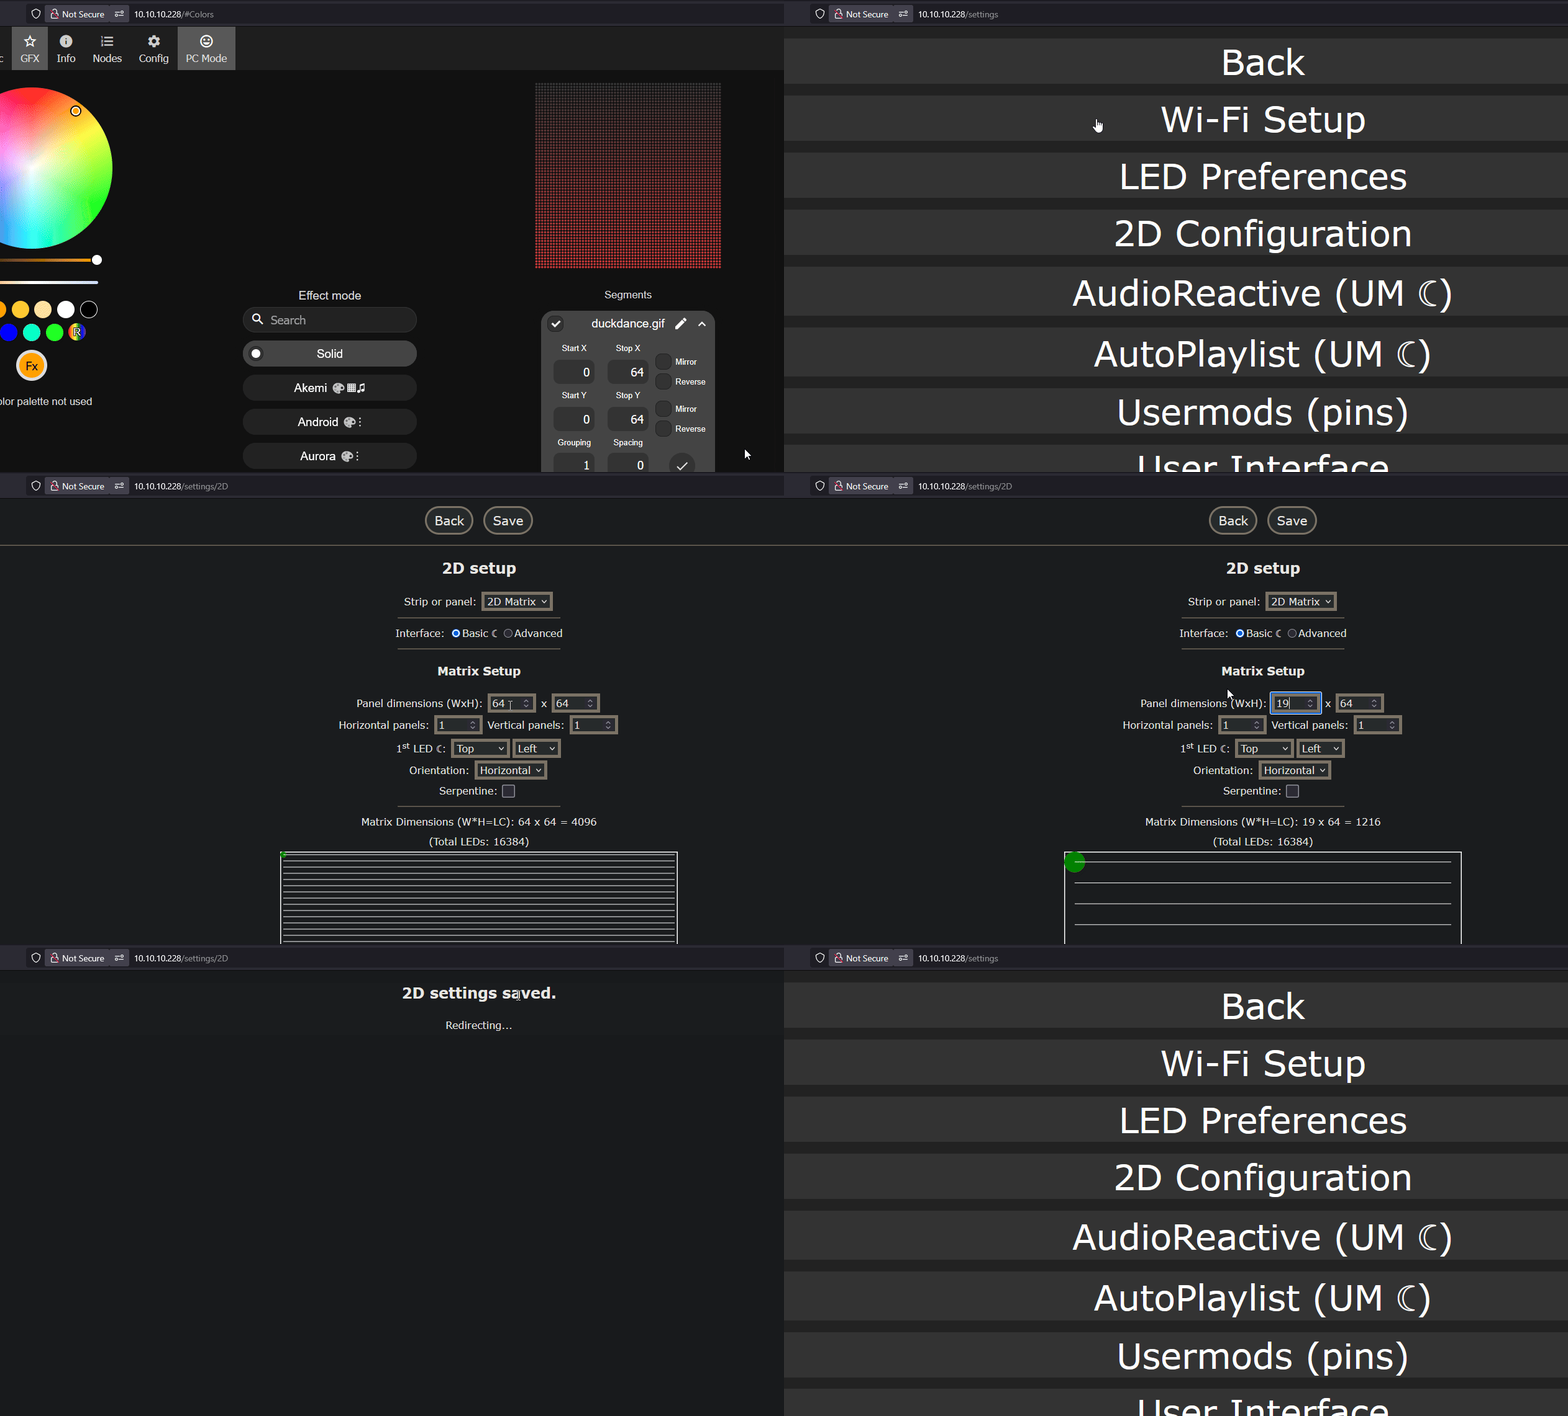
4. Reboot WLED before proceeding. Tap Info at the top, scroll down, and select Reboot WLED. When prompted, tap again to confirm the reboot.
1. Navigate to your WLED instance in a browser or using the WLED-native app on your phone. You can use http://your-hostname-here.local or its IP address. Click here if you need to find your IP or hostname.
2. Click on Config, then LED Preferences. set Chain Length to 4 then Save.
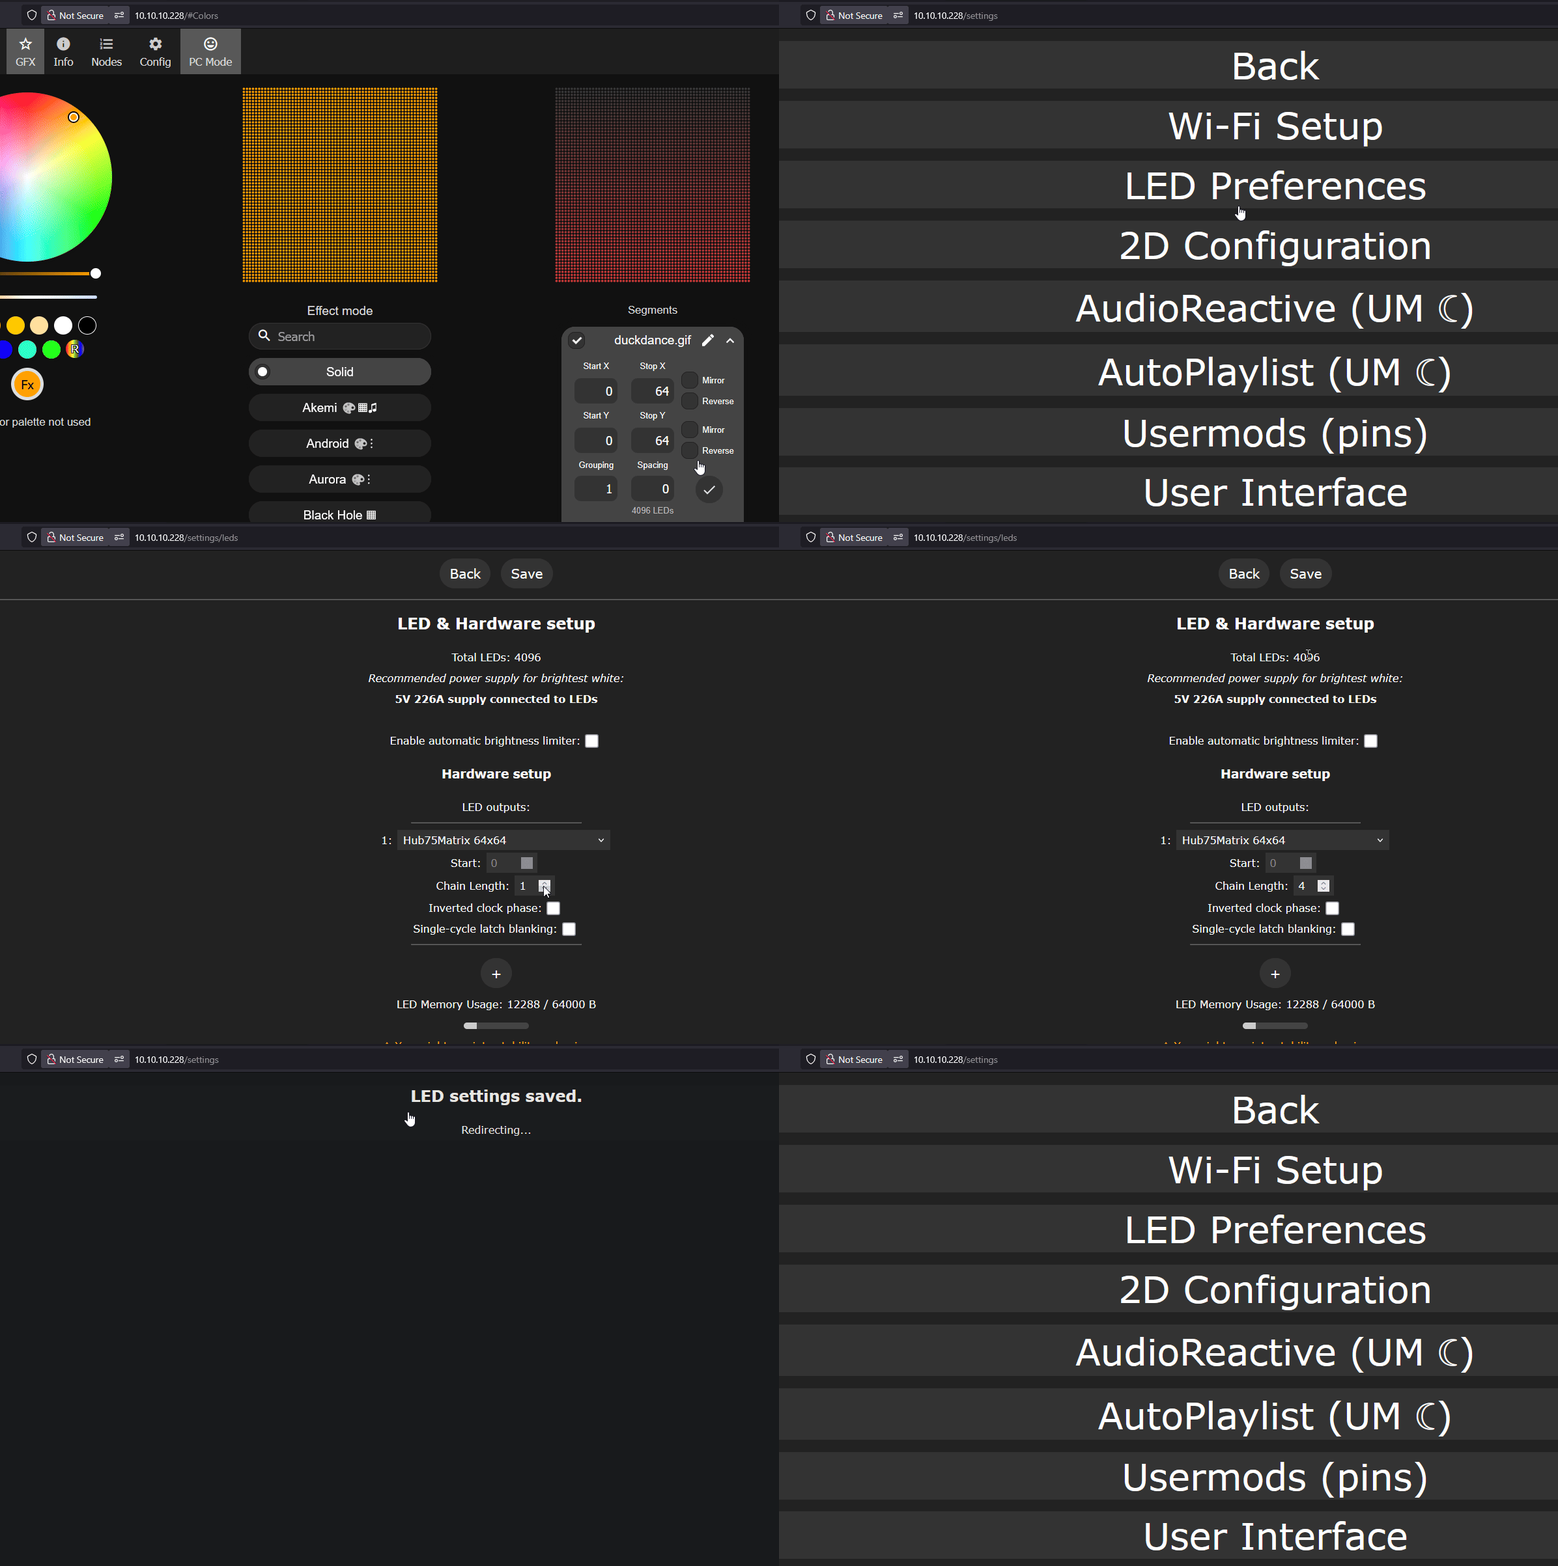
3. Click on Config, then 2D Configuration and change the Panel dimensions (WxH) to 256 x 64 and click Save.
Leave Horizontal panels and Vertical panels at 1. The combined size goes in the panel dimensions, not the panel counts. Matrix Dimensions below should confirm your new total.
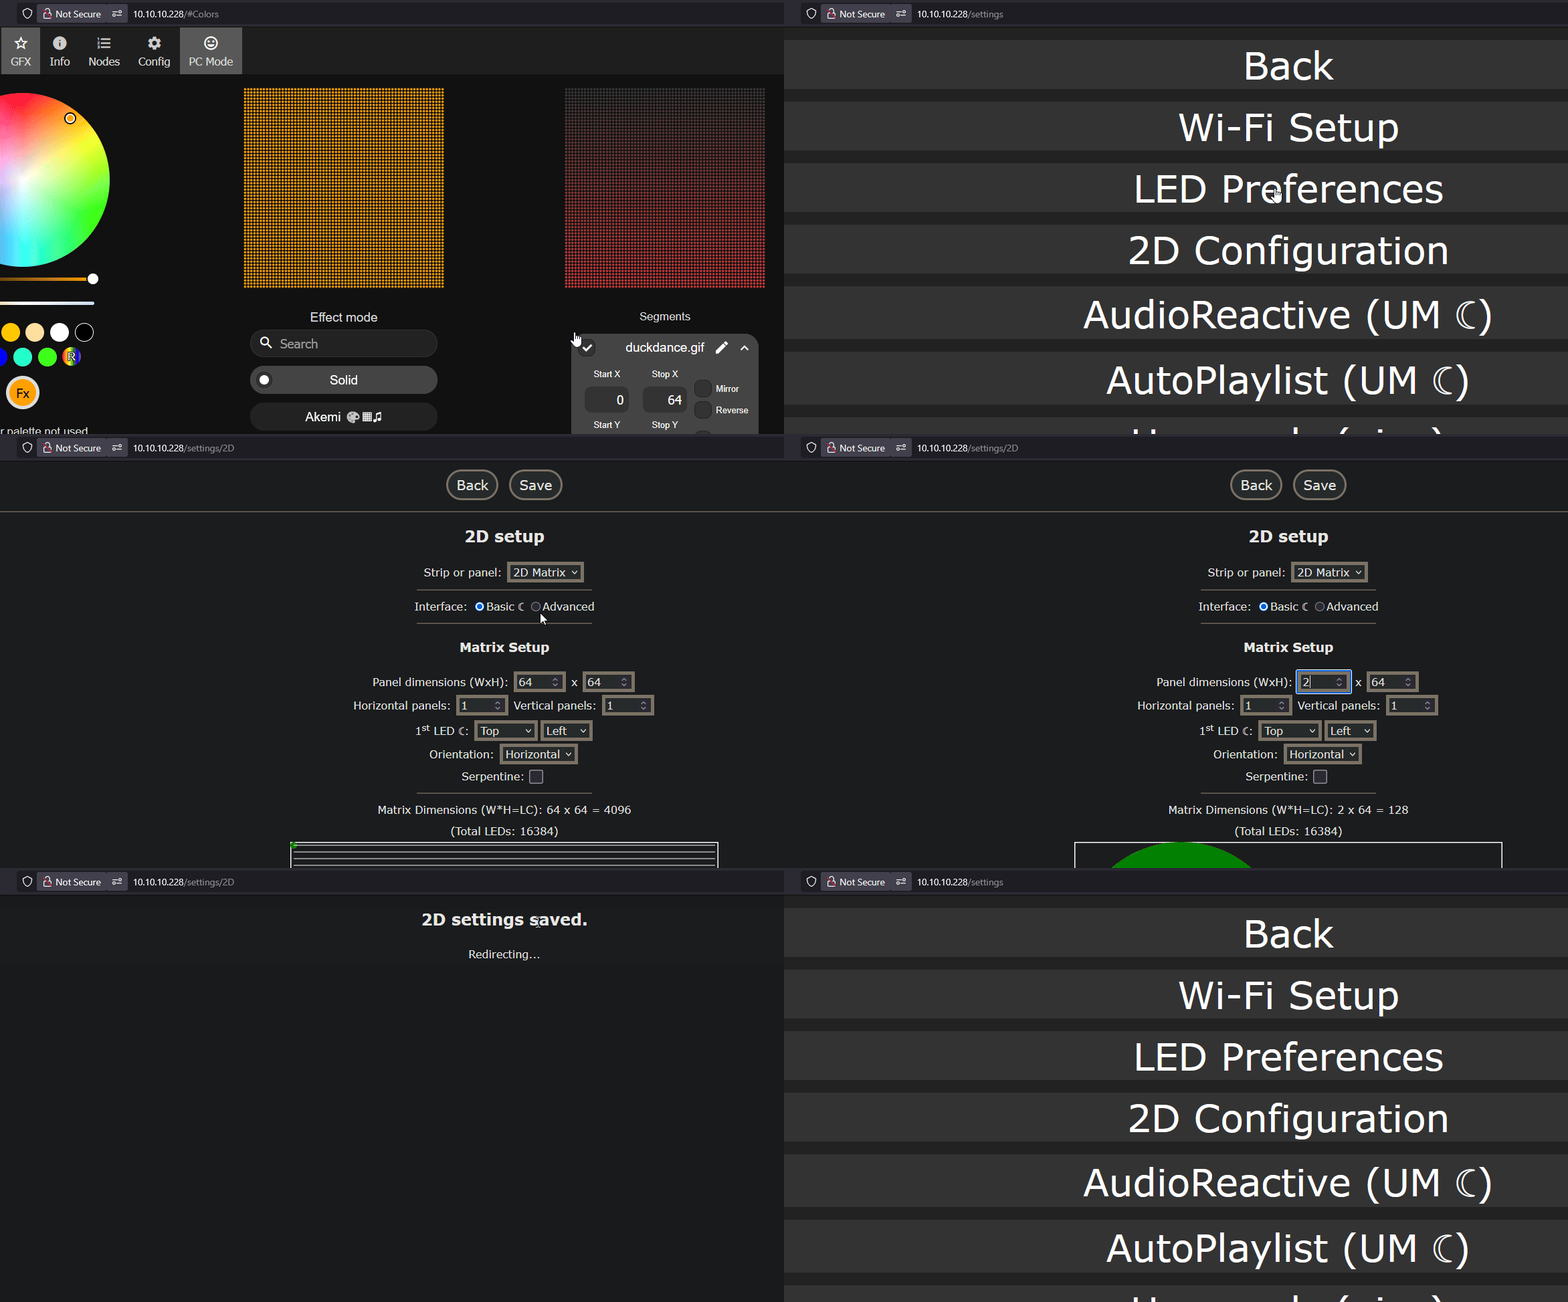
4. Reboot WLED before proceeding. Tap Info at the top, scroll down, and select Reboot WLED. When prompted, tap again to confirm the reboot.
Segment Setup
WLED works using segments and your device now has different stop and end pixels for each segment since you have added more LEDs with each additional panel
Below we will create multiple Segments in WLED which we will then edit until they are setup to show the correct number of pixels for your number of panels.
Think of segments like taking one big set of leds and cutting them into smaller chunks to then individually control. Segment 1 will control the top 1/4 of the display, Segment 2 will control the second 1/4, Segment 3 will control the third 1/4 and Segment 4 will control the bottom 1/4 of the matrix.
You can go back later and change these to your own layout - for example maybe you want to control all of the first led matrix with Segment 0 and the second matrix with Segment 1 you can definitely do that!
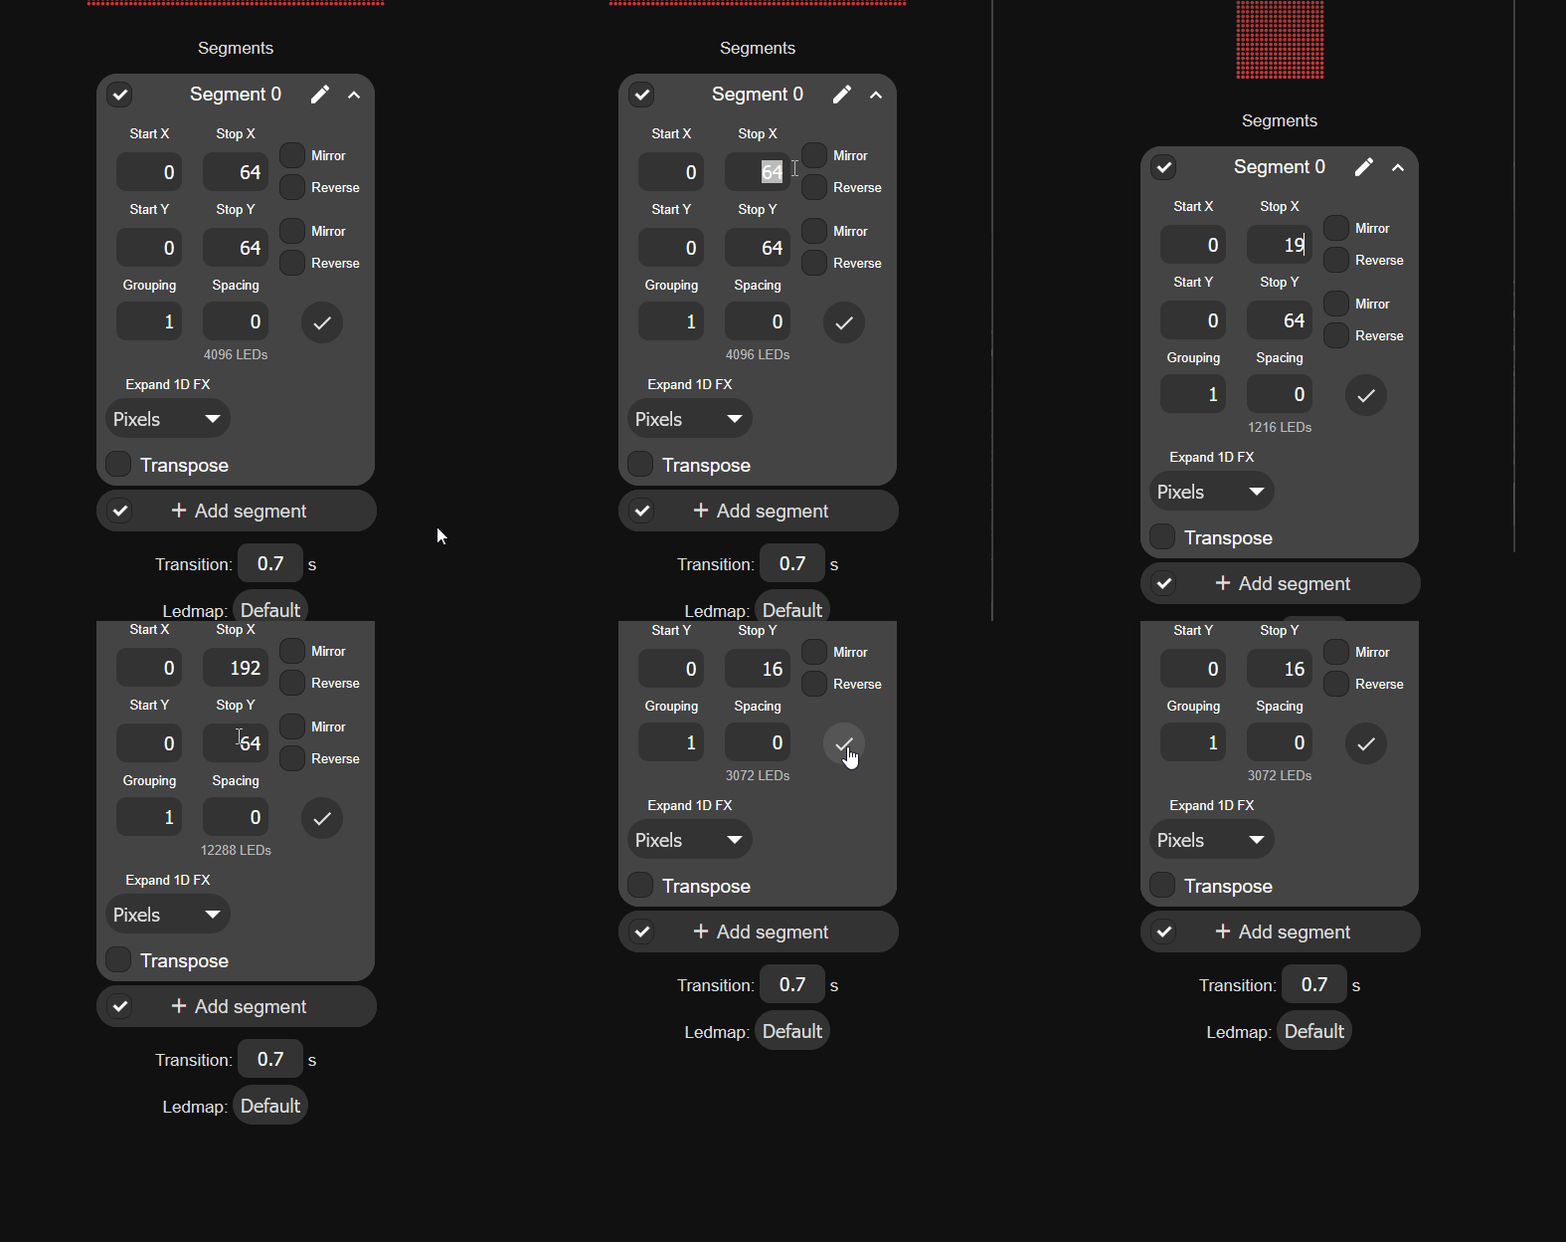
If you grew an existing setup rather than starting fresh, the default segment keeps its old bounds and your new pixels stay dark. Set Stop X and Stop Y to your new dimensions before adding any more segments.
1. Navigate to the main page of your wled instance in a browser or using the WLED-native app and focus on the Segments section.
2. Since we are using two panels, we will begin by editing Segment 0 and setting the Stop X to "128" and the Stop Y to "16"
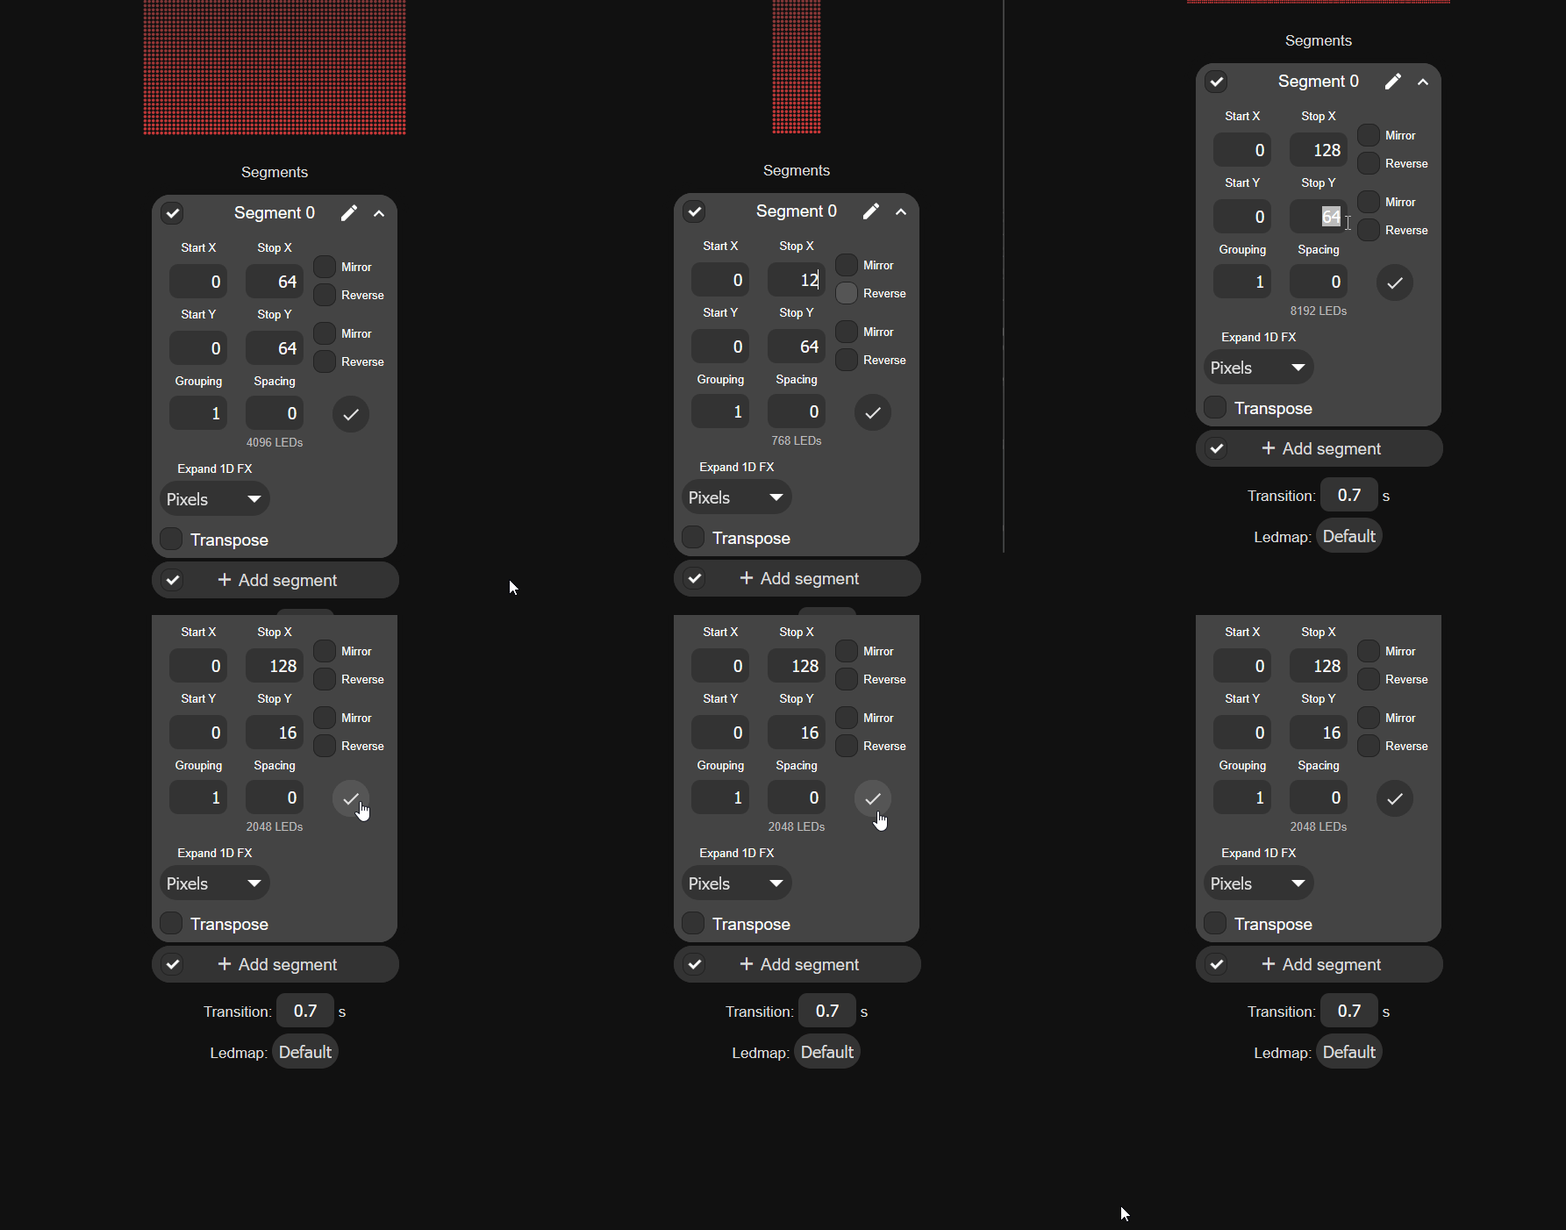
3. Click on Add segment, give it a name (such as Segment 1) then set the Start Y to "16" and the Stop Y to "32".
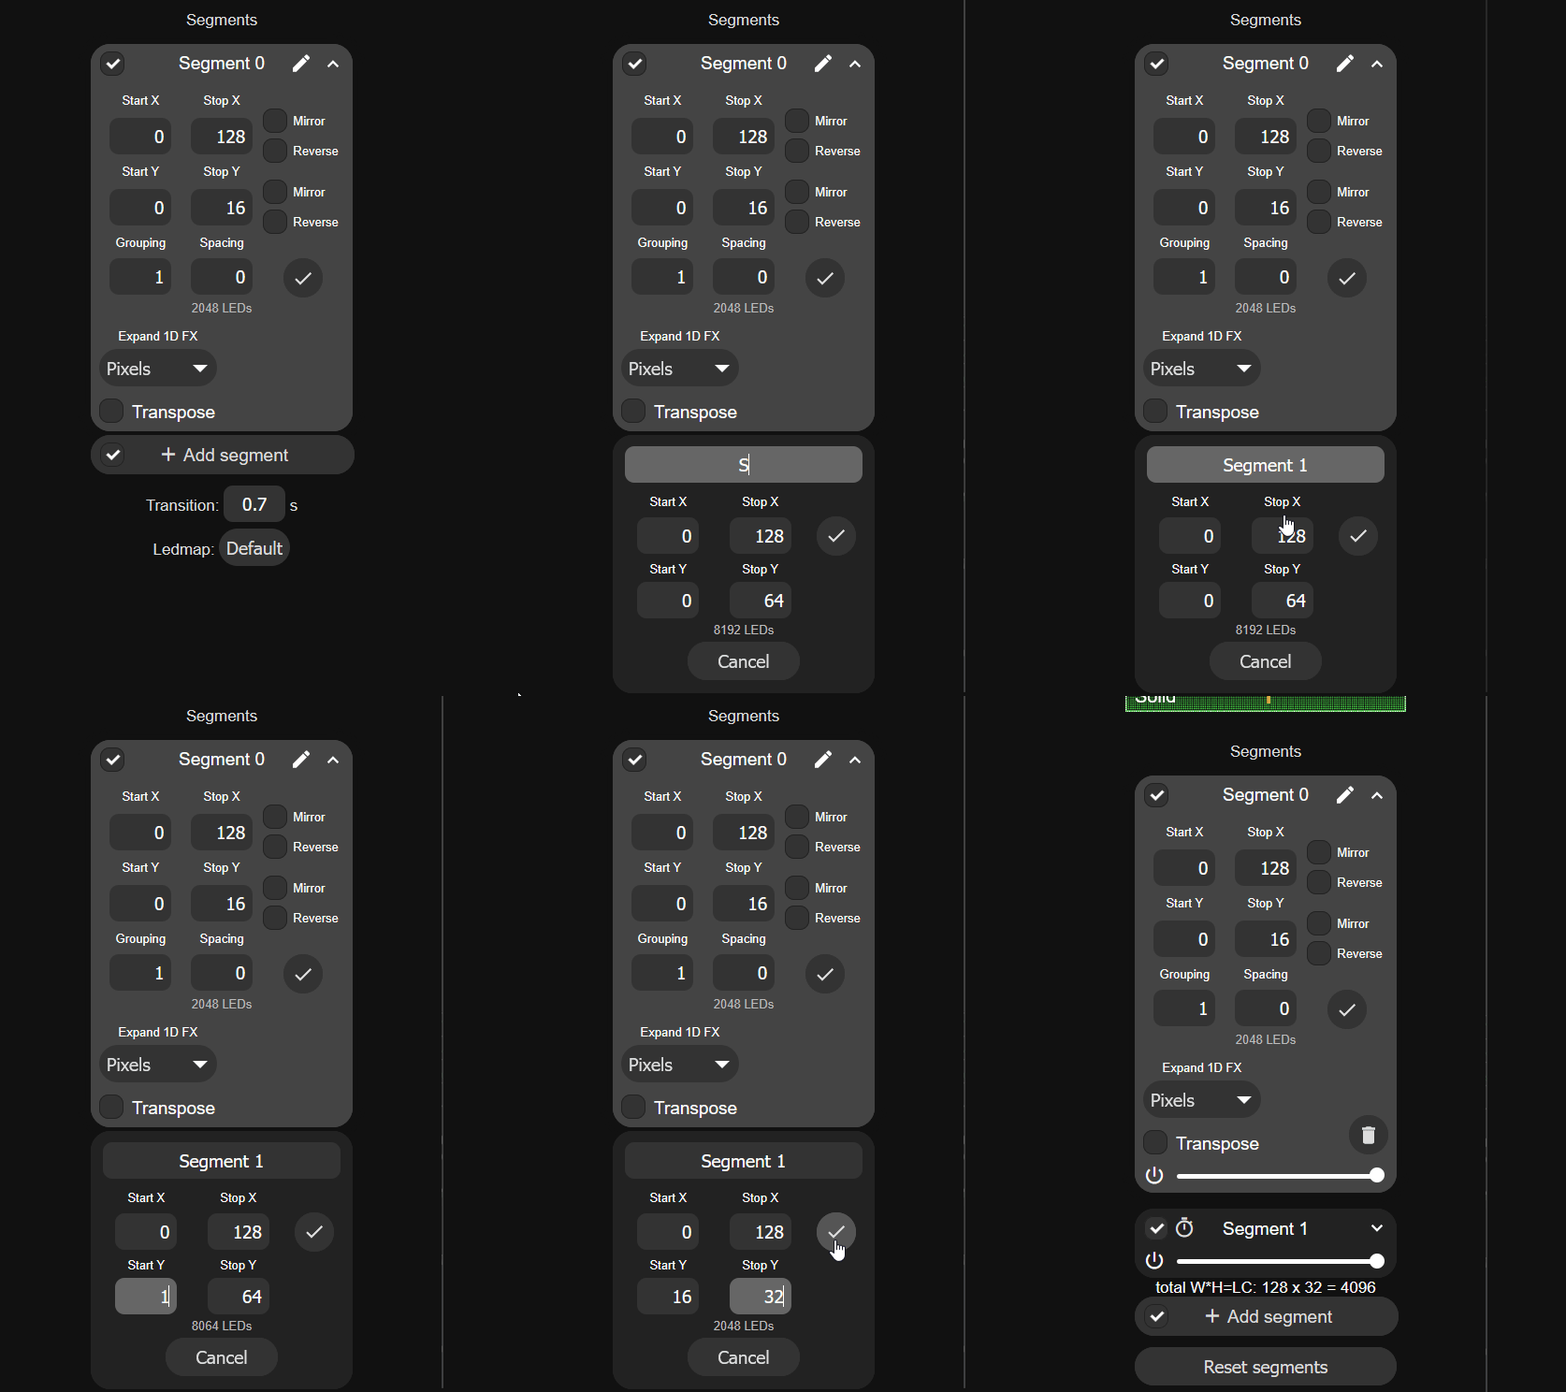
4. Click on Add segment, give it a name (such as Segment 2) then set the Start Y to "32" and the Stop Y to "48".
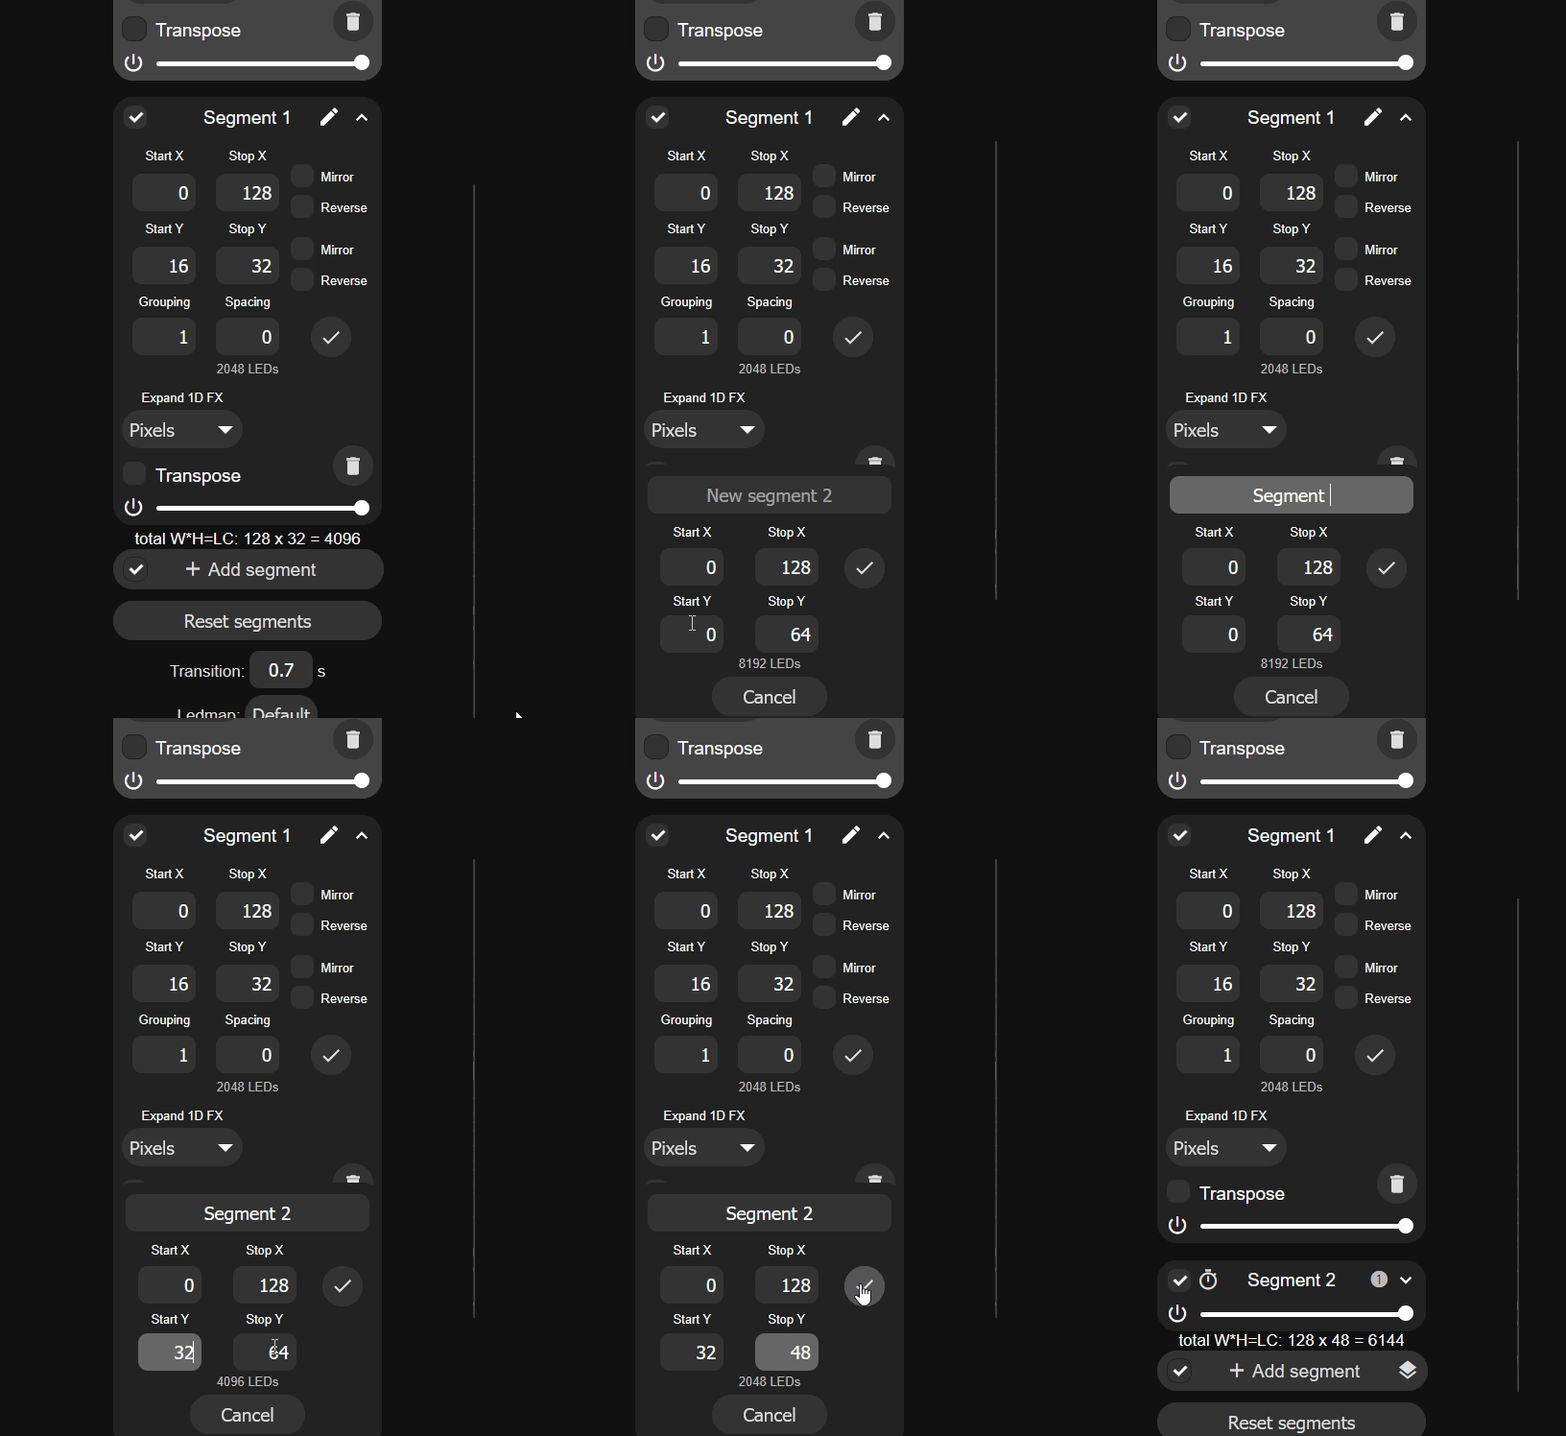
5. Click on Add segment, give it a name (such as Segment 3) then set the Start Y to "48" and the Stop Y to "64".
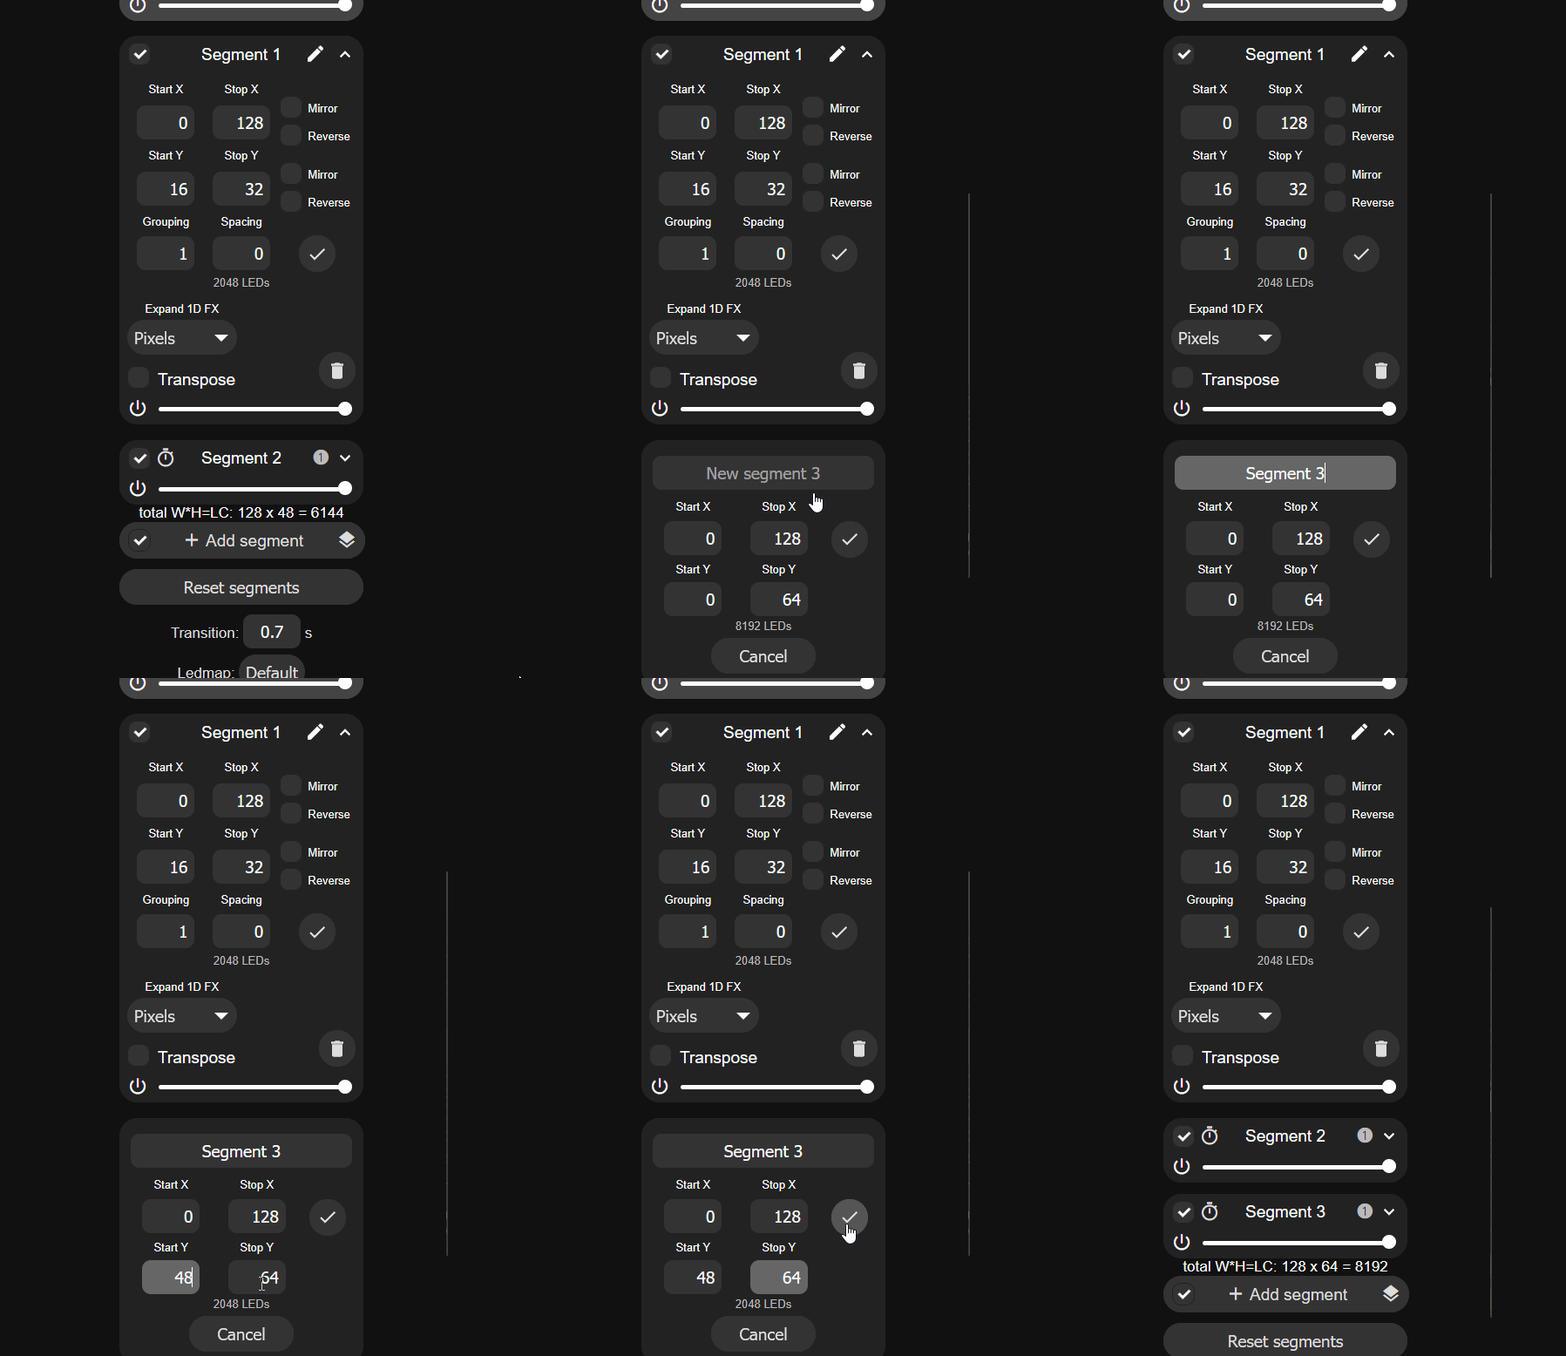
6. You should see four equal segments 0-3 at the top of the screen.
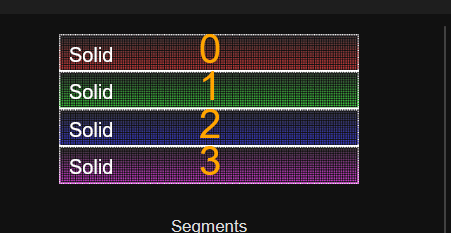
7. Test it by changing the effect to "Scrolling Text" and editing the name of each segment to be any text you want!
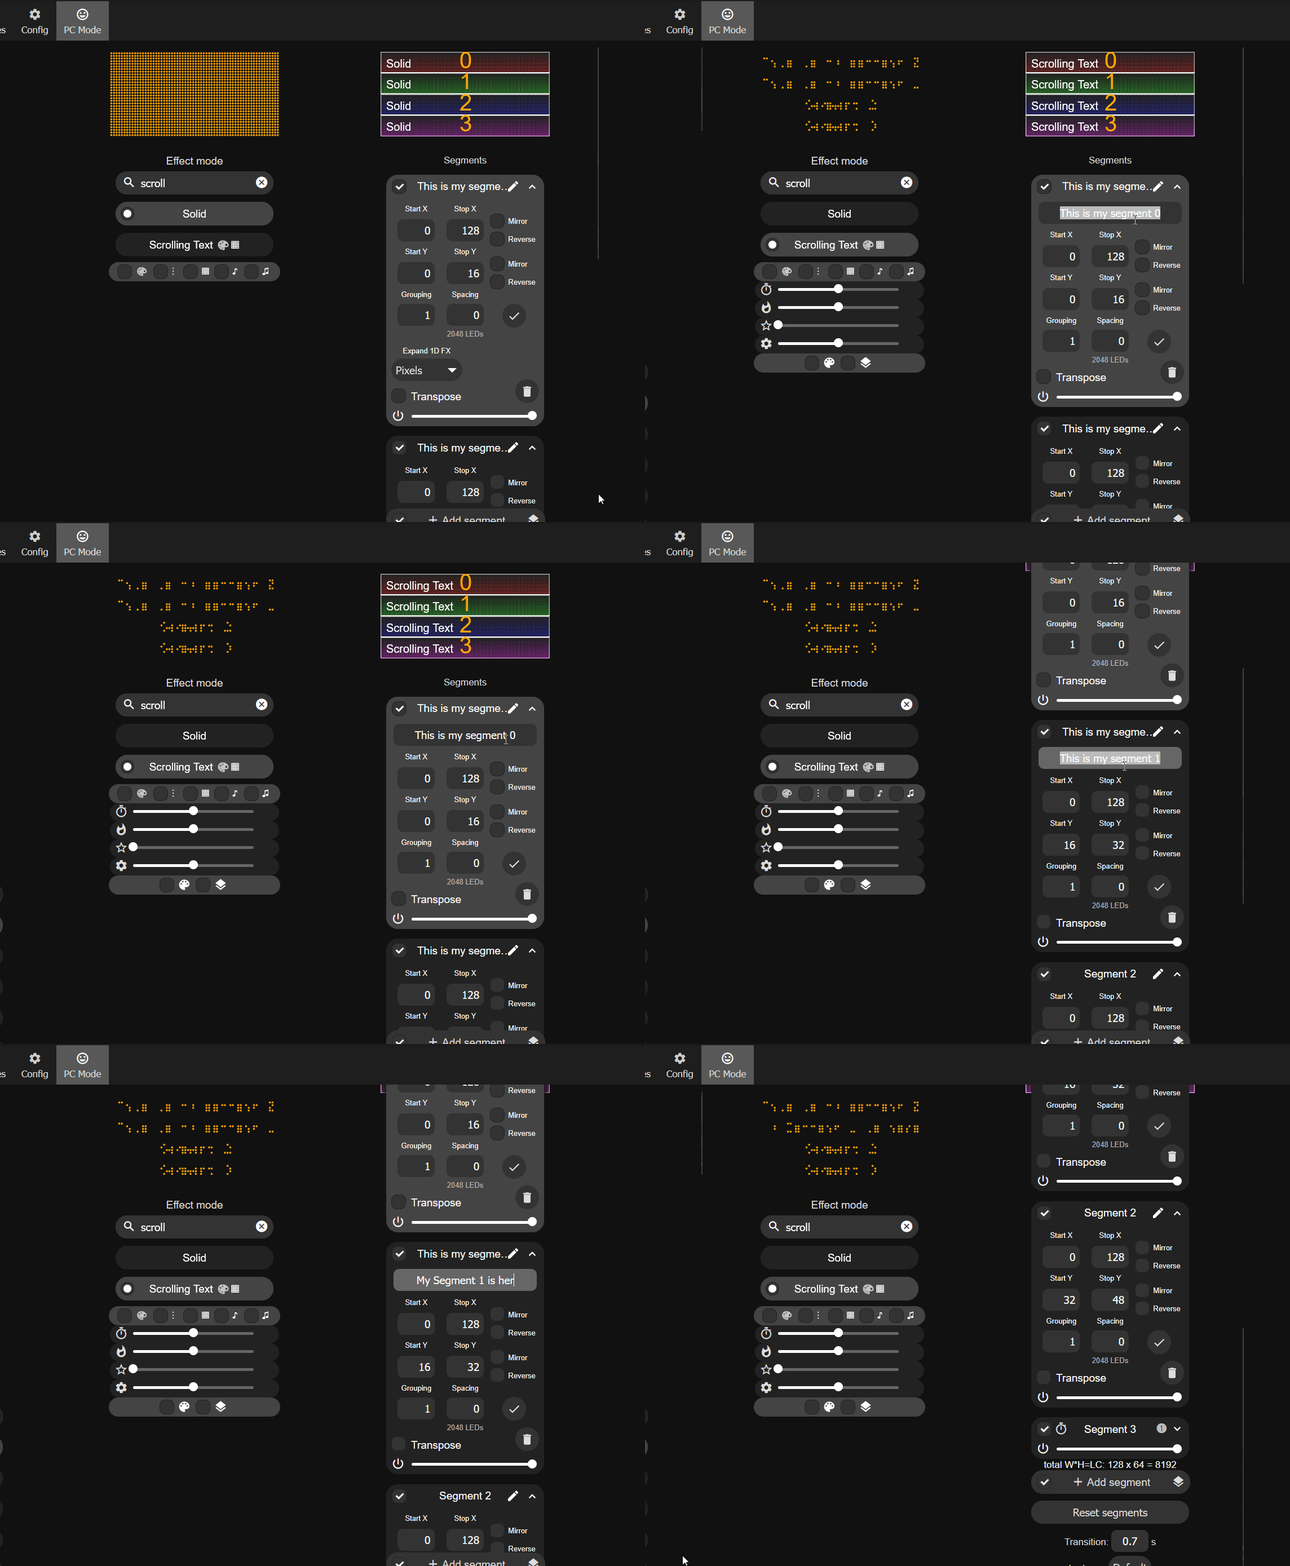
Your segments need to be saved to a Preset or they will disappear when you reboot or run other presets.
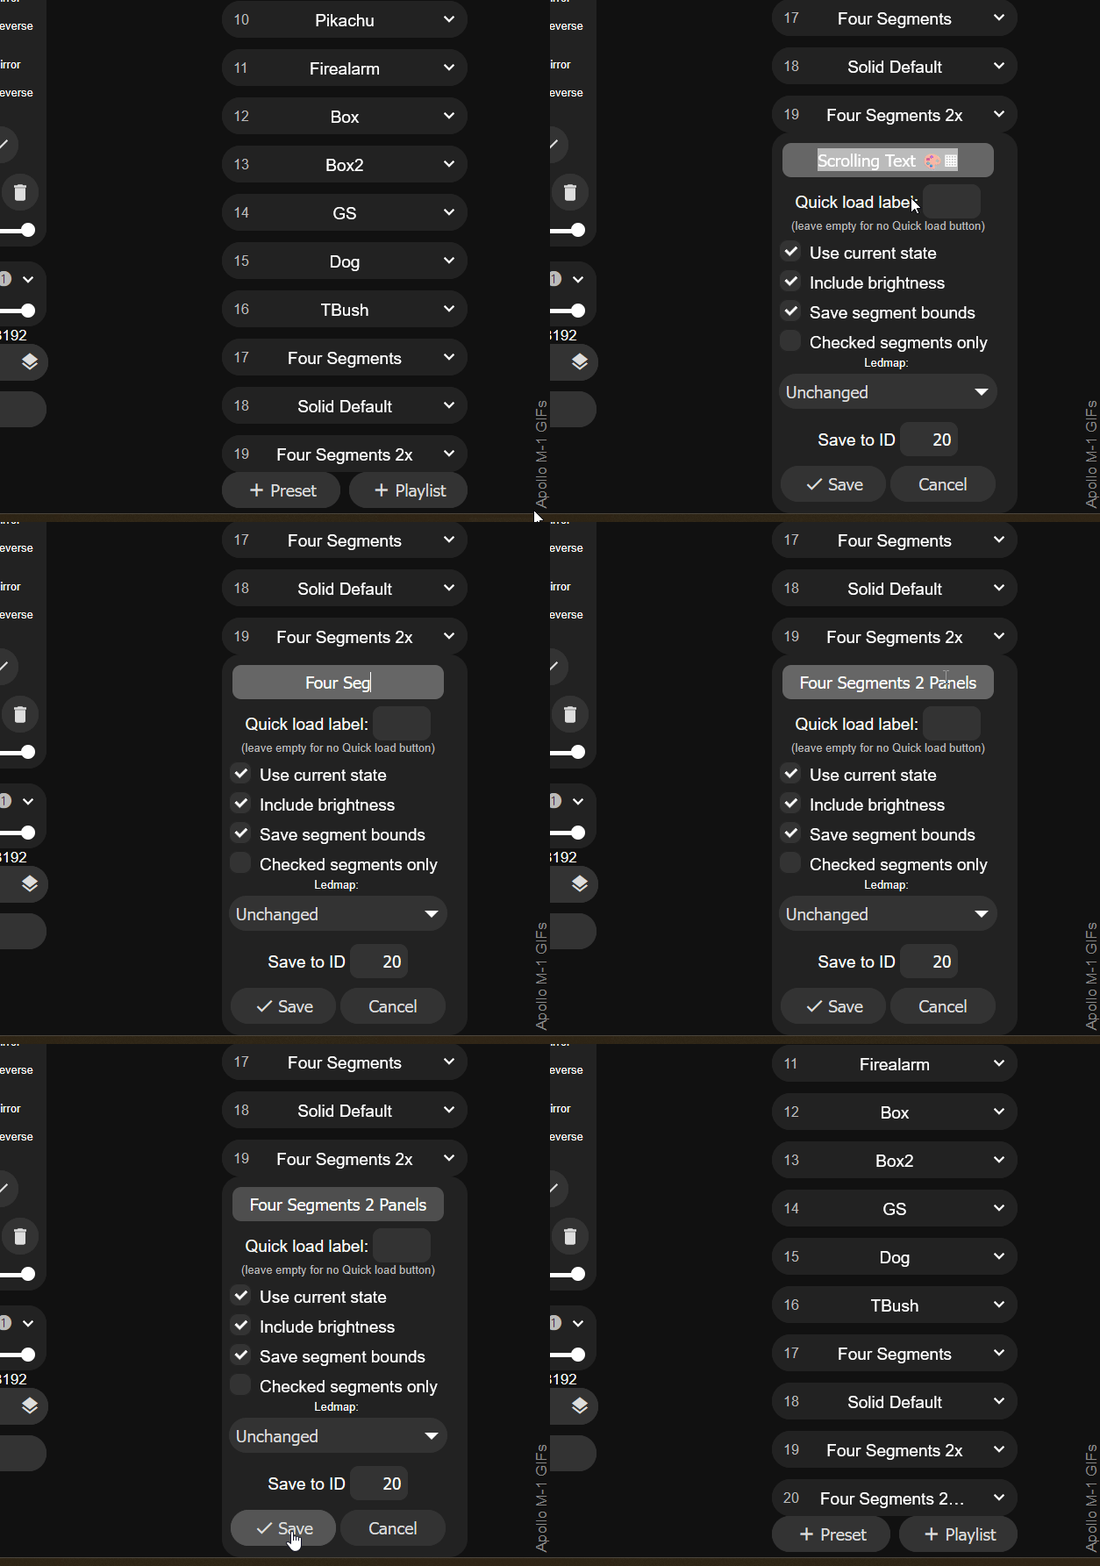
You must save your segments as a preset or they will get wiped away after a reboot or when another preset with different segments is used.
8. Save your segments by creating a new preset. Click on the + Preset button and typing in a name then clicking Save at the bottom.
1. Navigate to the main page of your wled instance in a browser or using the WLED-native app and focus on the Segments section.
2. Since we are using three panels, we will begin by editing Segment 0 and setting the Stop X to "192" and the Stop Y to "16".
3. Click on Add segment, give it a name (such as Segment 1) then set the Start Y to "16" and the Stop Y to "32".
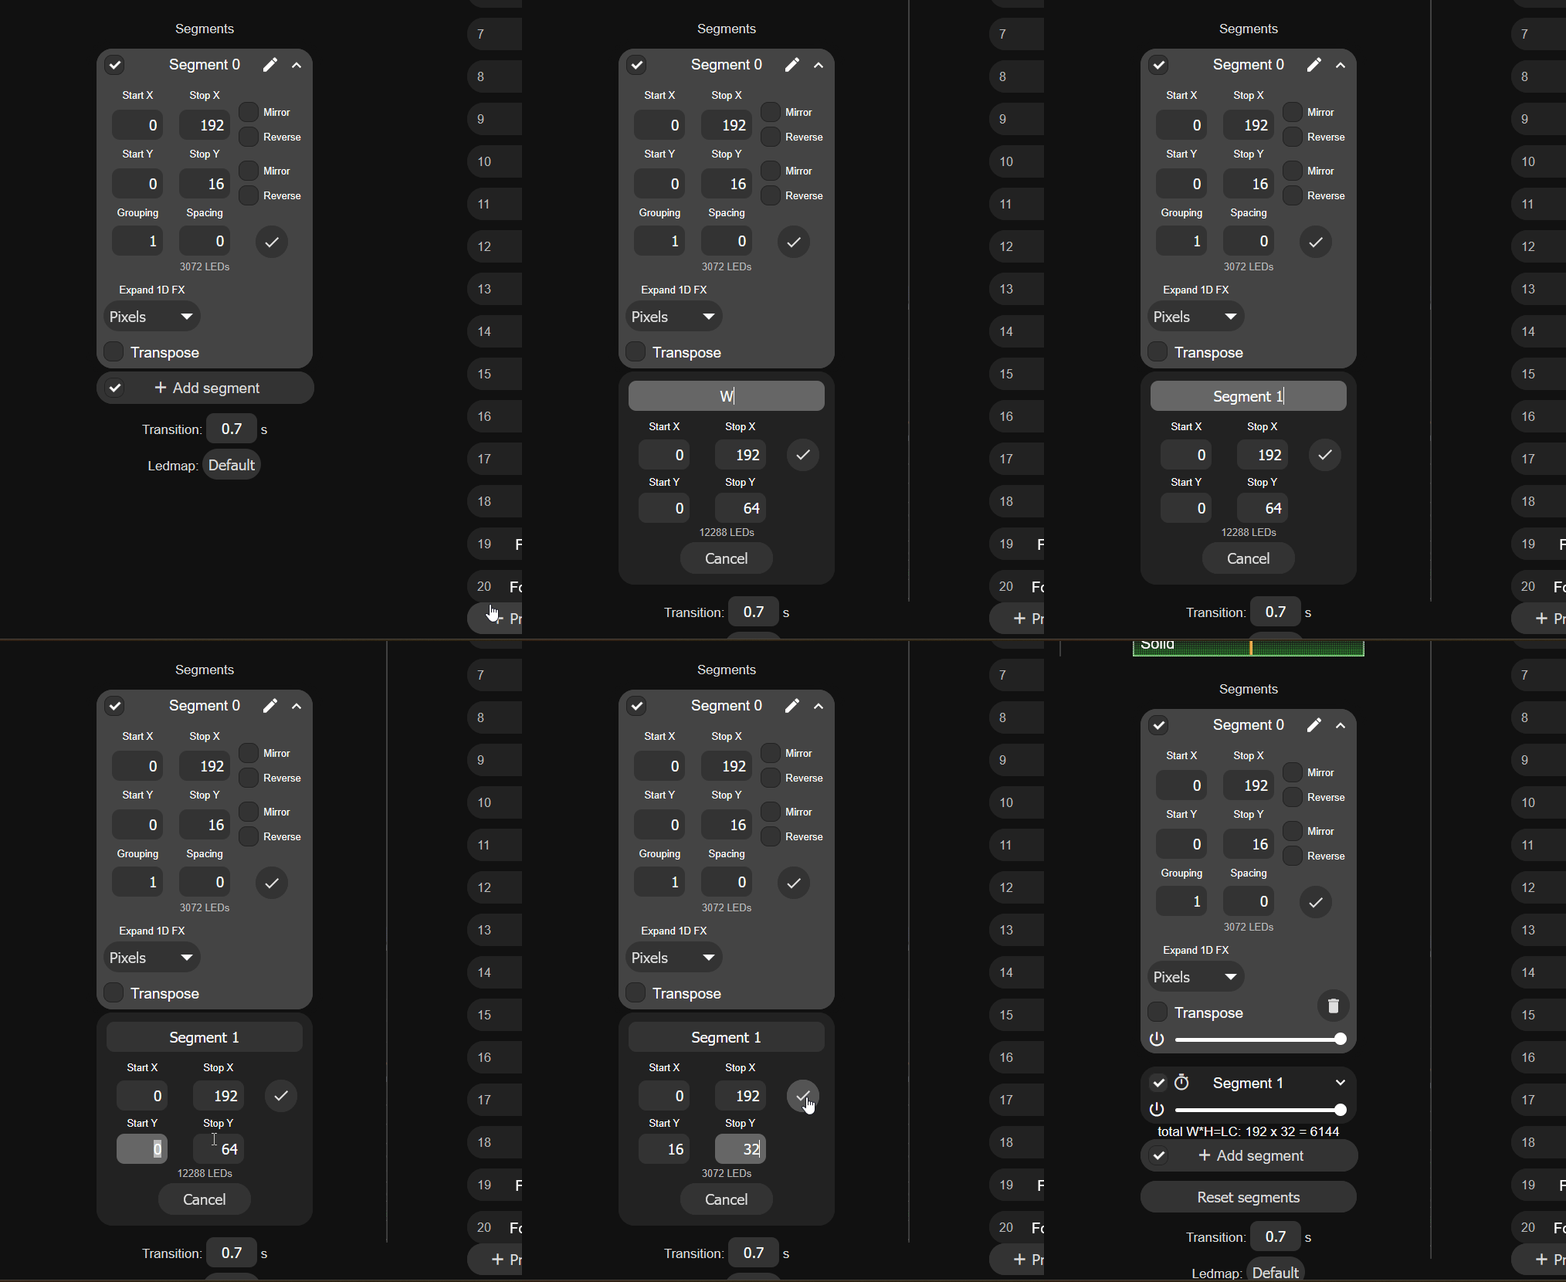
4. Click on Add segment, give it a name (such as Segment 2) then set the Start Y to "32" and the Stop Y to "48".
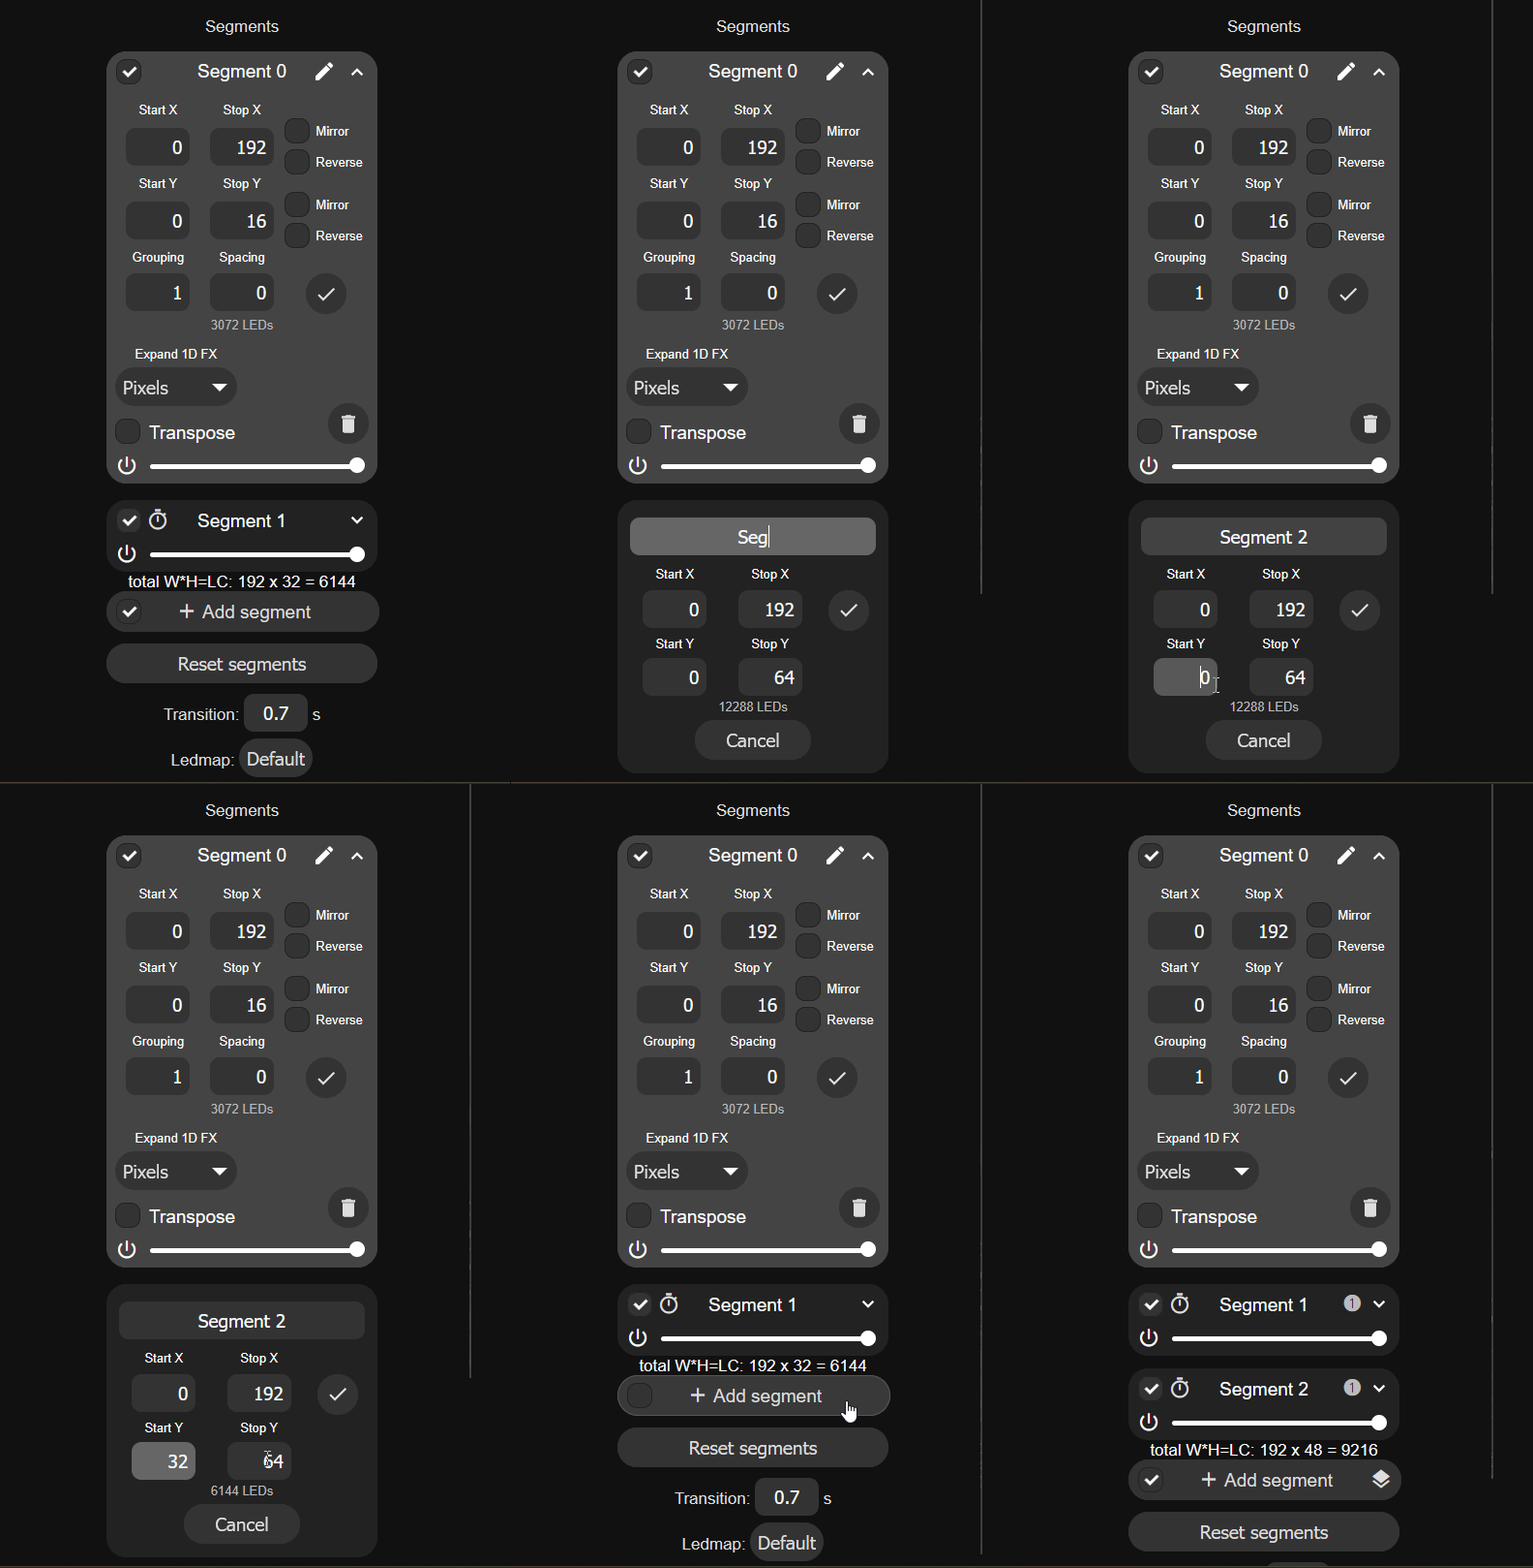
5. Click on Add segment, give it a name (such as Segment 3) then set the Start Y to "48" and the Stop Y to "64".
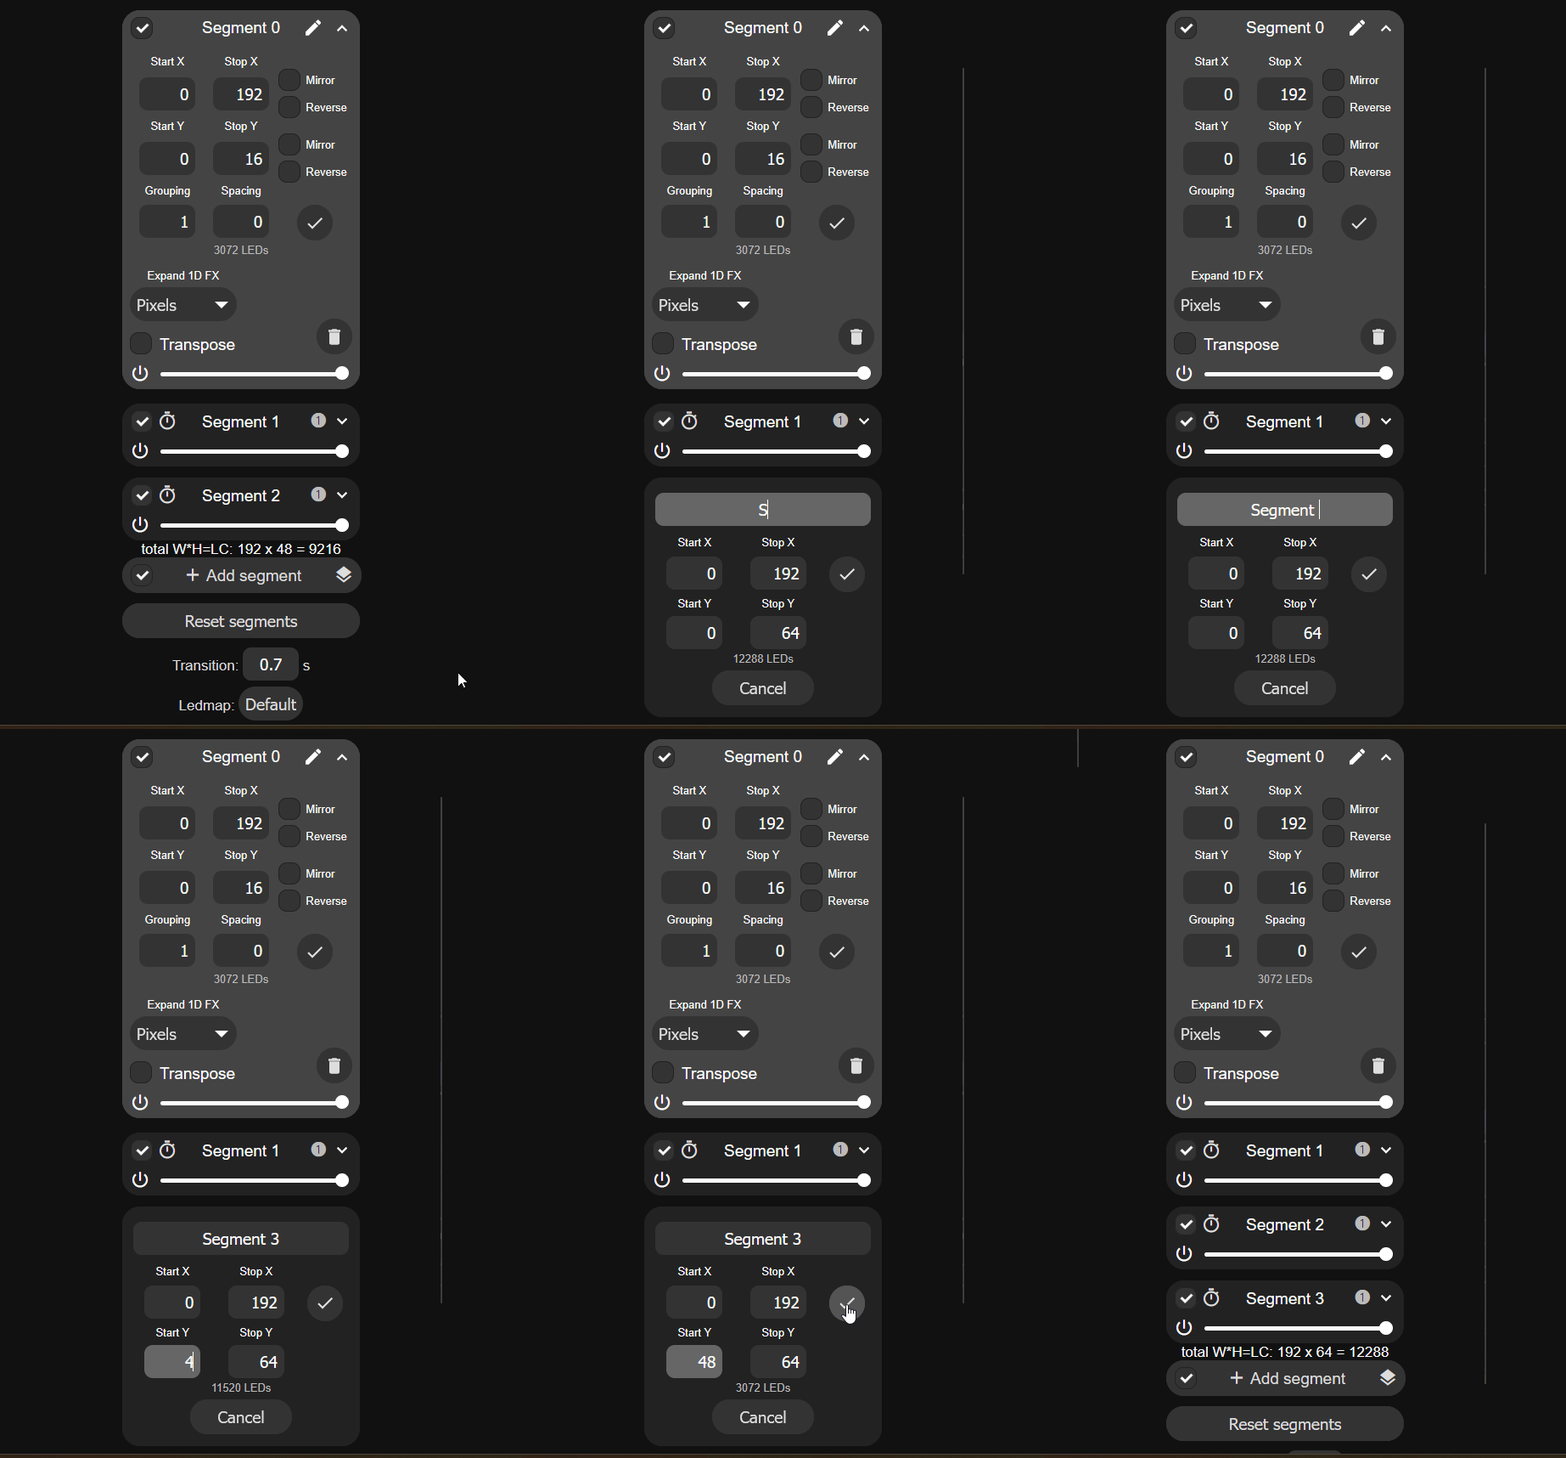
6. You should see four equal segments 0-3 at the top of the screen.
7. Test it by changing the effect to "Scrolling Text" and editing the name of each segment to be any text you want! 32 Character maximum limit in WLED.
Your segments need to be saved to a Preset or they will disappear when you reboot or run other presets.
You must save your segments as a preset or they will get wiped away after a reboot or when another preset with different segments is used.
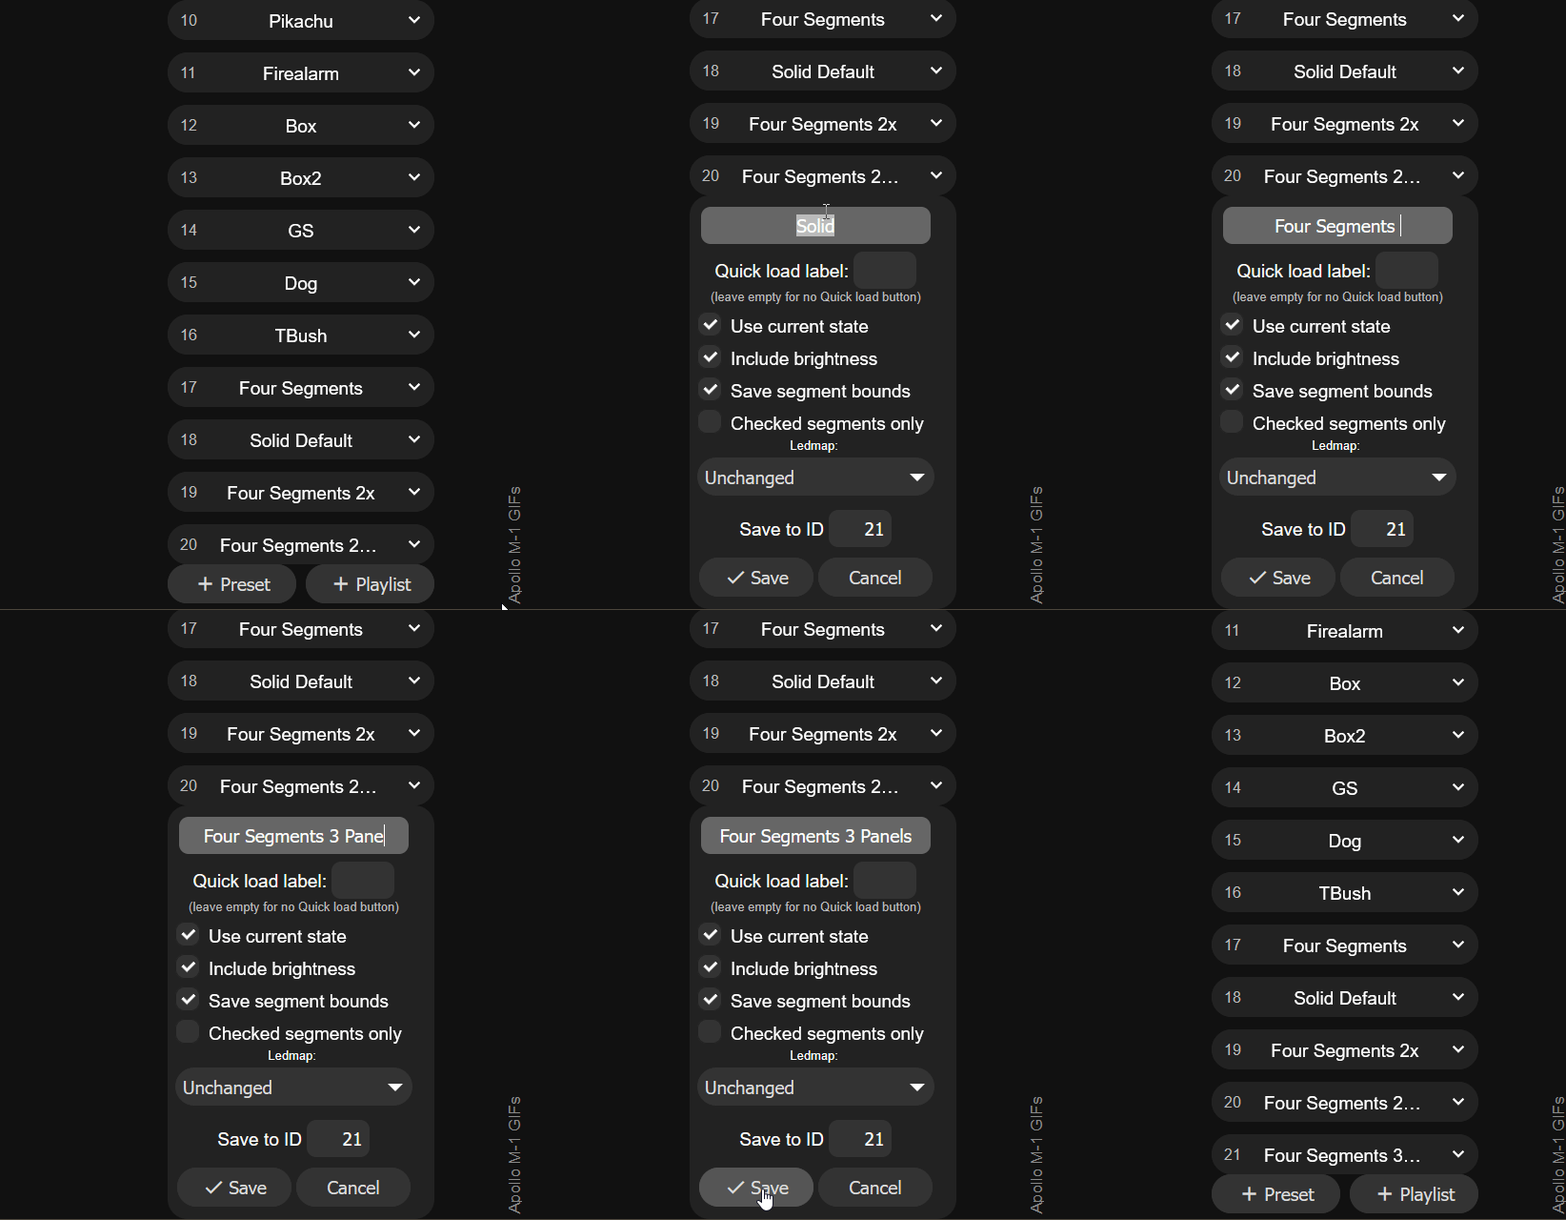
8. Save your segments by creating a new preset. Click on the + Preset button and typing in a name then clicking Save at the bottom.
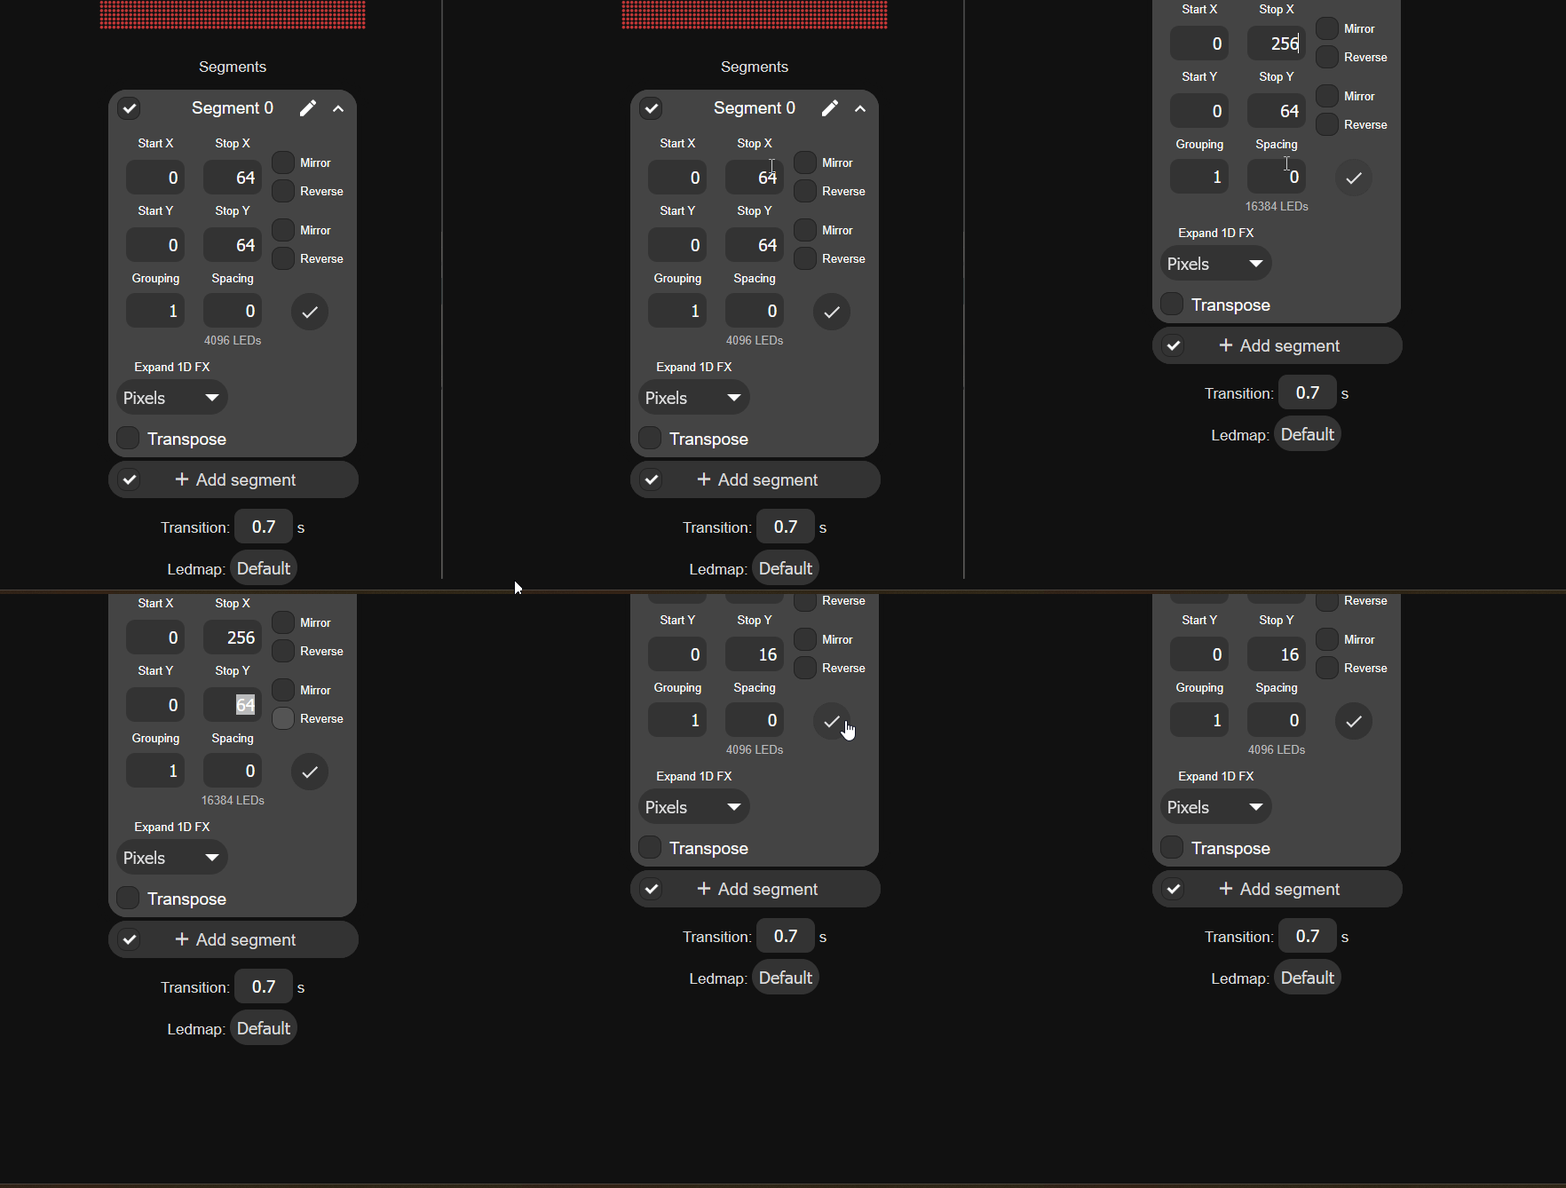
1. Navigate to the main page of your wled instance in a browser or using the WLED-native app and focus on the Segments section.
2. Since we are using four panels, we will begin by editing Segment 0 and setting the Stop X to "256" and the Stop Y to "16".
3. Click on Add segment, give it a name (such as Segment 1) then set the Start Y to "16" and the Stop Y to "32".
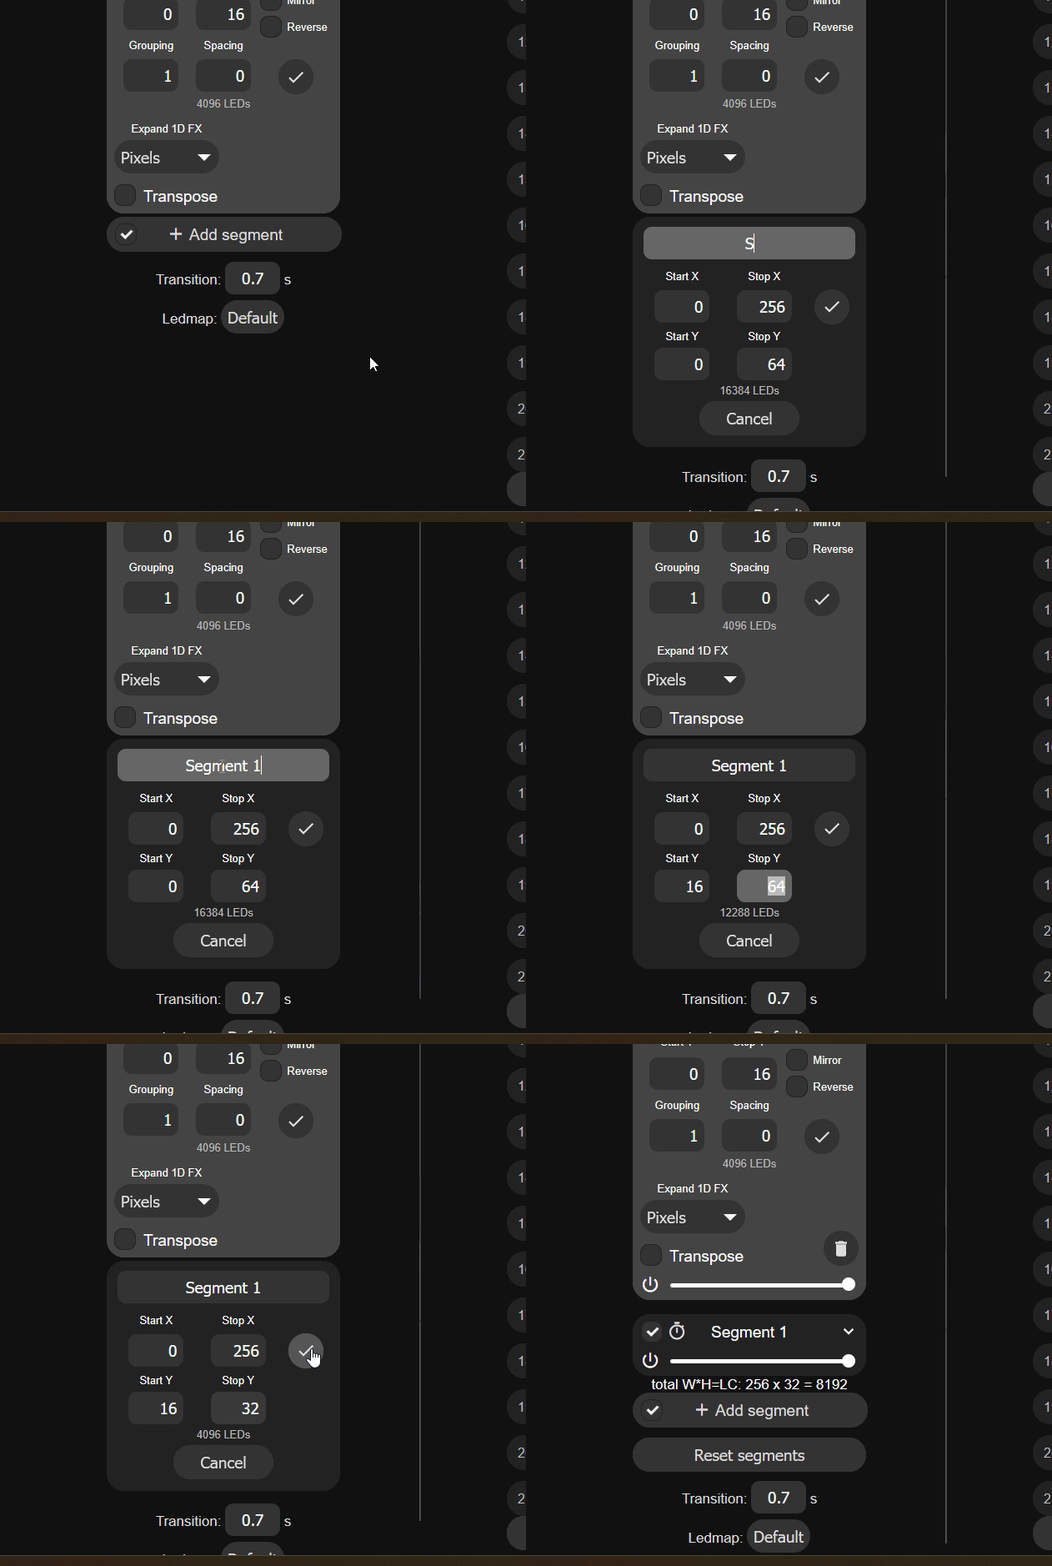
4. Click on Add segment, give it a name (such as Segment 2) then set the Start Y to "32" and the Stop Y to "48".
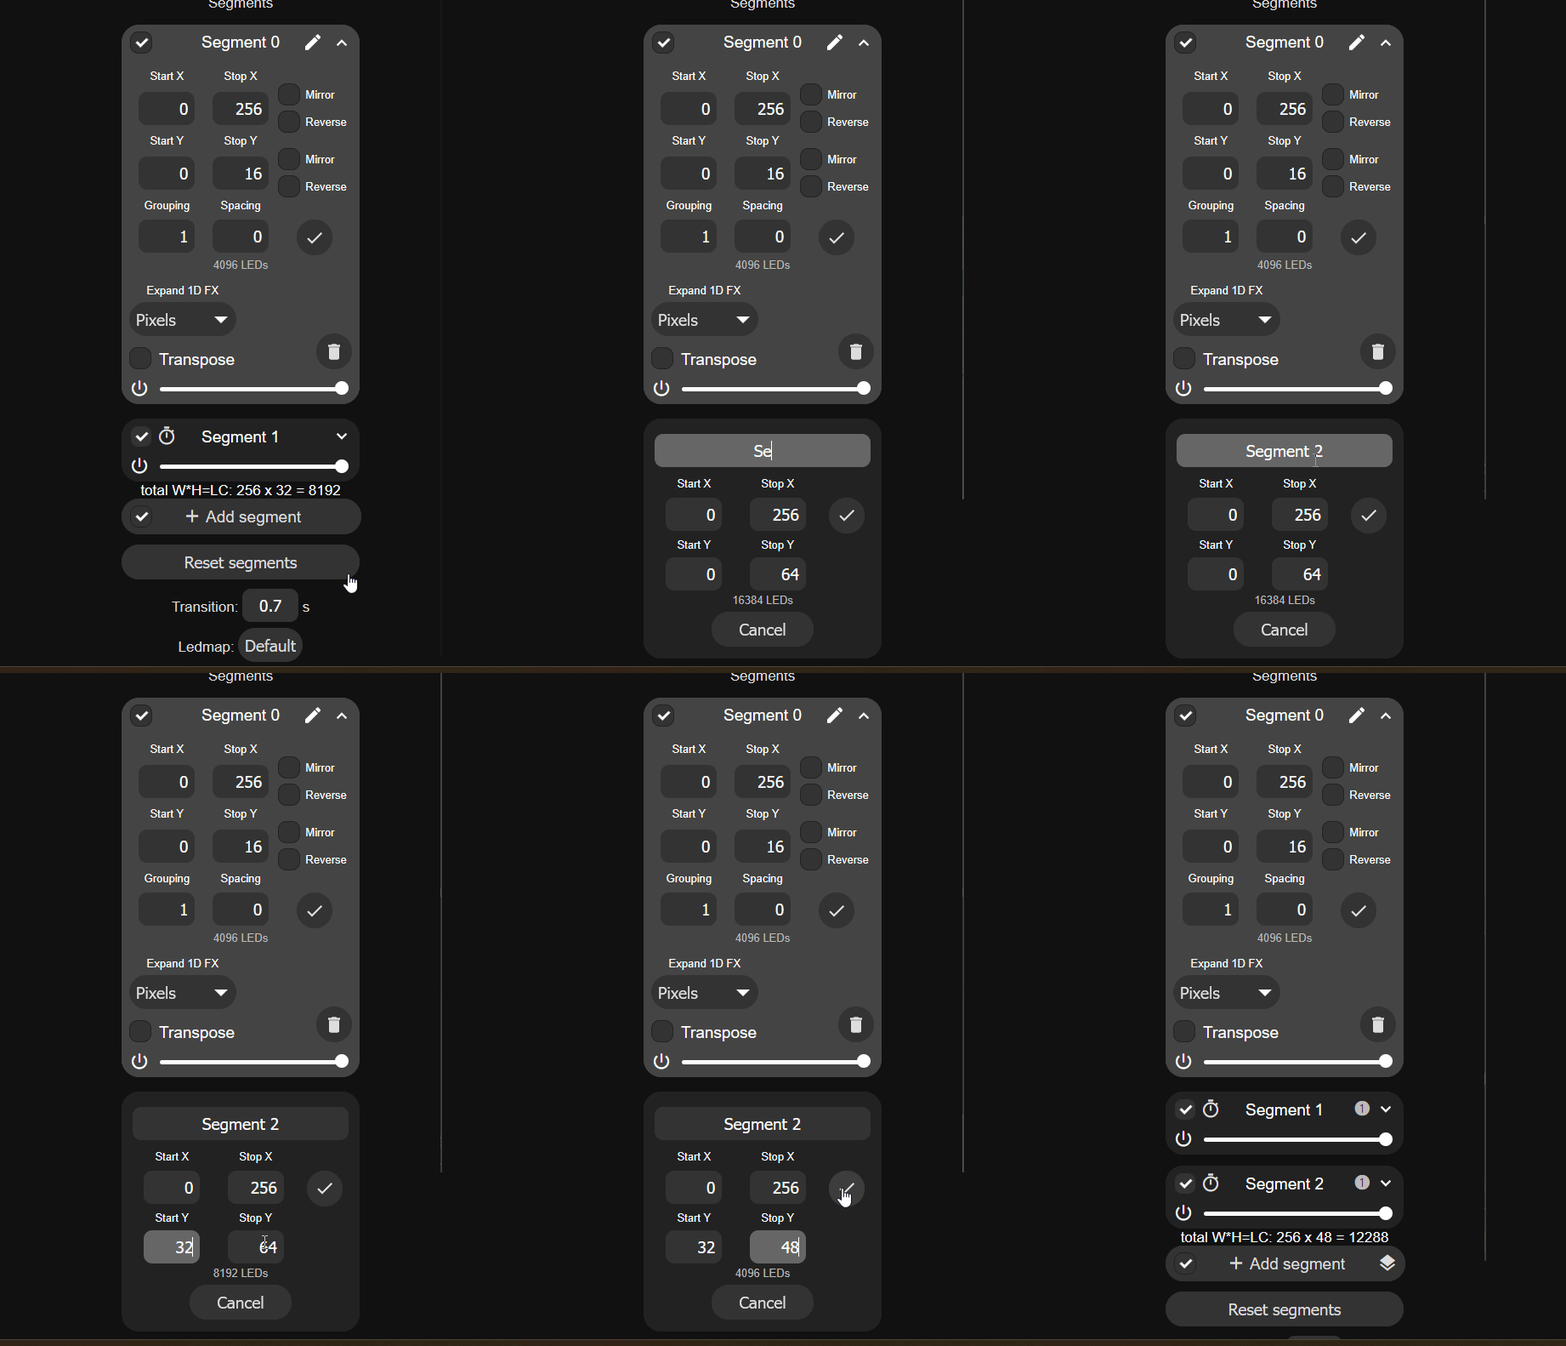
5. Click on Add segment, give it a name (such as Segment 3) then set the Start Y to "48" and the Stop Y to "64".
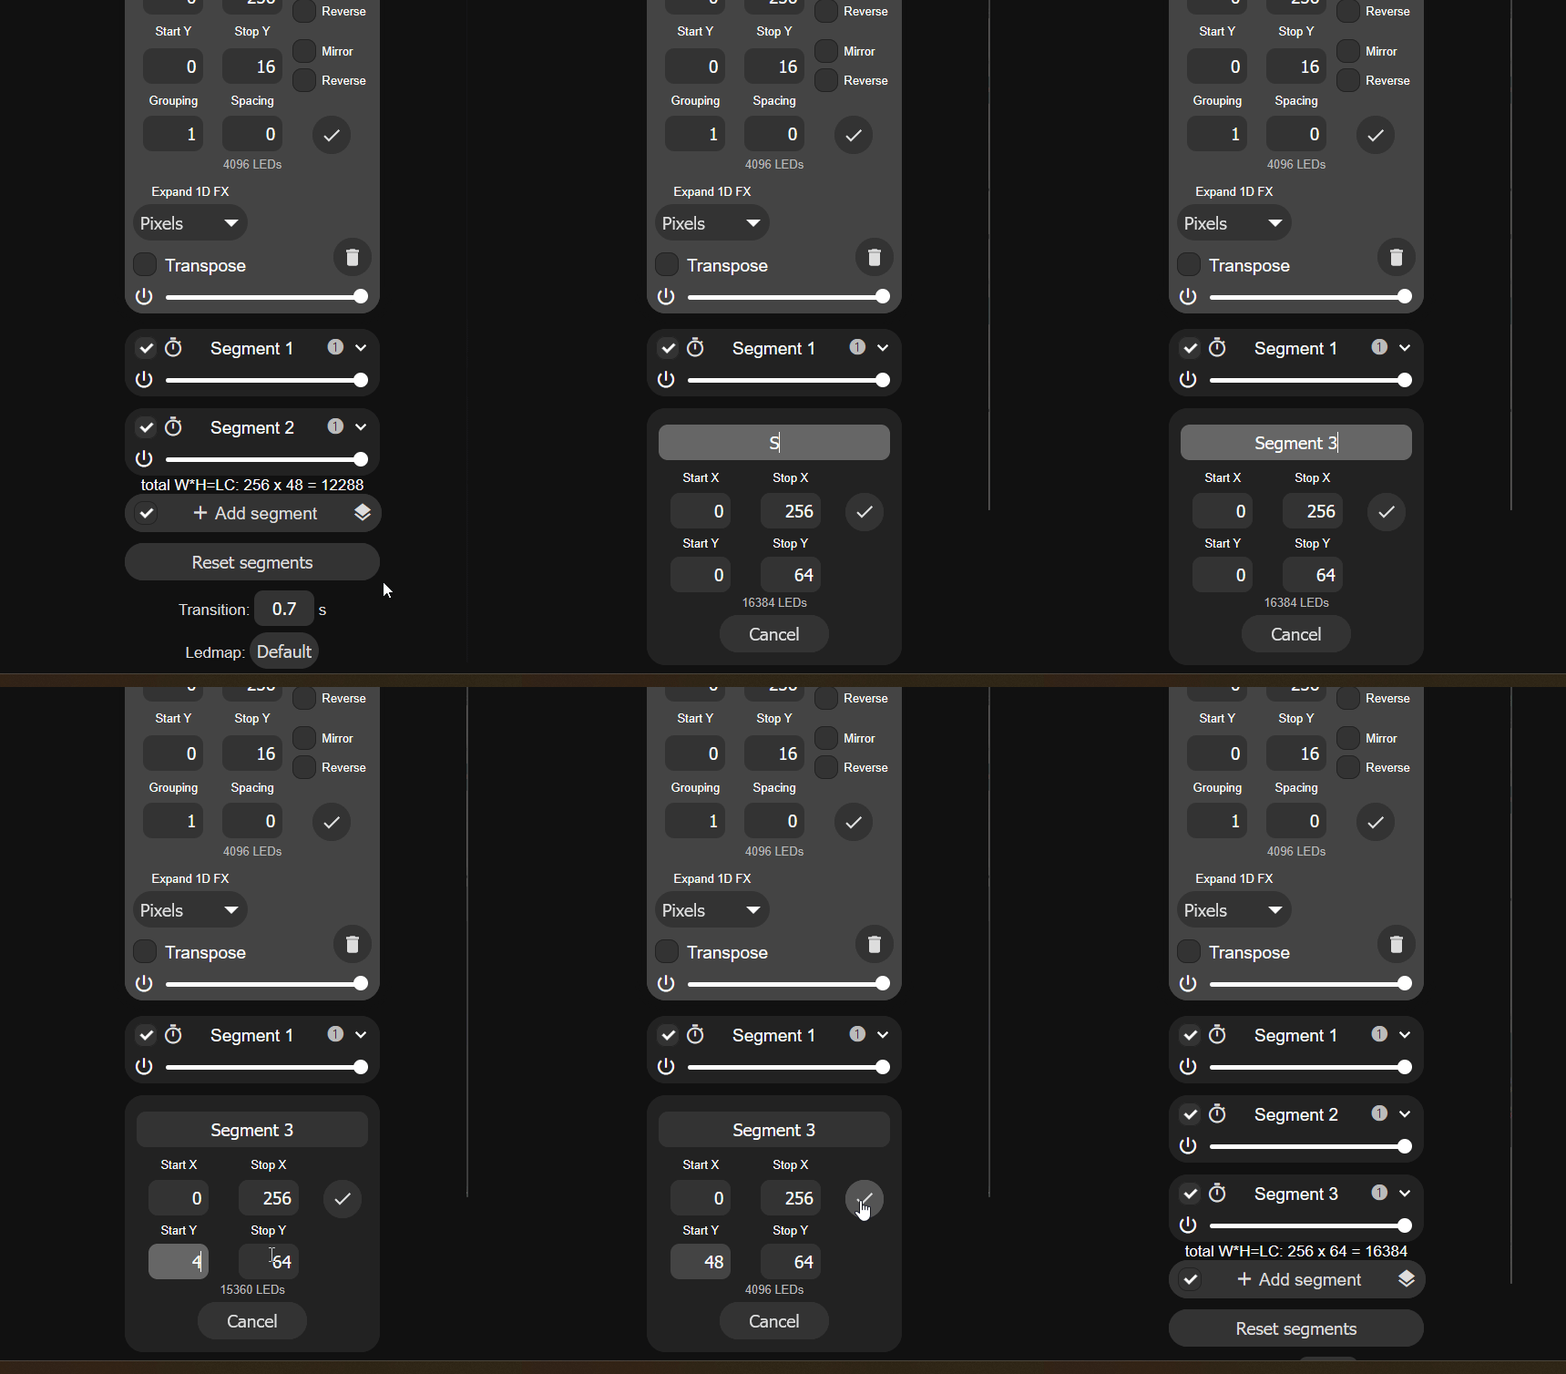
6. You should see four equal segments 0-3 at the top of the screen.
7. Test it by changing the effect to "Scrolling Text" and editing the name of each segment to be any text you want! 32 Character maximum limit in WLED.
Your segments need to be saved to a Preset or they will disappear when you reboot or run other presets.
You must save your segments as a preset or they will get wiped away after a reboot or when another preset with different segments is used.
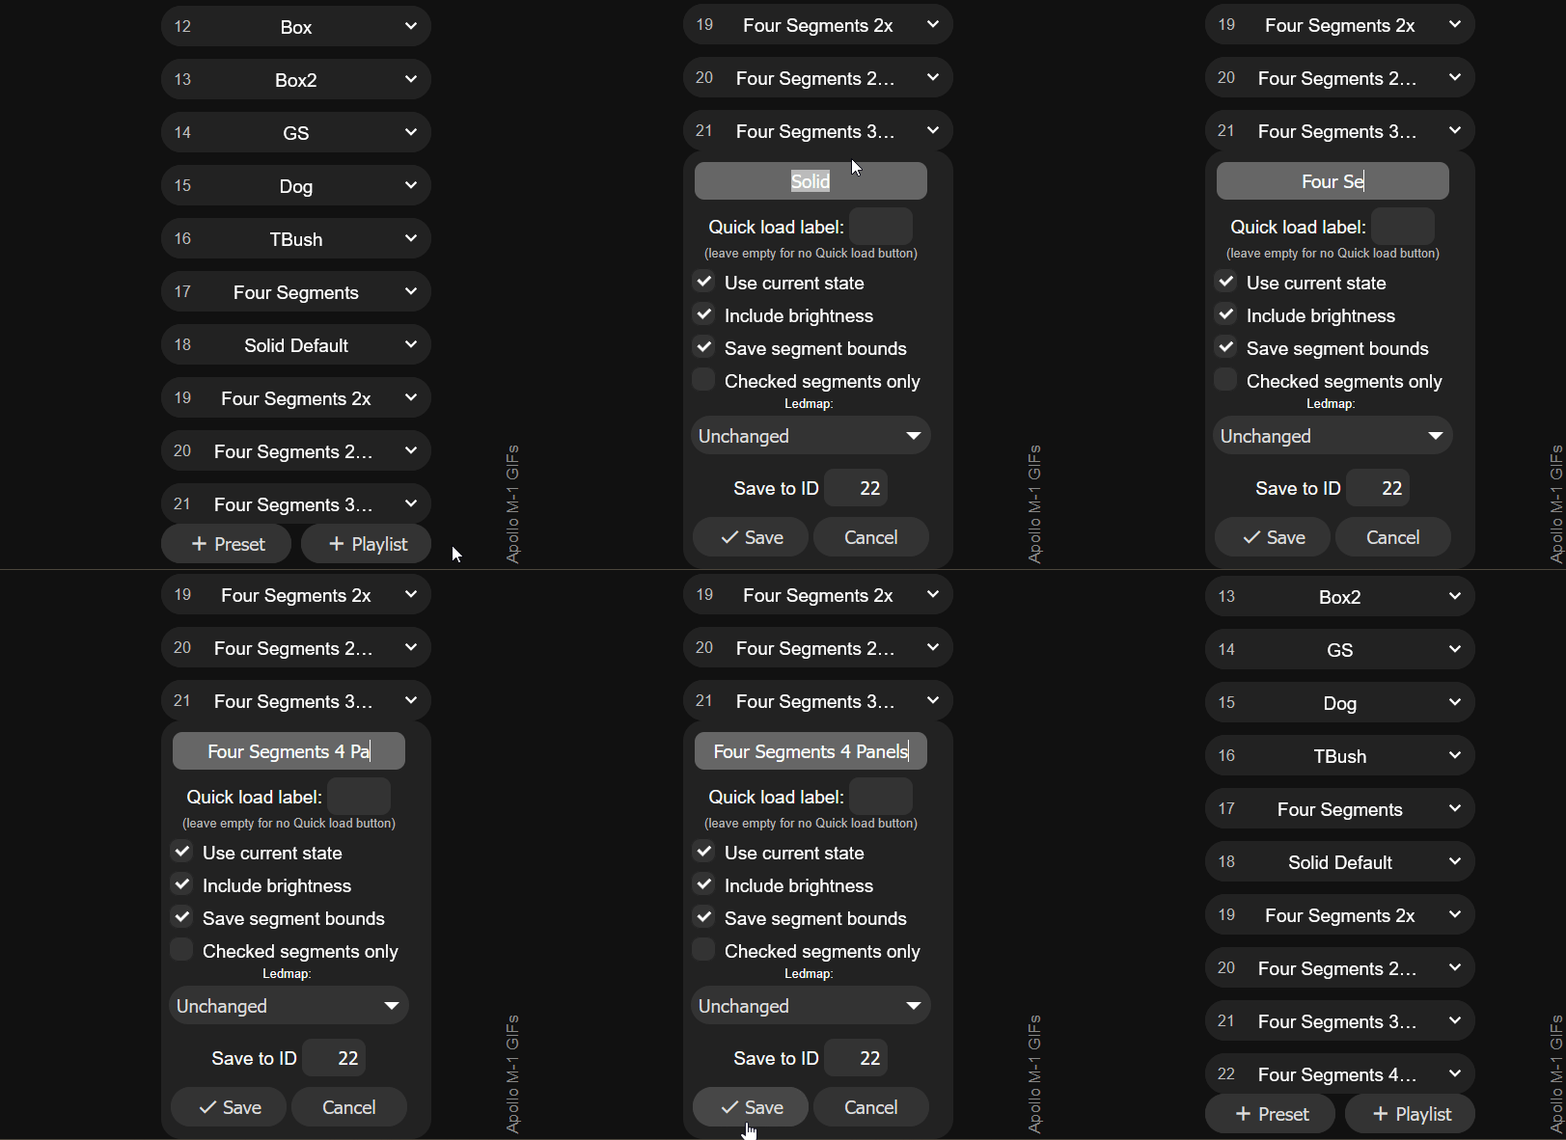
8. Save your segments by creating a new preset. Click on the + Preset button and typing in a name then clicking Save at the bottom.
On a 2x2 the display is 128 wide and 128 tall, so four equal horizontal bands are 32 pixels each rather than 16.
1. Edit Segment 0 and set Stop X to "128" and Stop Y to "32".
2. Add a segment, set Start Y to "32" and Stop Y to "64".
3. Add a third, Start Y "64" and Stop Y "96".
4. Add a fourth, Start Y "96" and Stop Y "128".
5. Save the layout as a preset, or it disappears on the next reboot.
What to Expect
Driving four panels asks a lot more of the controller than one, and a few things change that are worth knowing before you decide something is broken.
Frame rate drops as you add pixels. A single built-in panel runs around 44 fps. At 16,384 pixels, whether that is 256x64 or 128x128, most content runs around 30 fps and the heaviest 2D effects around 15 fps. GIFs depend on how much of the image changes per frame: typical pixel art with a sprite moving over a steady background runs 15 to 25 fps, while a full-screen plasma where every pixel changes each frame drops to about 8 fps. The panels themselves are refreshed by hardware the whole time, so a lower rate means slower motion, never flicker.
The LED memory gauge on the LED Preferences page reads high with four panels. That is expected and does not cause instability.
Ghosting shows up more readily. Four chained panels load the drive lines harder than one, so faint red fringing behind bright content or at a seam appears at a lower brightness than you are used to. It is harmless. Drop the global brightness a step if it bothers you.
Going Bigger Than Four Panels
Four panels per M-1 is the limit, in any arrangement that multiplies to four or fewer. That is a real constraint rather than an artificial cap: the display driver keeps its frame buffer in the fastest part of the chip's memory and four panels already fill most of it, the panel hardware refreshes more slowly as the chain grows, and eight panels of bright content would need something like a 25 amp supply.
For a bigger build, use more M-1s, one per group of up to four panels. Each keeps full image quality and speed, and WLED's built-in sync makes several units run the same effect together. For a true video wall where each unit shows its own slice of one picture, software like xLights or LedFx can drive each M-1 as a tile.