Tune your MSR-2 radar with the Apollo mmWave dashboard
The Apollo mmWave dashboard puts every setting your radar has on one screen, with live charts that show what the radar sees. On an Apollo MSR-1, Apollo MSR-2, or Apollo R PRO-1 with the optional LD2412 radar addon, it can teach the radar what your empty room looks like in about a minute and a half, so it stops reacting to the room itself and starts reacting to people. On an R PRO-1 or an Apollo MTR-1 it is also where you draw occupancy zones on a map of the room.
This guide starts with a calibration, since it's the first thing a new MSR-1, MSR-2, or R PRO-1 needs, then explains the rest of the cards and how to fine-tune by hand. If you only do one thing today, press Calibrate with empty room and leave the room: Calibrate with an empty room shows what to expect. On an MTR-1, or an R PRO-1 without the LD2412, go straight to drawing zones.
Before you start
- The Apollo mmWave integration is installed and Apollo mmWave is in your Home Assistant sidebar. If not, follow the Apollo mmWave dashboard setup guide.
- Your radar is online in Home Assistant through ESPHome.
- Your sensor is mounted where it will stay. A calibration describes the room from the sensor's position, so moving the sensor later means calibrating again.
- A calibration needs the room empty for about a minute and a half: people and pets out, robot vacuum docked.
How radar tuning works
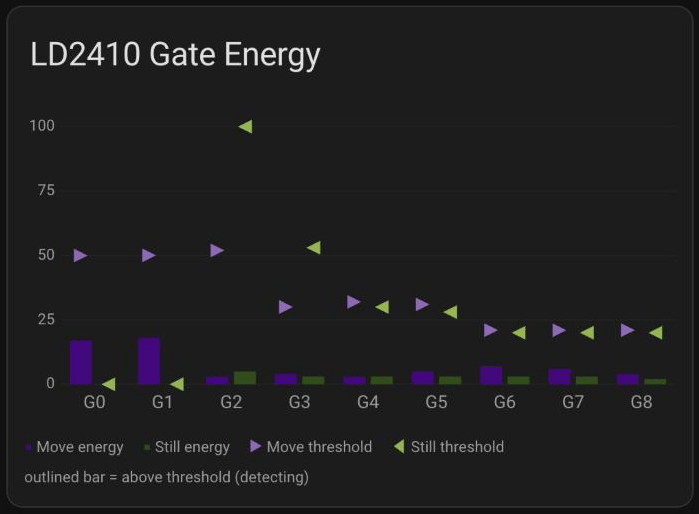
The radar splits the space in front of it into distance bands called gates. G0 sits right at the sensor, G1 is the next band out, and so on to the far edge of its range. For every gate the radar measures two kinds of signal on a scale of 0 to 100: move energy, which rises when something moves at that distance (someone walking past), and still energy, which picks up the much smaller signal of someone who is there but not moving (sitting on the couch, breathing, typing).
Each gate has a move threshold and a still threshold. When a gate's energy rises above its threshold, that gate detects a target (the radar's word for a person, or anything else it picks up) and the radar reports presence. A lower threshold makes the gate more sensitive (and more likely to trigger on a fan or a curtain); a higher one makes it less sensitive. To see the live energy of every gate, the radar has to be in Radar Engineering Mode, a diagnostic setting that streams the per-gate readings to Home Assistant. With it off you still get presence, but the Gate Energy chart has nothing to show. It's safe to turn on and off whenever you like: it changes what the radar reports, not how it detects. The calibration turns it on for you while it listens.
How far away is each gate?
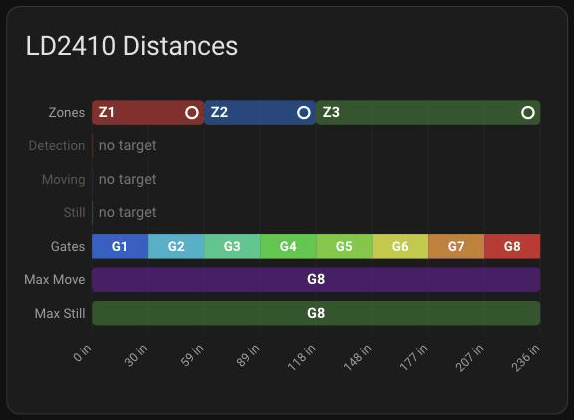
Each gate is one step of the radar's gate size. Unless you changed it, that's 0.75 m (about 2.5 ft). The setting is Gate Size on an MSR-1 or MSR-2 and Distance Resolution on an R PRO-1, and it's hidden on a new sensor: it only shows on the Detection Range card after you enable its entity on the sensor's device page. Multiply a gate's number by 0.75 m to find its far edge: G4 covers 2.25 m to 3 m (about 7.4 ft to 9.8 ft) from the sensor. The Gates row on the Distances chart draws each gate along the distance axis, so you can read it off the screen. It starts at G1, because G0 is the reading right at the sensor and has no width. On an R PRO-1, a smaller Distance Resolution (0.5 m) gives finer tuning over a shorter range, and a larger one (0.75 m) reaches farther.
Calibrate with an empty room
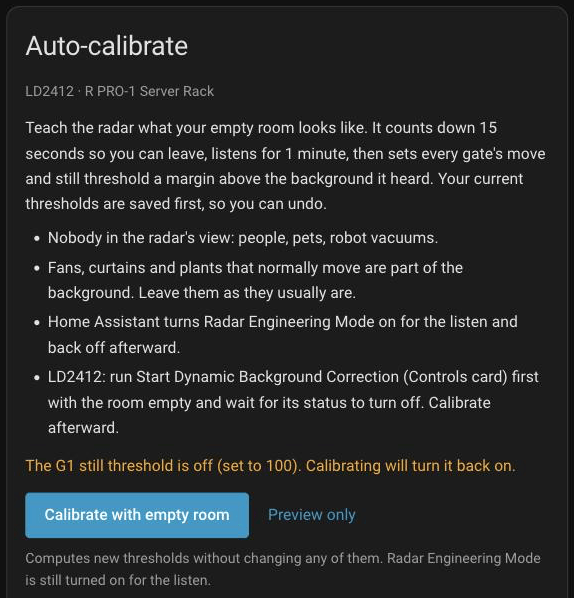
Calibration is the fastest way to a well-tuned radar. Home Assistant listens to every gate while nobody is in the room, notes the highest energy each gate reaches from the room itself (fans, curtains, plants), and sets each threshold a little above that. Your current thresholds are saved first, so you can always put them back.
Run it when you first set up a radar, when it triggers with nobody there, and after you move the sensor or rearrange the room.
Before you press the button, the card's checklist asks for three things (an R PRO-1 adds a fourth, covered in R PRO-1 and its LD2412 radar):
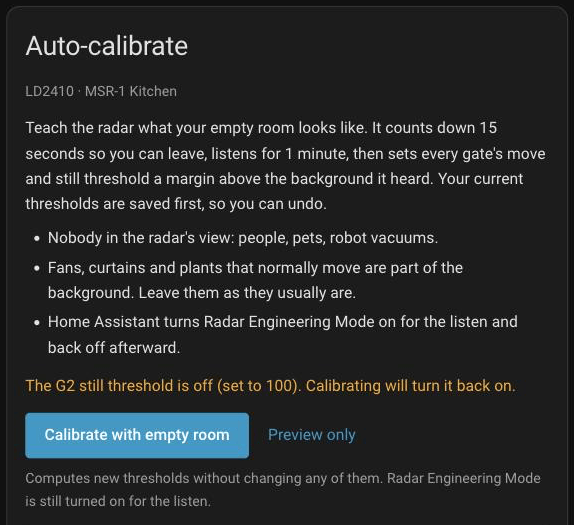
- Nobody in the radar's view: people, pets, and robot vacuums all count. Someone sitting still is the hardest case, because their still energy becomes the "background".
- Leave fans, curtains, and plants that normally move as they usually are. They are part of the background you want the radar to ignore.
- Radar Engineering Mode is handled for you. If it is off, Home Assistant turns it on for the listen and back off at the end. If it is already on, the card says Radar Engineering Mode is already on and will stay on.
On an MSR-1 or MSR-2 that has never been tuned, the card may also say These look like factory thresholds. Calibrating sets them for your room.
A threshold of 100 means that gate never triggers, so some people set a gate to 100 to turn it off. Calibration sets every gate the radar uses, including those, and the card warns you first, for example The G2 still threshold is off (set to 100). Calibrating will turn it back on. If you turned that gate off on purpose, calibrate anyway and set it back to 100 afterward on the Still Thresholds (or Move Thresholds) card.
Run a calibration
- Press Calibrate with empty room on the Auto-calibrate card. Take your phone with you if you'd like to watch the countdown and the listen from outside the room.
- Leave the room while the countdown runs and close the door behind you. Then move away from the door and the walls: the radar can see through drywall and thin doors, so waiting right outside can count as someone in the room. If the room has no door, go to another room, out of the sensor's view.
- Come back after about a minute and a half, once the card shows Thresholds updated, and read the result.
The job runs inside Home Assistant, so closing the browser or putting your phone away does not stop it. Open the dashboard again and the card picks up wherever the job is. Here is what the card shows along the way:
| Stage | What the card shows | How long |
|---|---|---|
| Starting (only if Radar Engineering Mode was off) | Turning on Radar Engineering Mode... | A moment |
| Countdown | Leave the room now. and Listening starts in 15 s., counting down | 15 seconds |
| Warm-up | Waiting for gate energy from the radar..., only if the radar is slow to start sending energy | A few seconds at most |
| Listening | Listening to the empty room... 60 s left, Keep the room empty. 12 samples so far., and two lines starting Highest so far, move: and Highest so far, still: with the peak of each gate so far | 60 seconds |
| Reading (R PRO-1 only) | Reading the radar's current thresholds... | A few seconds |
| Writing | Writing 16 thresholds to the radar... 7 of 16 and Values already written stay until you undo. The count is the number of thresholds that are changing. | A few seconds |
| Checking | Checking that the radar accepted the new values... | About 3 seconds |
| Done | Thresholds updated |
Here is a whole run on an MSR-1, sped up: the countdown, the listen with the highest energy of each gate so far, the writing and checking stages, and the result.
From the countdown through the listen, the card also reminds you: Leave Radar Engineering Mode on until this finishes. Turning it off during the listen stops the calibration without changing anything.
A Stop button sits under the progress bar until the checking stage. Press it and it reads Stopping... for a moment. Stopped before the writing stage, the card says Stopped. Nothing was changed. Stopped partway through writing, it says how many values were written and that Undo restores the saved values.
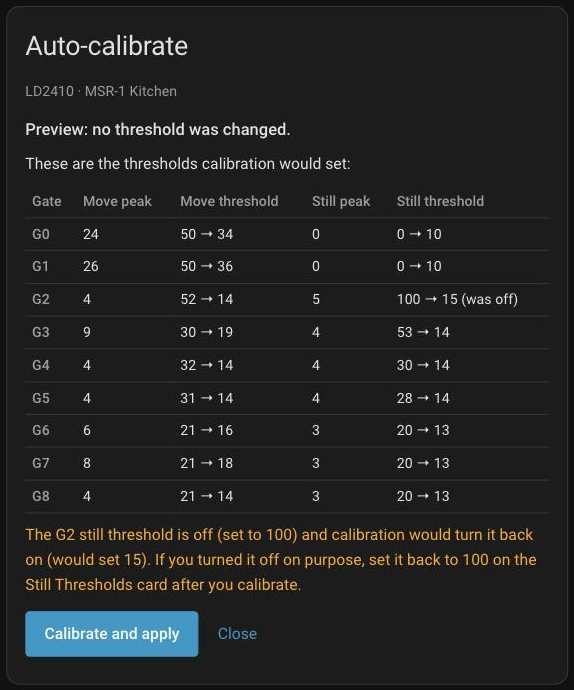
Not ready to change anything yet? Preview only runs the same countdown and listen and shows you the thresholds it would set. The card explains: Computes new thresholds without changing any of them. Radar Engineering Mode is still turned on for the listen. The preview ends with Preview: no threshold was changed. and These are the thresholds calibration would set: above the result table, and two buttons: Calibrate and apply starts a full calibration (with a fresh countdown and listen), and Close returns the card to its start.
Read the result
When the run finishes, the card shows Thresholds updated and a summary such as Calibrated at 02:32 PM from 60 samples. 16 of 18 thresholds changed. Times appear in your browser's format, so you might see 14:32 instead of 02:32 PM. An MSR-1 or MSR-2 has 18 thresholds (9 gates, move and still); an R PRO-1 has 28 (14 gates).
Below the summary is a table with one row per gate and the columns Gate, Move peak, Move threshold, Still peak, and Still threshold. The peak is the highest energy that gate reached while the room was empty. The new threshold is that peak plus some headroom: 10 points or a quarter of the peak, whichever is larger, capped at 100. A move peak of 14 becomes a threshold of 24, and a still peak of 60 becomes 75.
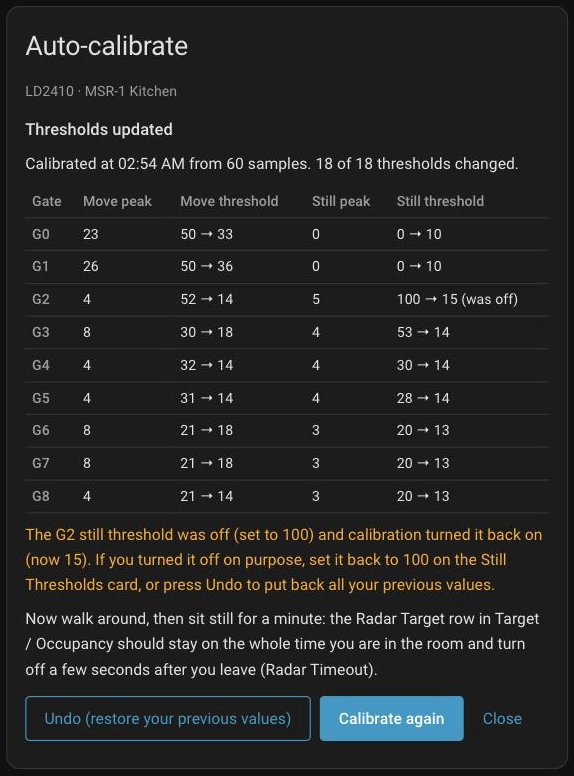
What the threshold cells mean:
- 50 → 24: the threshold changed from 50 to 24.
- 24 (unchanged): the new value matched the old one, so nothing was written.
- 100 → 15 (was off): that gate was turned off (set to 100) and calibration turned it back on. A line under the table says so and how to turn it off again.
- 100 (off) or 40 → 100 (off): the background at that gate was so strong the threshold went to the top of the scale, so that gate can no longer trigger. On an MSR-1 or MSR-2, the G0 and G1 still thresholds often end up here, because those gates sit right at the sensor and their still energy idles near the top. That's normal and needs no action, so the card does not warn about them. For any other gate in use, including G0 and G1 move, the card warns you (see Warnings the card can show).
- no data: the gate sent too few readings, so it was left as it was.
- (spike seen) after a peak: one reading jumped well above the rest, as if something moved. The threshold still comes from that peak, so that gate ends up less sensitive. If nothing should have moved there, run the calibration again with the room empty.
- not confirmed (radar offline) or (not confirmed): the radar did not report the new value back. See Thresholds did not change on the radar.
Gates outside the range the radar is set to use are dimmed, with a note under the table such as G7, G8: not used (beyond Max Move Gate 6). They are still calibrated, so they are ready if you extend the range later.
Check the result or undo it
Under the table, the card suggests a walk test:
Now walk around, then sit still for a minute: the Radar Target row in Target / Occupancy should stay on the whole time you are in the room and turn off a few seconds after you leave (Radar Timeout).
Walk through the room, then sit somewhere you usually sit and stay still for a minute or two. Radar Target covers still presence as well as movement, so it should stay on while you sit still, and turn off a few seconds after you leave, once Radar Timeout runs out. To watch the gates themselves, press Turn on Radar Engineering Mode on the Gate Energy chart: the bars of the gates you are standing in should be outlined, and no gate inside the radar's range should be outlined once you walk out. When you're done, turn Radar Engineering Mode off again on the Controls card.
Below the walk-test line are three buttons: Undo (restore your previous values), Calibrate again (a fresh calibration with a new countdown and listen), and Close. If the radar now misses you, or behaves worse than before, press Undo (restore your previous values). The card shows Restoring saved thresholds... 3 of 16 and then Restored your previous values. Undo saves the values it replaces first, so the button then reads Redo (put the calibrated values back), and pressing it puts the calibrated values back. The saved copy survives a Home Assistant restart.
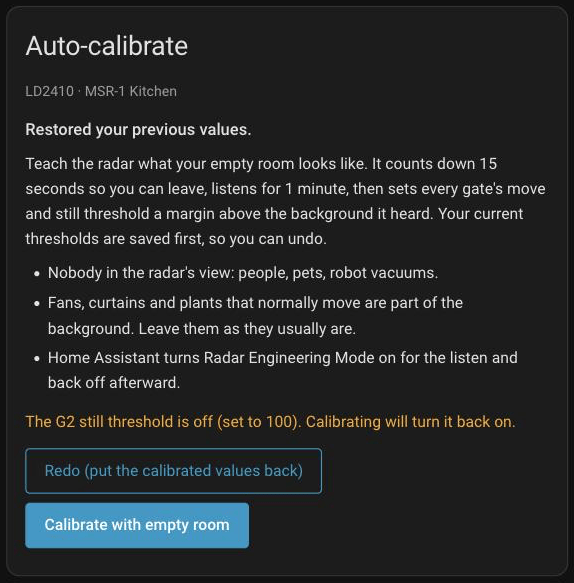
If someone walked in during the listen, press Stop: nothing is written before the writing stage. If you only notice afterward, press Undo, clear the room, and press Calibrate with empty room.
The next time you open the dashboard, the card starts on its checklist again with a line such as Last calibrated Oct 11, 02:32 PM, 16 of 18 thresholds changed. (in your browser's date and time format), the Undo (restore your previous values) button with the time those values were saved under it (Saved Oct 11, 02:31 PM.), and Show last result to open the last result table.
Warnings the card can show
Warnings appear under the result table. Each one is a sign the result may not match your empty room:
- The radar reported someone present for 40% of the listen. If someone was in the room, even sitting still, press Undo and run it again. The radar detected presence for more than a quarter of the listen. That is normal for a radar that was too sensitive (which is what you are fixing), but if a person or pet was in the room, the thresholds are too high. Press Undo, clear the room, and run it again. If you're sure the room was empty, keep the result and do the walk test in Check the result or undo it.
- The G3 move threshold is now off (its background peaked at 92). If a fan or curtain moves there all day this is fine; if not, press Undo and run again with the room really empty. That gate can no longer detect anything. If something at that distance moves all day, that is the expected result. If not, something moved there during the listen: press Undo and run it again with the room empty.
- The radar was unavailable for part of the listen; gates with too few readings were left as they were. The radar dropped off the network for a moment. Gates marked no data kept their old thresholds. Check the radar's connection and run it again.
- The G2 still threshold was off (set to 100) and calibration turned it back on (now 15). If you turned it off on purpose, set it back to 100 on the Still Thresholds card, or press Undo to put back all your previous values. You had that gate turned off, and calibration set it like every other gate. If you want it off, set it back to 100 on the card the line names. A preview words it as what calibration would do.
- 2 values could not be confirmed: G3 move threshold reads back 35 (asked for 27), G5 still threshold could not be read (radar offline). Check the Move / Still Thresholds cards. The radar did not report some of the new values back. The heading reads Thresholds updated, 2 could not be confirmed. Check those gates on the threshold cards, and press Undo or run it again once the radar is stable.
A tour of the radar tab
Open Apollo mmWave from your sidebar and, if you have more than one radar, pick your radar's tab. On a wide screen the cards sit in four columns; on a phone they stack in the order below. Card titles start with the name of the radar chip: LD2410 on an MSR-1 or MSR-2, LD2412 on an R PRO-1.
First column
- Auto-calibrate: the calibration card, always at the top of the tab. It shows the chip and the device name under its title, a short checklist, and the Calibrate with empty room button. Everything about it is in Calibrate with an empty room above.
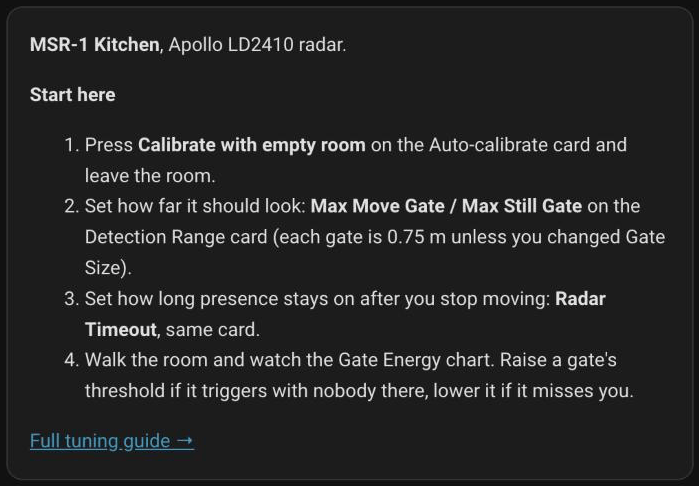
- A help card with your radar's name and a Start here checklist of four steps: calibrate, set how far the radar should look, set how long presence stays on, then walk the room and watch the Gate Energy chart. It ends with a Full tuning guide → link to the manual tuning guide on this wiki: the MSR-2 guide on an MSR-1 or MSR-2, and the LD2412 section of the R PRO-1 guide on an R PRO-1.
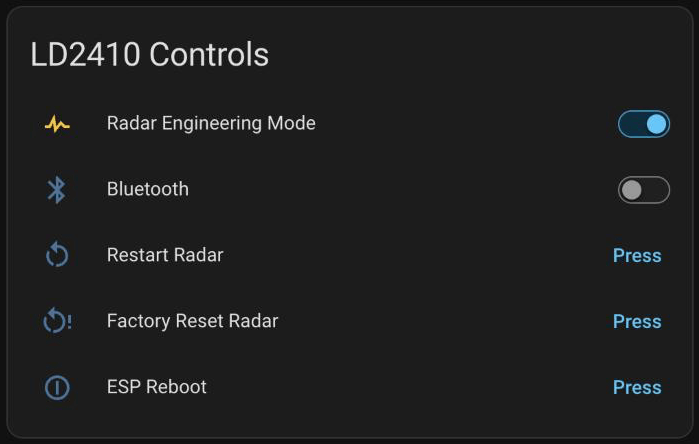
- LD2410 Controls: the Radar Engineering Mode switch, plus Bluetooth, Restart Radar, Factory Reset Radar, and ESP Reboot. On an R PRO-1 the card also has Start Dynamic Background Correction and Background Correction Running (see R PRO-1 and its LD2412 radar). Restart Radar restarts the radar chip and ESP Reboot restarts the whole sensor; neither changes your settings. Leave Factory Reset Radar alone unless Apollo support asks you to press it: it puts the radar chip's settings, every threshold included, back to factory values. If you press it by accident, run Calibrate with empty room again.
- LD2410 Zone Config (MSR-1 and MSR-2): Start Zone 1, End Zone 1, End Zone 2, and End Zone 3 split the radar's range into three distance bands, each with its own occupancy sensor (Radar Zone 1 Occupancy to Radar Zone 3 Occupancy). These are distances from the sensor, not areas you draw like on the R PRO-1 and MTR-1 zone map. They're optional: leave them as they are unless you want separate sensors for, say, the couch and the far end of the room.
Second column
- LD2410 Distances: a chart laid out along the radar's range. From top to bottom it can show a Zones row with your three distance bands (Z1 to Z3, with a filled circle when someone is in that band), bars for the current Detection, Moving, and Still distance, the Gates row, and bars that mark how far the radar is set to look (Max Move and Max Still, or Max Gate and Min Gate on an R PRO-1). On a computer, hover over a row for a short explanation. Distances show in meters, or in inches if Home Assistant uses US units.
- LD2410 Detection Range: Radar Timeout (how long presence stays on after the last detection), the gate size (hidden until you enable its entity), and the limits that set how far the radar looks: Max Move Gate and Max Still Gate on an MSR-1 or MSR-2, Max Gate and Min Gate on an R PRO-1. A note under the card explains each one.
- LD2410 Target / Occupancy: Radar Target (anyone detected), Radar Moving Target, Radar Still Target, and on an MSR-1 or MSR-2 Radar Zone 1 Occupancy to Radar Zone 3 Occupancy. On an R PRO-1 this card sits in the first column instead.
Third column
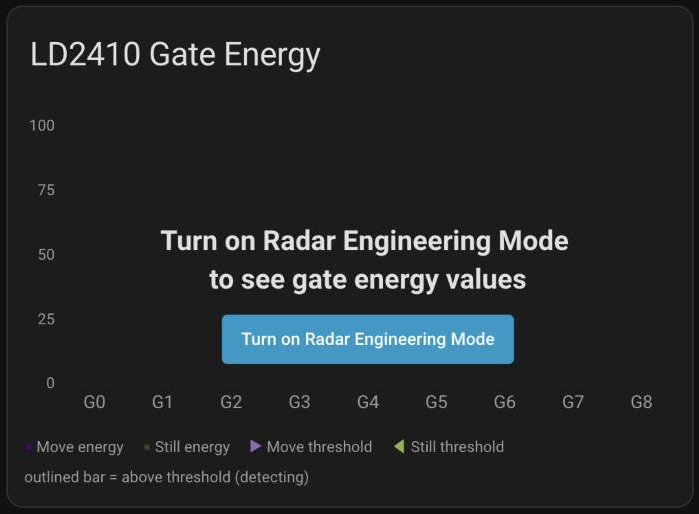
- LD2410 Gate Energy: the chart you tune with. Each gate has two bars, a purple one for move energy and a green one for still energy, on a 0 to 100 scale. While Radar Engineering Mode is on, a right-pointing triangle marks each gate's move threshold and a left-pointing triangle its still threshold, and a bar that rises above its threshold gets an outline in the threshold's color: outlined bar = above threshold (detecting). While Radar Engineering Mode is off, the chart is dimmed with Turn on Radar Engineering Mode to see gate energy values and a Turn on Radar Engineering Mode button you can press right there.
- LD2410 Move Thresholds: one row per gate (G0 to G8 on an MSR-1 or MSR-2, G0 to G13 on an R PRO-1) to set each gate's move threshold. A note underneath recaps how thresholds work.
Fourth column
- LD2410 Occupancy History: the last hour of Detected (and, on an MSR-1 or MSR-2, Zone 1 to Zone 3), so you can see when the radar thought someone was there.
- LD2410 Still Thresholds: one row per gate for the still thresholds.
On an R PRO-1 the tab continues with a Zone Map heading and the zone map for its LD2450 radar (see Draw zones on the R PRO-1 and MTR-1). An MTR-1 tab holds the zone map on its own.
R PRO-1 and its LD2412 radar
Every R PRO-1 has an LD2450 radar, and the optional LD2412 addon adds a second one. The LD2412 handles presence and gets the tuning cards and the calibration, and the LD2450 tracks positions for the zone map. An R PRO-1 without the LD2412 still shows the LD2412 cards on its tab, but there's no radar behind them, so the calibration and this section don't apply to it; its zone map works the same. On the tuning cards, a few things differ from an MSR-1 or MSR-2:
- The LD2412 has 14 gates, G0 to G13, so a calibration sets 28 thresholds.
- LD2412 Detection Range has Distance Resolution instead of Gate Size, and Max Gate and Min Gate instead of Max Move Gate and Max Still Gate. Gates below Min Gate or beyond Max Gate are dimmed in the result table, for example G0: not used (below Min Gate 1).
- There is no Zone Config card, and the Distances chart shows the gates and the Max Gate and Min Gate bars without live distance bars.
- Before it writes, the calibration asks the radar for its current thresholds (Reading the radar's current thresholds...), so what it saves for Undo matches the radar.
The LD2412 also has its own background learning, Start Dynamic Background Correction on the LD2412 Controls card. It runs on the radar chip and stores its result inside the radar. Background Correction Running shows whether it is still working. Use both, in this order:
- Clear the room and press Start Dynamic Background Correction.
- Wait for Background Correction Running to turn off. Until it does, the Auto-calibrate card says Background correction is running on the LD2412. Wait for its status to turn off. and its button stays disabled.
- Press Calibrate with empty room with the room still empty.
Run the calibration again after any later background correction. During a calibration on an R PRO-1, the card's reminder reads Leave Radar Engineering Mode on and do not press Start Dynamic Background Correction until this finishes. Pressing it during the listen stops the calibration without changing anything.
Undo cannot reverse a background correction
The Auto-calibrate card's Undo restores the thresholds Home Assistant saved. Dynamic Background Correction changes the radar itself, outside those thresholds, so Undo cannot reverse it.
Fine-tune gates by hand
Calibration gets most rooms right. If one spot still misbehaves, the Gate Energy chart shows you which gate to change. The outline is the signal to read: an outlined bar is a gate whose energy is above its threshold right now. Inside the range the radar uses, that means the gate is detecting a target.
-
Press Turn on Radar Engineering Mode on the Gate Energy chart. The bars and threshold triangles appear.
-
Leave the room and watch the chart from your phone, somewhere out of the radar's view (it can see through drywall, so step away from the wall too). A bar that is outlined while nobody is there is a gate causing false triggers. Gates outside the range the radar uses can be outlined too, but the radar ignores them: that range runs up to Max Move Gate for move bars and Max Still Gate for still bars, or from Min Gate to Max Gate on an R PRO-1.
- Raise the threshold of each gate causing false triggers on Move Thresholds (purple bar) or Still Thresholds (green bar) until its triangle sits a few points above the highest point the bar reaches.
- Sit or stand where the radar misses you. Your gate is the one whose bars rise when you shift in place; the Gates row on the Distances chart shows which gate covers your distance from the sensor. Lower that gate's threshold a few points at a time until its bar is outlined while you are there, but not after you leave.
- Turn off Radar Engineering Mode on the Controls card when you are done. The chart has no off button.
Two settings on Detection Range also help. Lower Max Move Gate and Max Still Gate (Max Gate on an R PRO-1) to stop the radar looking past a certain distance, such as a hallway beyond the doorway. Raise Radar Timeout if lights turn off while you sit still.
Calibrate first, then fine-tune
A new calibration sets every threshold again, including ones you changed by hand. If you calibrate after fine-tuning and prefer your own values, Undo brings them back.
Draw zones on the R PRO-1 and MTR-1
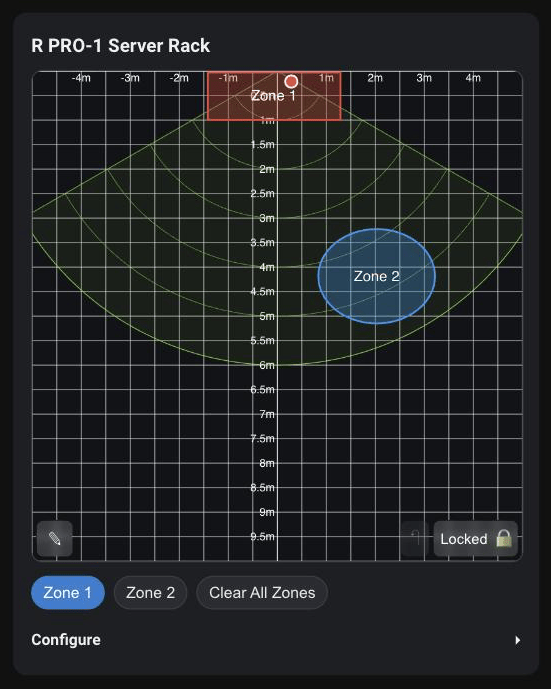
The LD2450 radar in the R PRO-1 and MTR-1 tracks where up to three people are in the room. The zone map lets you draw areas on that map, such as the couch or the desk, and gives each area its own occupancy sensor. On an MTR-1 the zone map is the whole tab. On an R PRO-1 it sits under the Zone Map heading after the tuning cards.
The card shows your radar's name, a grid with the radar's view cone, and a dot for each person it tracks. Buttons sit in the bottom corners of the grid, with a row of zone buttons and a Configure section underneath.
Lock and unlock
The bottom-right corner has a lock toggle that reads Unlocked or Locked. The map starts locked once the radar has zones, and your browser remembers your choice for each radar. Drawing on a locked map shows Unlock the grid before drawing.
Add a zone
Open Configure → Zones and press Add Zone. The new zone is named Zone 1 (then Zone 2, and so on), gets its own button under the grid, and is selected and ready to draw.
Draw a zone
- Unlock the map and press the zone's button to select it.
- Press ✎ (Drawing modes) in the bottom-left corner and pick a shape: ▭ (Rectangle), ◯ (Ellipse), or ⬠ (Polygon).
- For a rectangle or ellipse, drag across the grid and let go to save.
- For a polygon, click each corner, then double-click or press ✓ (Finish polygon) to save. A polygon can have up to 32 points. ↺ (Undo last point) or Backspace removes the last point, and Esc cancels the shape.
Drawing a new shape for a zone replaces its old one. Made a mistake? ↶ (Undo last zone change) in the bottom-right corner puts the last change back. Drawing works with touch too, so you can draw zones from a phone or tablet.
Rename a zone
In Configure → Zones, type a new name next to the zone and press Save. The name appears on the zone's button.
Clear or delete a zone
Double-click a zone's button to clear its shape, or press Clear All Zones to clear every shape while keeping the zones. To remove a zone completely, along with its sensors, press Delete next to it in Configure → Zones.
Match the map to how the sensor is mounted
Under Configure, drag Cone rotation: (from -180° to 180°) until the view cone points the way your sensor faces. The tracked dots rotate with it, and the angle is saved for the radar. Double-click the slider to reset it.
Use the zone sensors
Each zone gets an occupancy sensor named Zone 1 presence (and so on) on the radar's device page in Home Assistant. It turns on when a tracked person is inside the zone, ready to use in your automations. When you rename a zone on the card, its sensors follow, so a zone named Couch gets Zone 1 presence - Couch. A name you gave the sensor yourself in Home Assistant is kept.
Calibrate from an automation
The Calibrate with empty room button runs the apollo_mmwave.calibrate_gates action, and your automations can run it too. When an automation already knows the room is empty, set settle_s: 0 to skip the countdown, and wait: true to get the result back when the run ends. This example recalibrates an office radar at 3:00 AM if nobody has been detected for 30 minutes, and sends a notification when the outcome is anything other than applied:
alias: Recalibrate the office radar overnight
triggers:
  - trigger: time
    at: "03:00:00"
conditions:
  - condition: state
    entity_id: binary_sensor.apollo_msr_2_abc123_radar_target
    state: "off"
    for: "00:30:00"
actions:
  - action: apollo_mmwave.calibrate_gates
    data:
      device_id: your_device_id
      settle_s: 0
      wait: true
    response_variable: calibration
  - if:
      - condition: template
        value_template: "{{ calibration.outcome != 'applied' }}"
    then:
      - action: persistent_notification.create
        data:
          title: Radar calibration
          message: >
            Outcome {{ calibration.outcome }}
            {% if calibration.error %}({{ calibration.error.message }}){% endif %},
            {{ calibration.changed }} thresholds changed.
To use it, create a new automation, open the three-dot menu, choose Edit in YAML, and paste it in. Then replace binary_sensor.apollo_msr_2_abc123_radar_target with your radar's Radar Target sensor, and your_device_id with your radar. To fill in the device without looking up its ID, switch the action to the visual editor and pick your radar under Radar Device. If the action is refused before it starts (the radar is offline, for example), the automation stops with an error at that step instead of sending the notification.
Each call calibrates one radar. Two related actions round it out: apollo_mmwave.cancel_calibration stops a running job, and apollo_mmwave.restore_gate_thresholds does what Undo does. The card offers only the newest saved thresholds, while the action can restore an older set with its snapshot_id field. Developer Tools → Actions lists every field.
Only automate it for a room you know is empty
A person sleeping or a pet napping can look like an empty room to an automation. Pick a time and a room where nobody is, and remember each run replaces any thresholds you set by hand.
Troubleshooting
Calibration will not start
The Calibrate with empty room button is disabled when the card cannot run a calibration. The card says why:
- Radar is offline. Calibration needs the radar online and its gate entities enabled. Check that the radar is powered and shows as online under Settings → Devices & services → ESPHome. If it is online, open your sensor's device page from that list and check that the Radar Engineering Mode switch and the gate threshold and gate energy entities are enabled. A disabled entity is listed under + N entities not shown: select it, open its settings (the cog), turn on Enabled, and click Update.
- Background correction is running on the LD2412. Wait for its status to turn off. (R PRO-1) Wait for Background Correction Running to turn off.
- Apollo mmWave is still loading... The integration is starting or reloading, and the card keeps trying on its own. If it changes to Apollo mmWave is not loaded, so calibration is unavailable., press Retry. If that keeps happening, check Settings → Devices & services for an error on the Apollo mmWave integration.
If the button works but the card answers with a line starting Calibration failed:, the rest of the line says what went wrong, and Try again runs it again once you have fixed it. The common ones:
- The radar is unavailable right now. Check that it is online, then try again. The radar dropped off the network.
- Home Assistant could not turn Radar Engineering Mode on within 10 s. Is the radar online? The radar did not respond to the switch.
- No gate energy readings arrived within 20 s of turning Radar Engineering Mode on. Check that the radar is online and that Radar Engineering Mode on the Controls card brings the Gate Energy chart to life.
- Radar Engineering Mode turned off during the listen. Nothing was changed. Someone, or an automation, turned it off during the listen. Leave it on and try again.
- The radar has not reported 18 of its threshold values yet. The radar has not sent its thresholds to Home Assistant since it started, which can happen after it has been running for a long time. Press Read settings from the radar: the card asks the radar for its settings, shows Reading settings from the radar..., and tries again a few seconds later. If the card can't find the radar's query params button, it says Open the radar's device page, press its Query Params button in the Diagnostic section, wait a few seconds, then try again. On an R PRO-1 without the LD2412 addon, this message is expected: there's no radar to report thresholds, so reading the settings can't fix it. Skip the calibration and use the zone map.
- Your Home Assistant user is not allowed to control this radar's entities. Run the calibration from a Home Assistant user that can control the radar.
Radar Engineering Mode was left on
The calibration only turns Radar Engineering Mode off if it was the one that turned it on. If you turned it on yourself, or with the button on the Gate Energy chart, it stays on until you turn it off with Radar Engineering Mode on the Controls card.
If Home Assistant restarted during the countdown or the listen, nothing was written: the calibration turns Radar Engineering Mode back off when Home Assistant starts again, and the card says, for example, Last calibration Oct 12, 12:37 AM was stopped by a Home Assistant restart. Nothing was changed. Press Calibrate with empty room to run it again.
If Home Assistant restarted while thresholds were being written, or the radar went offline before the calibration could turn the mode off, the Auto-calibrate card shows a banner the next time you open it. It starts with A calibration was interrupted by a restart. or The last calibration could not turn Radar Engineering Mode back off (the radar was offline). Press Turn it off next to Radar Engineering Mode may still be on. If the banner also says Some thresholds may have been written., press its Undo to put the saved thresholds back, then run the calibration again.
Keep Radar Engineering Mode out of your history
While Radar Engineering Mode is on, the radar updates its 18 (MSR-1 and MSR-2) or 28 (R PRO-1) gate energy sensors about once a second, and Home Assistant's recorder, the part that saves history, stores every update. Turning the mode off when you're done avoids this. If you like to leave it on to watch the chart, add the block below to your configuration.yaml (the File editor app is one way to open it), then restart Home Assistant. If the file already has a recorder: section, add the exclude: lines to it instead of adding a second recorder: key.
Thresholds did not change on the radar
- You ran a preview. Preview only never writes anything. Press Calibrate and apply, or Calibrate with empty room.
- The new value matched the old one. Cells that read (unchanged) were already right, so nothing was written.
- The gate had no data. Gates marked no data keep their old thresholds. Check the radar's connection and run the calibration again.
- The radar did not confirm the value. Cells marked (not confirmed) and the warning that values could not be confirmed mean the radar did not report the new value back. Check the gates on the Move Thresholds and Still Thresholds cards, then run it again once the radar is stable, or set those gates by hand.
- The run was stopped. Stopped. Nothing was changed. means nothing was written.
The chart says to turn on Radar Engineering Mode
If the chart instead reads Radar unavailable and Waiting for the device to reconnect, the radar is offline and the button is hidden until it comes back: check its power and Wi-Fi. Otherwise, the Gate Energy chart only shows bars while Radar Engineering Mode is on. Press Turn on Radar Engineering Mode on the chart itself, or turn on Radar Engineering Mode on the Controls card. The bars appear within a few seconds, once the radar starts sending energy. If the calibration turned the mode on, it turns it back off when it finishes, so the overlay returning after a calibration is expected.