Zone Mapper tool
Apollo's LD2450-based presence sensors, like the MTR-1 and R-PRO-1, track up to three targets across the room. With the Zone Mapper tool you draw their detection zones on a visual grid in Home Assistant, watch targets move in real time, and get an occupancy sensor for every zone you draw.
Zone Mapper has two parts that work together:
- The Zone Mapper integration, a backend that stores your zones and creates an occupancy sensor for each one.
- The Zone Mapper card, a dashboard card where you draw and manage the zones.
Install both parts
The card does nothing without the integration, and the integration has no interface without the card. Complete both installations before you start drawing zones. Home Assistant 2025.9.4 or newer is recommended.
Video walkthrough
MostlyChris covers the full setup, from installation to drawing your first zones:
Install with HACS (recommended)
HACS is a community store for Home Assistant that handles installing and updating custom integrations and cards. If you don't have it yet, follow the HACS download guide and initial configuration guide.
With HACS in place, both Zone Mapper parts install in one pass:
- Open HACS from your Home Assistant sidebar.
- Click the three-dot menu in the upper right corner and choose Custom repositories.
- Add
https://github.com/ApolloAutomation/zone-mapperwith type Integration. - Add
https://github.com/ApolloAutomation/zone-mapper-cardwith type Dashboard. - Search HACS for Zone Mapper and download both the integration and the card.
- Restart Home Assistant when prompted.
- Go to Settings → Devices & services → Add integration, search for Zone Mapper, and add it.
The integration adds a "Zone Mapper" view with the card to your default dashboard the first time it is set up, so you don't have to place the card yourself (storage-mode dashboards only; you can opt out in the integration options). Open the new view and you're ready to pick your device and start drawing.
Manual installation
If you'd rather install without HACS:
- Copy the contents of the integration's
custom_componentsfolder to/config/custom_components/zone_mapper. - Download
zone-mapper-card.jsfrom the card repository to/config/www. - Add the card as a resource under Settings → Dashboards → Resources with URL
/local/zone-mapper-card.jsand type JavaScript Module. - Restart Home Assistant, then hard-refresh your browser to clear the cached resource list.
Configure the card
Zones themselves are managed on the card, so the YAML stays small: it sets the location name, theme, grid size, and units.
type: custom:zone-mapper-card
location: Office       # shown on the card and used to build zone entity IDs
dark_mode: false
start_locked: true     # start with drawing locked

# Units (display only, stored as mm internally)
input_units: mm        # mm | cm | m | in | ft
grid_units: mm         # mm | cm | m | in | ft
unit_display: false    # show unit-aware axis labels and cone range rings
unit_label_size: 18    # optional, px (8..24)

# Grid extents (Y points down: y_min is the top edge, y_max is the bottom)
grid:
  x_min: -6000
  x_max: 6000
  y_min: 0
  y_max: 12000

# Device view cone
device_cone:
  y_max: 6000          # max range (radius) to display
  fov_deg: 120         # total horizontal field of view (120 shows ±60°)
  angle_deg: 0         # initial rotation (-180..180)
Use the card

Set target entities
The card needs to know which X/Y coordinate sensors to track:
- Click the Configure drop-down, then Device and Targets.
- Select your device. The X/Y target entities populate automatically, and you can adjust them by hand if needed.
- For helper entities that aren't tied to a device, leave the device picker on Select device and use Add X/Y Pair instead.
- Click Apply to save your selection.
Using the imperial system? Switch your target sensors to millimeters
Home Assistant shows the Target X and Y sensors in inches (in) when your system uses US units, while the card reads them in millimeters (mm). When the units don't match, your target dots never appear on the grid. Metric users can skip this; everyone else, convert the sensors before drawing zones:
- Open your device's page under Settings → Devices & services → ESPHome.
- Under Sensors, click Target 1 X, open its settings with the gear icon, and change Unit of Measurement to mm.
- Repeat for the X and Y sensors of all three targets (six entities in total).
Changing the card's units instead also works, but then you need to adjust the grid distances to match, so converting the sensors is the recommended path.
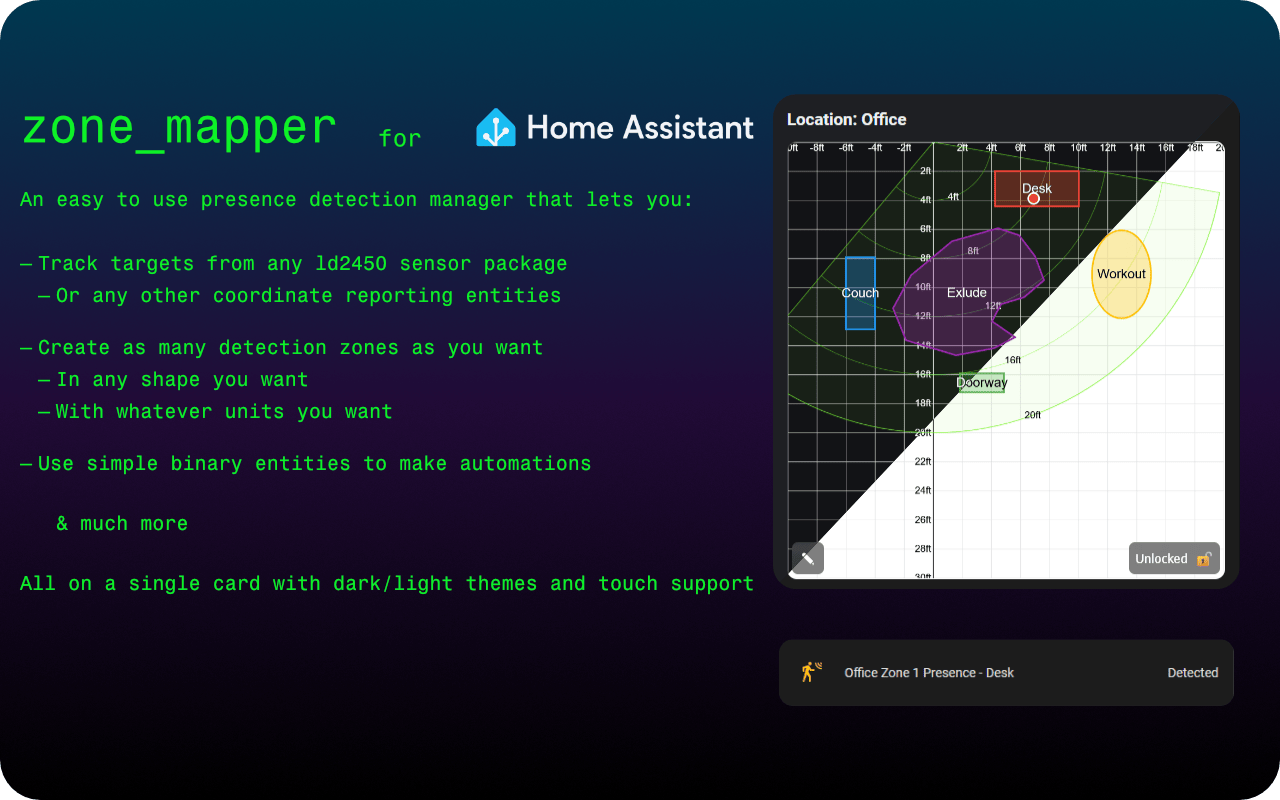
Add zones
- Click the Configure drop-down, then Zones.
- Click Add Zone, name the zone, and click Save.
Zones and their paired entities can be deleted from the same panel.
Draw zones
This is where the tool earns its "best" rating: instead of typing coordinates, you draw the zone where you want it.
- Select a zone with its button.
- Click ✎ and choose a shape: rectangle, ellipse, or polygon.
- For rectangles and ellipses, drag to define the bounding box and release to save.
- For polygons, click to place vertices and double-click to finish. Backspace removes the last vertex, and Esc cancels the in-progress shape.
A few controls worth knowing:
- Double-click a zone's button to clear that zone.
- Toggle 🔒 to lock the card and prevent accidental edits.
- Rotate the device's view cone with the slider to match how the sensor is mounted. Target dots rotate with it, and the angle persists across restarts.
- Drawing works with touch as well as a mouse, so you can set up zones from a phone or tablet.
Entities created
For each zone, the integration creates:
- A coordinate sensor,
sensor.zone_mapper_<location>_zone_<id>, that stores the zone's shape so it survives restarts. - A presence binary sensor,
<location> Zone <id> Presence, that turns on when any tracked target is inside the zone.
The location is slugified with Home Assistant's rules, so location: Office produces sensor.zone_mapper_office_zone_1. Entities are created the first time you draw a zone for a location.
Example automation
The presence sensors work like any other occupancy sensor. This automation turns on a light when zone 1 is occupied, then turns it off two minutes after the zone empties:
alias: Office Light Control
mode: restart
max_exceeded: silent
triggers:
  - trigger: state
    entity_id: binary_sensor.office_zone_1_presence
    from: "off"
    to: "on"
actions:
  - alias: Turn on the light
    action: light.turn_on
    target:
      entity_id: light.office_1
  - alias: Wait until the zone is empty
    wait_for_trigger:
      trigger: state
      entity_id: binary_sensor.office_zone_1_presence
      from: "on"
      to: "off"
  - alias: Wait two minutes
    delay: 120
  - alias: Turn off the light
    action: light.turn_off
    target:
      entity_id: light.office_1
Troubleshooting
- Click Apply and Save after setting up the card or making changes. Most "nothing happens" reports come down to a missed Apply.
- Resource not found: confirm the resource URL is
/local/zone-mapper-card.js, the file is under/config/www, and clear your browser cache. - Zones don't persist: check the coordinate sensor's attributes for
shape,data, androtation_degunder Developer Tools → States, and confirm thezone_mapper.update_zoneservice is being called. - Coordinate entity not found: draw a zone once to create the entities for that location.
- No target dots appear when you move: your Target X/Y sensors are most likely reporting in inches while the card reads millimeters. Switch the six target sensors to mm as described under Set target entities.
- Presence never turns on: verify the tracked X/Y entities have numeric states (not
unknownorunavailable) and that the target actually sits inside the drawn zone. - Target dots linger after you leave the room: a known quirk of many LD2450 sensors running ESPHome, not a Zone Mapper issue.
Going deeper
Zone Mapper supports more than this page covers, including a zone_mapper.update_zone service for scripted zone changes, pre-seeded zone lists, and multi-unit grids. The README files in the zone-mapper and zone-mapper-card repositories document the full service contract and card options.