Play a Tune from Home Assistant
🌱 New here? Try these first:
The buzzer is an output, not a switch, so it never shows up as an entity you can toggle in Home Assistant. To play tunes from Home Assistant you expose an API action: a named command on the device that Home Assistant can call. You build it right in the Device Builder editor, no hand-written YAML required.
Before you start
Work through these pages first. This tutorial assumes your device is flashed, the LED & Buzzer module is wired up, and the kit is connected to Home Assistant:
- First Steps to create your starter kit device in ESPHome Device Builder.
- Adding the LED & Buzzer Module to wire up the buzzer output.
- Connect to Home Assistant to bring the device into Home Assistant.
Add the LED & Buzzer module first
An API action here plays a tune with rtttl.play, which only exists once the module's rtttl: component is on the device. Add the action on a device without the module and the install fails with Unable to find action with the name 'rtttl.play'. If you hit that error, go back to Adding the LED & Buzzer Module and finish all four Add clicks. The last one drops in the rtttl: block that makes rtttl.play work.
Add the API action
Start with a single named song, or set up a bank of swappable song slots. Pick a tab:
Difficulty: Level 1
Add one song
The simplest version is a single action that plays one fixed tune. In Home Assistant it becomes a one-click action you can drop into any automation.
-
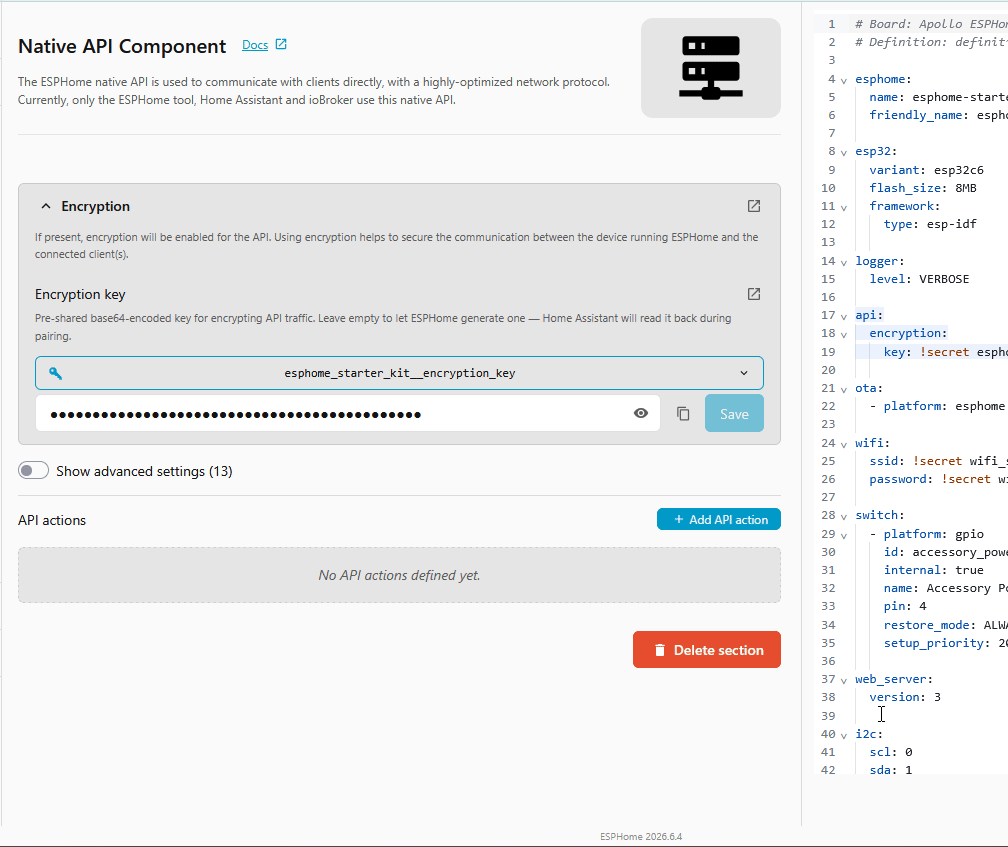
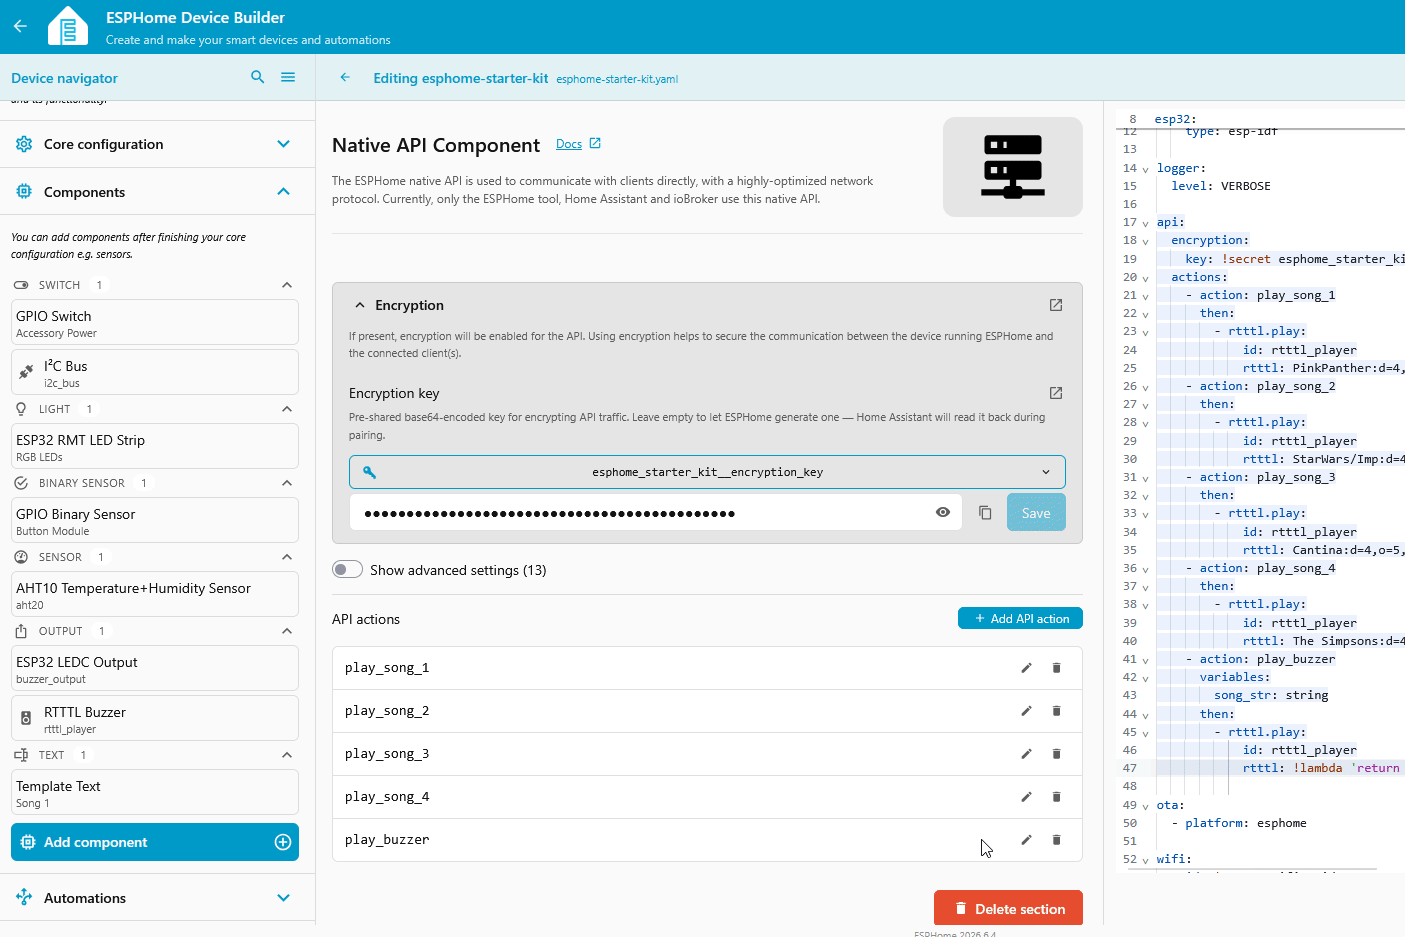
Open your starter kit device in ESPHome Device Builder and click Edit, then open the Core configuration tab and select Native API.
-
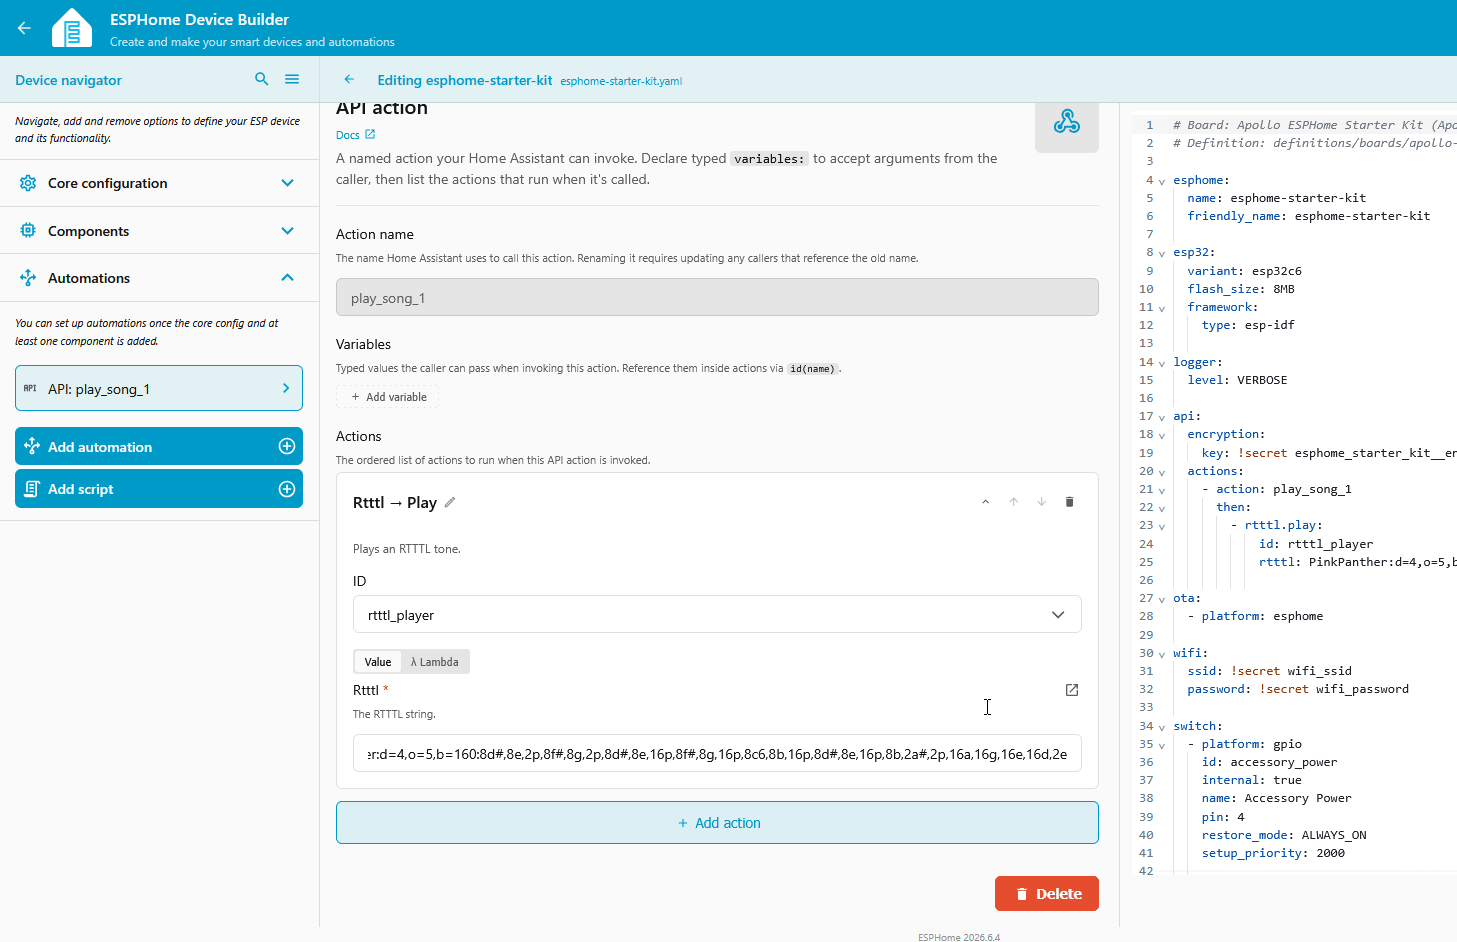
Click Add API Action and enter
play_pink_pantheras the Action name. (1)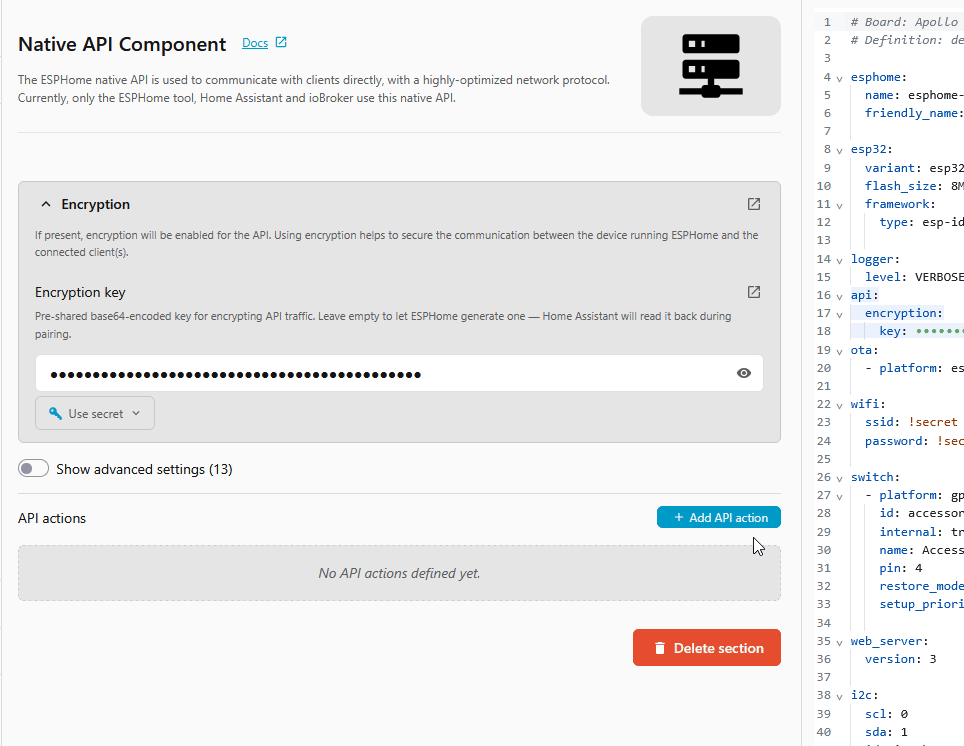
-
Click Add action, choose Rtttl → Play from the top of the list, and paste the Pink Panther theme into the Rtttl field:
PinkPanther:d=4,o=5,b=160:8d#,8e,2p,8f#,8g,2p,8d#,8e,16p,8f#,8g,16p,8c6,8b,16p,8d#,8e,16p,8b,2a#,2p,16a,16g,16e,16d,2e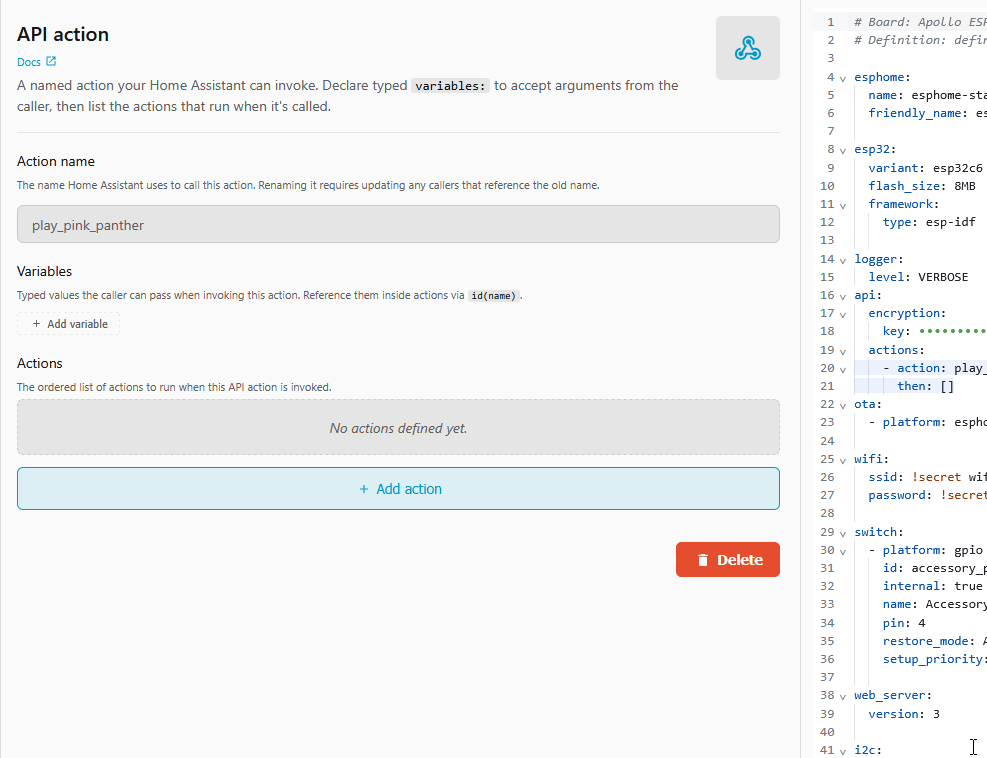
- The name you enter here becomes the Home Assistant action
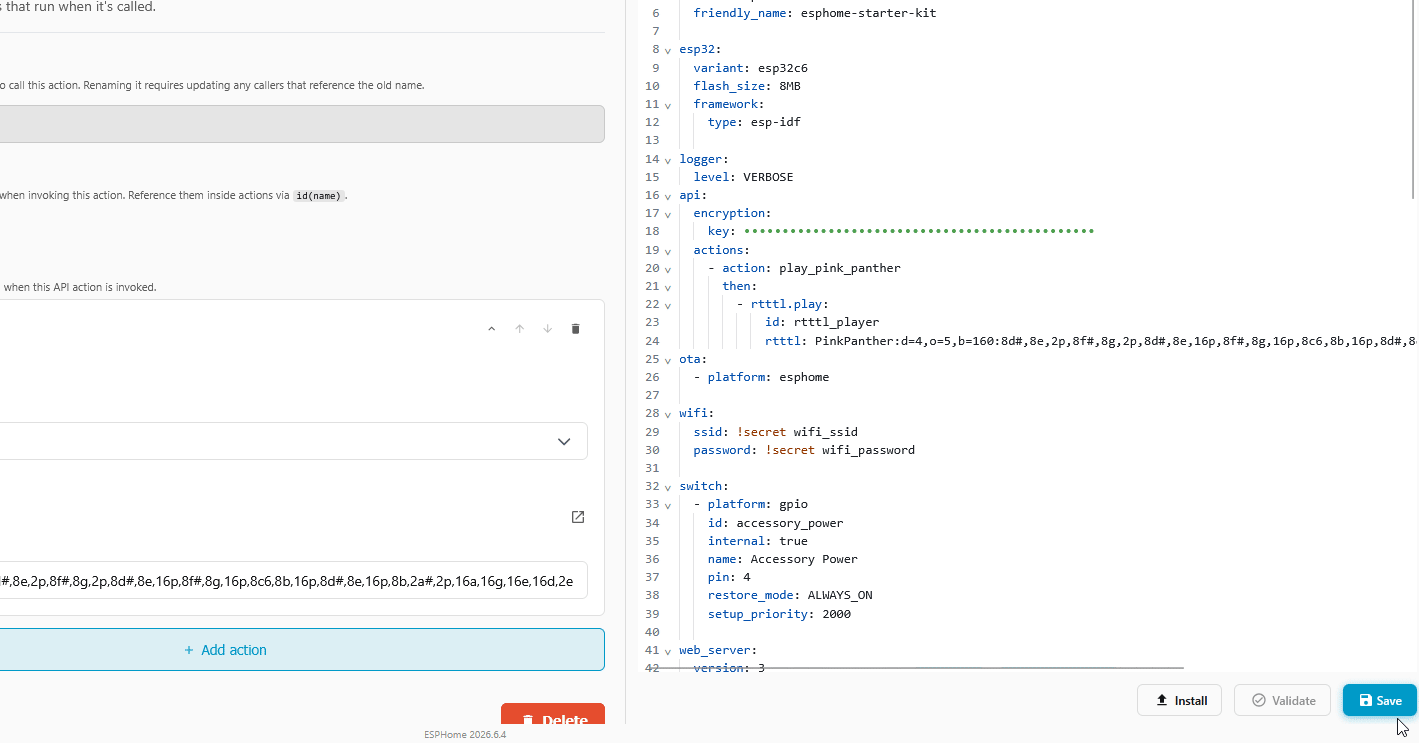
esphome.esphome_starter_kit_play_pink_panther. Behind the scenes the editor writes anapi:→actions:block, which you can watch appear in the YAML pane.
What the editor built in YAML
The form and the YAML pane stay in sync. Your api: block now has one action:
Difficulty: Level 2
Add song slots
Naming an action after its song reads nicely in Home Assistant, but if you want a handful of songs you can swap out later, set them up as numbered slots instead. This is how the H-2 exposes its buzzer songs: four song slots plus one play-anything action. (H-2 routes each slot through a script so its physical song buttons can share the same tune. The Starter Kit has no song buttons, so we skip the scripts and play the tune directly.)
-
Open your starter kit device in ESPHome Device Builder and click Edit, then open the Core configuration tab and select Native API.
-
Add a slot for each of the four tunes below. Each slot is its own API action, so repeat these steps once per song:
- From the Core configuration tab, open Native API, then click Add API Action.
- Enter the Action name (
play_song_1throughplay_song_4). (1) - Click Add action and choose Rtttl → Play from the top of the list.
- Paste the tune into the Rtttl field.
- A slot keeps its name whatever tune is in it, so you can repoint
play_song_3at a new song later without renaming it or breaking any automation that calls it. Find more tunes on the Play a Tune page.
The gif shows the first slot; the tunes for all four are below.
play_song_1— Pink PantherPinkPanther:d=4,o=5,b=160:8d#,8e,2p,8f#,8g,2p,8d#,8e,16p,8f#,8g,16p,8c6,8b,16p,8d#,8e,16p,8b,2a#,2p,16a,16g,16e,16d,2eplay_song_2— Imperial MarchStarWars/Imp:d=4,o=5,b=112:8d.,16p,8d.,16p,8d.,16p,8a#4,16p,16f,8d.,16p,8a#4,16p,16f,d.,8p,8a.,16p,8a.,16p,8a.,16p,8a#,16p,16f,8c#.,16p,8a#4,16p,16f,d.,8p,8d.6,16p,8d,16p,16d,8d6,8p,8c#6,16p,16c6,16b,16a#,8b,8p,16d#,16p,8g#,8p,8g,16p,16f#,16f,16e,8f,8p,16a#4,16p,2c#play_song_3— CantinaCantina:d=4,o=5,b=250:8a,8p,8d6,8p,8a,8p,8d6,8p,8a,8d6,8p,8a,8p,8g#,a,8a,8g#,8a,g,8f#,8g,8f#,f.,8d.,16p,p.,8a,8p,8d6,8p,8a,8p,8d6,8p,8a,8d6,8p,8a,8p,8g#,8a,8p,8g,8p,g.,8f#,8g,8p,8c6,a#,a,gplay_song_4— Simpsons -
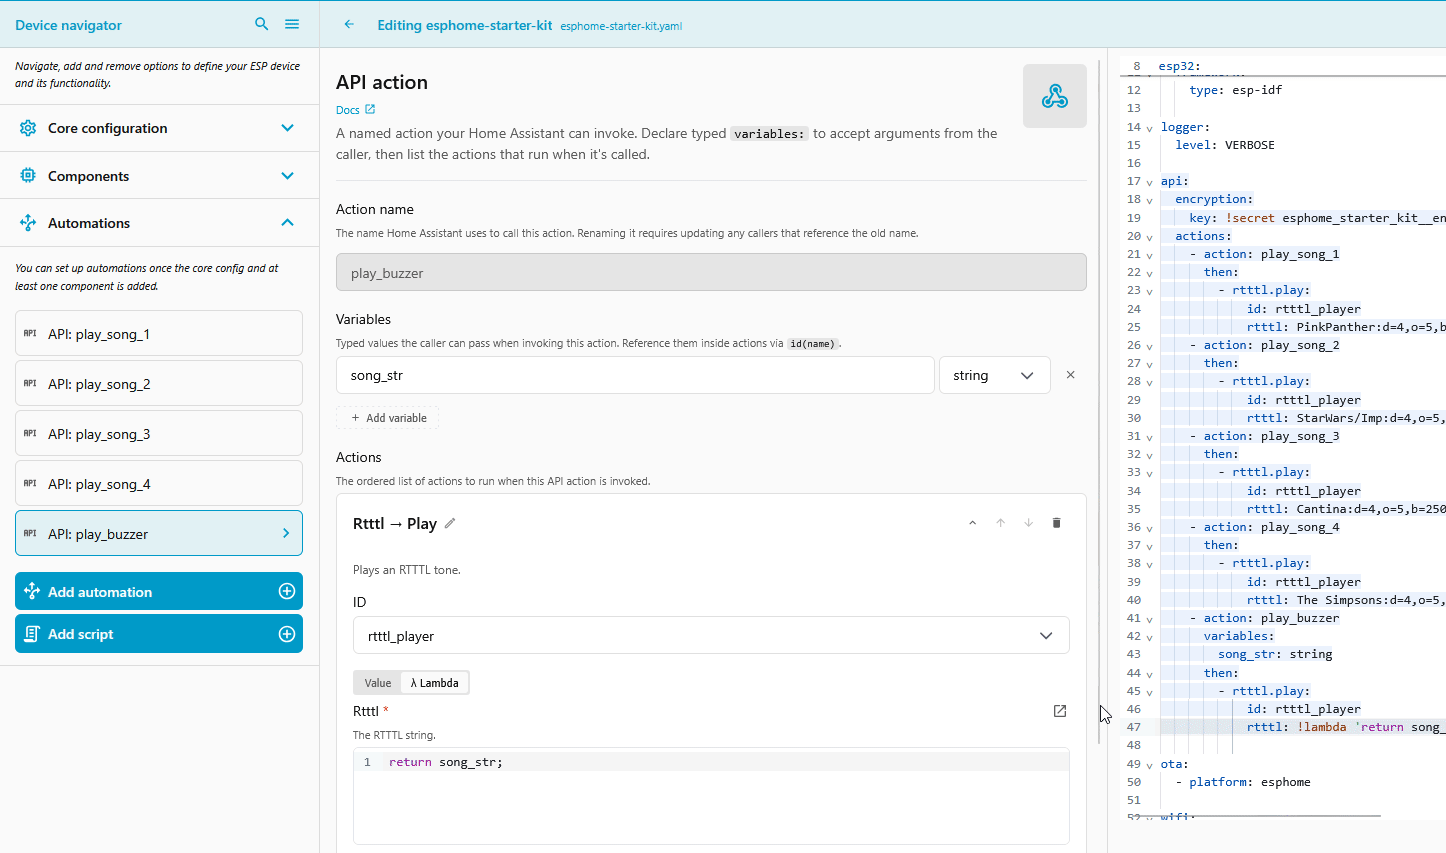
Add a play-anything action. Go back to Core configuration → Native API → Add API Action once more:
- In Action name, enter
play_buzzer. - Under Variables, click + Add variable, name it
song_str, and set the type to string. - Under Actions, add Rtttl → Play. In the Rtttl field, switch from Value to λ Lambda and enter
return song_str;(1). That hands whatever tune Home Assistant sends straight to the buzzer.
- Use λ Lambda, not Value. A plain Value treats
song_stras literal text, a tune named "song_str" that won't play, while the lambda returns the variable's contents. Leave the quotes offsong_strso it stays the variable and not a string.
- In Action name, enter
What the editor built in YAML
The four slots plus the play-anything action:
api:
  actions:
    - action: play_song_1
      then:
        - rtttl.play:
            id: rtttl_player
            rtttl: PinkPanther:d=4,o=5,b=160:8d#,8e,2p,8f#,8g,2p,8d#,8e,16p,8f#,8g,16p,8c6,8b,16p,8d#,8e,16p,8b,2a#,2p,16a,16g,16e,16d,2e
    - action: play_song_2
      then:
        - rtttl.play:
            id: rtttl_player
            rtttl: StarWars/Imp:d=4,o=5,b=112:8d.,16p,8d.,16p,8d.,16p,8a#4,16p,16f,8d.,16p,8a#4,16p,16f,d.,8p,8a.,16p,8a.,16p,8a.,16p,8a#,16p,16f,8c#.,16p,8a#4,16p,16f,d.,8p,8d.6,16p,8d,16p,16d,8d6,8p,8c#6,16p,16c6,16b,16a#,8b,8p,16d#,16p,8g#,8p,8g,16p,16f#,16f,16e,8f,8p,16a#4,16p,2c#
    - action: play_song_3
      then:
        - rtttl.play:
            id: rtttl_player
            rtttl: Cantina:d=4,o=5,b=250:8a,8p,8d6,8p,8a,8p,8d6,8p,8a,8d6,8p,8a,8p,8g#,a,8a,8g#,8a,g,8f#,8g,8f#,f.,8d.,16p,p.,8a,8p,8d6,8p,8a,8p,8d6,8p,8a,8d6,8p,8a,8p,8g#,8a,8p,8g,8p,g.,8f#,8g,8p,8c6,a#,a,g
    - action: play_song_4
      then:
        - rtttl.play:
            id: rtttl_player
            rtttl: The Simpsons:d=4,o=5,b=160:c.,e,f#,8a,g.,e,c,8a4,8f#4,8f#4,8f#4,2g4,8p,8p,8f#4,8f#4,8f#4,8g4,a4.,8c,16p,8c,16p,8c,2c
    - action: play_buzzer
      variables:
        song_str: string
      then:
        - rtttl.play:
            id: rtttl_player
            rtttl: !lambda 'return song_str;'
Edit songs from the dashboard
The slots above are fixed tunes, and play_buzzer plays a tune you pass in each time. If you'd rather keep a few named songs you can edit and replay right from the dashboard, store each one in a text field with its own play button. Both show up on the web server and in Home Assistant, so you can paste a new tune and play it without touching the config or reflashing. This is how the H-2 exposes its songs.
-
From the Components tab, search Template Text and select it. Then:
- Set the Name to
Song 1and set Mode to Text. - Turn on Optimistic. (1)
- Set the ID to
song_1. (2) - Turn on Restore value so edits survive a reboot.
- Lets the field store what you type. Without it the install fails with "Either optimistic mode must be enabled, or set_action must be set".
- The play buttons reference these IDs by name, so they have to match exactly, or the install fails with "Couldn't find ID 'song_1'".
Repeat for Song 2, Song 3, and Song 4, giving each the matching ID (
song_2,song_3,song_4). To have a tune ready to play right away, paste an RTTTL string into each field's Initial value; otherwise leave it empty and paste one in from the dashboard before pressing Play. - Set the Name to
-
Add a Template Button component named
Play Song 1, then wire up what it plays:- Scroll down and click Add Automation, choose Button → On press, and click Continue.
- Click Add action and choose Rtttl → Play.
- Switch the Rtttl field to λ Lambda and enter
return id(song_1).state;.
Repeat for
Play Song 2throughPlay Song 4, pointing each at its own text field. (1)-
Use the matching text field in each button's lambda:
Play Song 2:return id(song_2).state;Play Song 3:return id(song_3).state;Play Song 4:return id(song_4).state;
What the editor built in YAML
text:
  - platform: template
    name: "Song 1"
    id: song_1
    icon: mdi:music-note
    entity_category: config
    mode: text
    optimistic: true
    restore_value: true
  - platform: template
    name: "Song 2"
    id: song_2
    icon: mdi:music-note
    entity_category: config
    mode: text
    optimistic: true
    restore_value: true
  - platform: template
    name: "Song 3"
    id: song_3
    icon: mdi:music-note
    entity_category: config
    mode: text
    optimistic: true
    restore_value: true
  - platform: template
    name: "Song 4"
    id: song_4
    icon: mdi:music-note
    entity_category: config
    mode: text
    optimistic: true
    restore_value: true

button:
  - platform: template
    name: "Play Song 1"
    icon: mdi:play
    on_press:
      - rtttl.play:
          id: rtttl_player
          rtttl: !lambda 'return id(song_1).state;'
  - platform: template
    name: "Play Song 2"
    icon: mdi:play
    on_press:
      - rtttl.play:
          id: rtttl_player
          rtttl: !lambda 'return id(song_2).state;'
  - platform: template
    name: "Play Song 3"
    icon: mdi:play
    on_press:
      - rtttl.play:
          id: rtttl_player
          rtttl: !lambda 'return id(song_3).state;'
  - platform: template
    name: "Play Song 4"
    icon: mdi:play
    on_press:
      - rtttl.play:
          id: rtttl_player
          rtttl: !lambda 'return id(song_4).state;'
Install, then open the web server or your Home Assistant dashboard. Each Song field holds an RTTTL string you can edit, and its Play Song button plays whatever's in it. Paste a tune into a field, then press its button. (1)
- Pressing Play on an empty field logs "Unable to determine name; missing ':'" — the field needs a tune first.
Install the firmware
Your actions are saved in Device Builder, but the device is still running its old firmware. Compile and install the new code to push them.
- Click Save in the bottom right of the editor.
- Click Install, then pick On the Network to push the new firmware over Wi-Fi.
- Wait for the compile and flash to finish. The device reboots once the install is done.
Call it from Home Assistant
With the device back online, each action you added shows up in Home Assistant. Test one from Developer Tools before wiring it into anything.
-
Click the button below to open Developer Tools → Actions:

-
In the Action field, search
play_song_1and pick ESPHome: esphome-starter-kit play_song_1. -
Click Perform action. The buzzer plays that slot's tune, no extra data needed.
Every other slot is there the same way (play_song_2, play_song_3, play_song_4), plus play_buzzer to play any tune you pass in. The same actions work inside any automation. (1)
- For a slot, pick its action (like
esphome.esphome_starter_kit_play_song_2) with no extra data. Foresphome.esphome_starter_kit_play_buzzer, set a song_str to any RTTTL string, for examplescale_up:d=32,o=5,b=100:c,c#,d,d#,e,f,f#,g,g#,a,a#,b. Handy triggers: a doorbell chime, a wash cycle finishing, or a morning wake-up scale.
Find more tunes
Any valid RTTTL line works as a tune. The Play a Tune page has a set of ready-to-paste songs (Mario, Cantina, the Imperial March) and links for browsing and previewing more. For seasonal ones, see the Holiday Songs collection.
Home Assistant can play the buzzer now. Your kit went from a button-only buzzer to one any automation can reach. Swap the trigger or the tune and you have a new audible notification, no extra hardware.
New to ESPHome? We're here to help.
Stuck on a step or want to show off what you built? Ask questions and share projects with the Apollo community.