Adding the Button Module
The button module is the first input your starter kit gets, and the fastest way to feel ESPHome respond to a physical action. By the end of this tutorial you'll have the button wired to your ESP32-C6, surfaced as a binary sensor in your YAML, and toggling live in the web server when you press it.
Before you start
Work through the two prerequisites first:
- Start Here to snap the button module off the panel.
- First Steps to install ESPHome Device Builder and create your starter kit device.
Attach Button module
Connect the button module to the ESP32-C6 using one of the FPC ribbon cables that came with the kit. Either FPC connector on the ESP32-C6 works, top or bottom.
1. Unplug the USB-C cable from the ESP32-C6 so it is powered off.

Handle the FPC connectors gently
The latches are small and the ribbon cable is fragile. Lift the latch with a fingernail, slide the cable in, and press the latch down. Never pull on the cable itself.
2. Flip up the latch on the FPC connector then gently slide the ribbon cable in to the connector with the blue side facing upwards. Gently press the latch down to lock it in place.
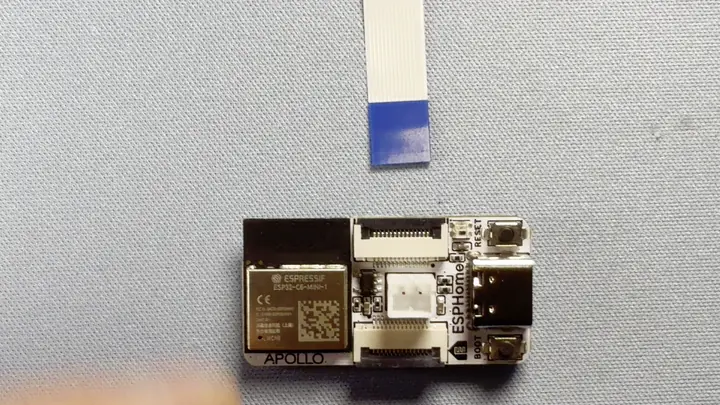
3. Slide the ribbon cable into the button module with the blue side facing upwards then press the latch down to lock it in place.

4. Plug the ESP32-C6 back into your computer.
Add to ESPHome Device Builder
ESPHome Device Builder ships an Add Component flow that knows the pin layout for every Apollo Starter Kit module. Use it instead of writing the binary sensor by hand, and you'll get the right GPIO and inversion settings on the first try.
- Open your starter kit device in Device Builder and click Edit.
- In the ESPHome Device Builder, navigate to the Components section.
- Click Add Component in the editor toolbar.
- Search for Button and select the Button Module.
- Click Add. Device Builder inserts the button's binary sensor block into your YAML.
What the button YAML does
The block Add Component drops into your config looks like this:
binary_sensor:
  - platform: gpio
    name: Button Module
    pin:
      inverted: true
      mode:
        input: true
        pullup: true
      number: 6
    id: button_module
Each option does something specific:
| Option | What it does |
|---|---|
platform: gpio |
Reads a digital input on a GPIO pin. |
name: Button Module |
The friendly name shown in Home Assistant and the web server. |
inverted: true |
The pin reads LOW when the button is pressed, so this flips it to an intuitive on/off state. |
mode.input: true |
Configures the pin as an input. |
mode.pullup: true |
Enables the ESP32-C6's internal pull-up so the pin doesn't float when the button isn't pressed. |
number: 6 |
The GPIO pin (GPIO6) the button module's FPC connector wires to on the ESP32-C6. |
id: button_module |
Internal handle you can reference from automations and lambdas elsewhere in the config. |
Install the firmware
Flash the device so the new button entity goes live.
- Click Install on your device card in ESPHome Device Builder.
- Choose Plug into the computer running ESPHome Device Builder for the first flash, or On The Network if the device is already on your Wi-Fi.
- Wait for the compile and flash to finish. First builds can take a few minutes.
- The device reboots and reconnects to your Wi-Fi on its own.
Test the Button
With the device back online, the button entity is live on the web server. Open it in a browser on the same network and watch it react in real time.
- In a browser, open
http://<your-device-name>.local/. If you usedesphome-starter-kitas the device name in Getting Started, that'shttp://esphome-starter-kit.local/. - Find the Button entity in the binary sensor list.
- Press the button on the module. The entity flips from OFF to ON while the button is held, then back to OFF when you release it.
Web server page showing the Button binary sensor toggling between ON and OFF as the button is pressed.
Your button module is now ready for you to use in automations!
Your Button Module is now ready for some fun tasks.. like toggling lights on and off in your room, watering your plants, and more!
Try it in an automation
Your button is live. Now make it trigger something:
![]() Button Controlled LEDs
Button Controlled LEDs
![]() Play a Tune
Play a Tune
![]() Press to Check Climate
Press to Check Climate
New to ESPHome? We're here to help.
Stuck on a step or want to show off what you built? Ask questions and share projects with the Apollo community.