Setup
- Getting Started
- Sensor Definitions
- Bluetooth Tracking with MTR-1
- General Tips
- How To Change The Update Frequency Of Sensors/Force Update
- Zone Configuration Using Home Assistant
- Zone Configuration Using HLKRadarTool App
Getting Started
Please refer to the general getting started article
Sensor Definitions


Component
The ld2450 component enables the use of the HLK-LD2450 human presence and motion detection radar module with ESPHome.
HLK-LD2450 Official Datasheet and user manuals
Motion target tracking involves real-time tracking of the position of a moving target within a specific area, enabling measurements of distance, angle, and speed. The LD2450 is a sensor module for tracking motion targets within the Hi-link 24G millimeter-wave radar series. It features simplified 24 GHz radar sensor hardware and intelligent algorithm firmware. It is mainly used in general indoor scenarios such as homes, offices, and hotels for tracking the location of moving human targets.
Note: Ensure that the LD2450 firmware version is V2.02.23090617 or later for proper integration functionality. You can use the HLKRadarTool mobile app to update the firmware.

The UART needs to be set up in your configuration for this sensor to work. parity and stop_bits must be NONE and 1, respectively. Using hardware UART pins is highly recommended, as they support the out-of-the-box 256000 baud rate of the LD2450 sensor.
# uart configuration
uart:
id: uart_ld2450
tx_pin: 17
rx_pin: 21
baud_rate: 256000
parity: NONE
stop_bits: 1
# ld2450 configuration
ld2450:
id: ld2450_radar
uart_id: uart_ld2450
throttle: 1000ms
Configuration variables:
- id (Optional, config-id): Manually specify the ID for the
ld2450component if you need multiple components. - uart_id (Optional, config-id): Manually specify the ID of the UART Component if you want to use multiple UART buses.
- throttle (Optional, int): Time in milliseconds to control the rate of data updates. Defaults to
1000ms.
Binary Sensor
The ld2450 binary sensor offers presence states for the targets.
binary_sensor:
- platform: ld2450
ld2450_id: ld2450_radar
has_target:
name: Presence
has_moving_target:
name: Moving Target
has_still_target:
name: Still TargetConfiguration variables:
- ld2450_id (Optional, config-id): Manually specify the ID for the
ld2450component if you are using multiple components. - has_target (Optional): True if either target is still or in motion. All options from Binary Sensor.
- has_moving_target (Optional): True if a moving target is detected. All options from Binary Sensor.
- has_still_target (Optional): True if a still target is detected. All options from Binary Sensor.
Sensor
The ld2450 sensor provides information about the states and attributes of detected targets.
sensor:
- platform: ld2450
ld2450_id: ld2450_radar
target_count:
name: Presence Target Count
still_target_count:
name: Still Target Count
moving_target_count:
name: Moving Target Count
target_1:
x:
name: Target-1 X
y:
name: Target-1 Y
speed:
name: Target-1 Speed
angle:
name: Target-1 Angle
distance:
name: Target-1 Distance
resolution:
name: Target-1 Resolution
target_2:
x:
name: Target-2 X
y:
name: Target-2 Y
speed:
name: Target-2 Speed
angle:
name: Target-2 Angle
distance:
name: Target-2 Distance
resolution:
name: Target-2 Resolution
target_3:
x:
name: Target-3 X
y:
name: Target-3 Y
speed:
name: Target-3 Speed
angle:
name: Target-3 Angle
distance:
name: Target-3 Distance
resolution:
name: Target-3 Resolution
zone_1:
target_count:
name: Zone-1 All Target Count
still_target_count:
name: Zone-1 Still Target Count
moving_target_count:
name: Zone-1 Moving Target Count
zone_2:
target_count:
name: Zone-2 All Target Count
still_target_count:
name: Zone-2 Still Target Count
moving_target_count:
name: Zone-2 Moving Target Count
zone_3:
target_count:
name: Zone-3 All Target Count
still_target_count:
name: Zone-3 Still Target Count
moving_target_count:
name: Zone-3 Moving Target CountConfiguration variables:
- ld2450_id (Optional, config-id): Manually specify the ID for the
ld2450component if you are using multiple components. - target_count (Optional, int): Total targets detected, stationary or moving. All options from Sensor.
- still_target_count (Optional, int): Count of stationary targets. All options from Sensor.
- moving_target_count (Optional, int): Count of moving targets. All options from Sensor.
- target_N (Optional): Details about the targets (N = 1 to 3). A maximum of 3 targets can be detected:
target_1,target_2,target_3.- x (Optional, int): Distance in millimeters (mm) of the target from the
ld2450sensor along the X-axis. All options from Sensor. - y (Optional, int): Distance in millimeters (mm) of the target from the
ld2450sensor in the Y direction. All options from Sensor. - speed (Optional, int): Speed of the moving target in
mm/s. All options from Sensor. - angle (Optional, int): Angle of target in degrees (°) relative to the
ld2450sensor. All options from Sensor. - distance (Optional, int): Distance in millimeters (mm) of the target from the
ld2450sensor. All options from Sensor. - resolution (Optional, int): The
ld2450target detection range resolution in millimeters (mm). All options from Sensor.
- x (Optional, int): Distance in millimeters (mm) of the target from the
- zone_N (Optional): Target count details in the defined zones (N = 1 to 3). A maximum of 3 zones:
zone_1,zone_2,zone_3.- target_count (Optional, int): Total targets detected in the zone, stationary or moving. All options from Sensor.
- still_target_count (Optional, int): Count of stationary targets in the zone. All options from Sensor.
- moving_target_count (Optional, int): Count of moving targets in the zone. All options from Sensor.
Switch
The ld2450 switch allows you to control your ld2450 Bluetooth and Multi/Single Target Tracking.
switch:
- platform: ld2450
ld2450_id: ld2450_radar
bluetooth:
name: "Bluetooth"
multi_target:
name: "Multi Target Tracking"Configuration variables:
- ld2450_id (Optional, config-id): Manually specify the ID for the
ld2450component if you are using multiple components. - bluetooth (Optional): Turn on/off the Bluetooth adapter. Defaults to
true. All options from Switch. - multi_target (Optional): Turn on/off the Multi Target Tracking option. All options from Switch.
Number
The ld2450 number allows you to control the presence timeout and zone area configuration of your ld2450.
number:
- platform: ld2450
ld2450_id: ld2450_radar
presence_timeout:
name: "Timeout"
zone_1:
x1:
name: Zone-1 X1
y1:
name: Zone-1 Y1
x2:
name: Zone-1 X2
y2:
name: Zone-1 Y2
zone_2:
x1:
name: Zone-2 X1
y1:
name: Zone-2 Y1
x2:
name: Zone-2 X2
y2:
name: Zone-2 Y2
zone_3:
x1:
name: Zone-3 X1
y1:
name: Zone-3 Y1
x2:
name: Zone-3 X2
y2:
name: Zone-3 Y2Configuration variables:
- ld2450_id (Optional, config-id): Manually specify the ID for the
ld2450component if you are using multiple components. - presence_timeout (Required, int): The duration, in seconds, for which the presence states will persist after detection is cleared. Default is
5seconds. All options from Number. - zone_N (Optional): Configuration of the zone (N = 1 to 3), defined as a rectangular area. A maximum of 3 Zones can be configured:
zone_1,zone_2,zone_3. The zone coordinates consist of x1 y1 (Near-Left) to x2 y2 (Far-Right) relative to theld2450sensor.- x1 (Optional, int): Start X coordinate in millimeters (mm) of the zone from the
ld2450sensor along the X-axis. All options from Number. - y1 (Optional, int): Start Y coordinate in millimeters (mm) of the zone from the
ld2450sensor along the Y-axis. All options from Number. - x2 (Optional, int): End X coordinate in millimeters (mm) of the zone from the
ld2450sensor along the X-axis. All options from Number. - y2 (Optional, int): End Y coordinate in millimeters (mm) of the zone from the
ld2450sensor along the Y-axis. All options from Number.
- x1 (Optional, int): Start X coordinate in millimeters (mm) of the zone from the
Button
button:
- platform: ld2450
ld2450_id: ld2450_radar
factory_reset:
name: "LD2450 Factory Reset"
restart:
name: "LD2450 Restart"Configuration variables:
- ld2450_id (Optional, config-id): Manually specify the ID for the
ld2450component if you are using multiple components. - factory_reset (Optional): Resets the
ld2450to its default values. All options from Button. - restart (Optional): Restarts the
ld2450device. All options from Button.
Text Sensor
The ld2450 text sensor allows you to get information about your ld2450.
text_sensor:
- platform: ld2450
ld2450_id: ld2450_radar
version:
name: "LD2450 Firmware"
mac_address:
name: "LD2450 BT MAC"
target_1:
direction:
name: "Target-1 Direction"
target_2:
direction:
name: "Target-2 Direction"
target_3:
direction:
name: "Target-3 Direction"Configuration variables:
- ld2450_id (Optional, config-id): Manually specify the ID for the
ld2450component if you are using multiple components. - version (Optional): The
ld2450firmware version. All options from Text Sensor. - mac_address (Optional): The
ld2450Bluetooth MAC address. All options from Text Sensor. - target_N (Optional): Targets (N = 1 to 3). A maximum of 3 targets can be detected:
target_1,target_2,target_3.- direction (Optional): Direction of the target relative to the
ld2450sensor. Possible values are:Stationary,Moving away,Coming closer,NA. All options from Sensor.
- direction (Optional): Direction of the target relative to the
Select
The ld2450 select allows you to control baud rate and zone type of your ld2450.
select:
- platform: ld2450
ld2450_id: ld2450_radar
baud_rate:
name: "Baud rate"
zone_type:
name: "Zone Type"Configuration variables:
- ld2450_id (Optional, config-id): Manually specify the ID for the
ld2450component if you are using multiple components. - baud_rate (Optional): Control the UART serial port baud rate. Defaults to
256000. Once changed, all sensors will stop working until a fresh install with an updated UART Component configuration. All options from Select. - zone_type (Optional): Control the Zone detection modes. It can be set to
Disabled,Detection, orFilter. Selecting theDisabledoption will disable zone area detection.Detectionmode is used to detect only targets in the specified area, whileFiltermode can be used to exclude an area from detection. All options from Select.
(Copied and adapted from hareeshmu)
Bluetooth Tracking with MTR-1
Please refer to the general Bluetooth tracking article
General Tips
MTR-1 PCB with Sensors


Light Sensor (LTR-390UV)

When mounting the MTR-1 be sure to position the device so that the large hole at the top is not covered. This allows more light to enter and will ensure better accuracy
The onboard RGB LED will trigger the light sensor. Be cognizant of this when making automations based on light/LUX.
Mounting

LD2450 Performance and Electrical Parameters
LD2450 Datasheet


Expanding Horizontal Distance as Target Moves Further Away
The detection is 60 degrees from center on each side. So it is a cone when you are close to it but at 4 feet away to the side you might not be visible. If you are further from the wall it can detect further in a horizontal distance.

Increased ESP Temperature
If you are experiencing higher than normal ESP temperatures ~140+ degrees F then changing the wifi power save mode option might help decrease the temperature. Here is the link to the ESPHome WiFi Component Power Save Mode.
Power Save Mode
The WiFi interface of all ESPs offer three power save modes to reduce the amount of power spent on WiFi. While some options can reduce the power usage of the ESP, they generally also decrease the reliability of the WiFi connection, with frequent disconnections from the router in the highest power saving mode.
NONE (least power saving, Default for ESP8266)
LIGHT (Default for ESP32)
HIGH (most power saving)
wifi:
# ...
power_save_mode: noneThe code above can be added to the devices .yaml through the ESPHome addon edit button.
(Thank you for the suggestion, Brian!)
(Referenced from ESPHome website)
How To Change The Update Frequency Of Sensors/Force Update
How To Change The Update Frequency Of Sensors/Force Update
Zone Configuration Using Home Assistant
Disclaimer: Currently having issues saving the zones after restarting the device when using this method. It is recommended to use the HLKRadarTool App Zone Configuration Guide.
You will need to have HACS and Plotly installed to make it easier to visualize the zones. If you already have HACS then you can skip Step 1. Same for Step 2 if you have Plotly.
1. Install HACS
2. Install Plotly
3. Copy the code below and add a Home Assistant card to visualize your zones. You will need to change all of the sensor_apollo_mtr_1 entity IDs to match your MTR-1 device. This can be done quickly by using a code editor or ChatGPT.
type: custom:plotly-graph
title: Target Positions
refresh_interval: 1
hours_to_show: current_day
layout:
height: 230
margin:
l: 50
r: 20
t: 20
b: 40
showlegend: true
xaxis:
dtick: 1000
gridcolor: RGBA(200,200,200,0.15)
zerolinecolor: RGBA(200,200,200,0.15)
type: number
fixedrange: true
range:
- 4000
- -4000
yaxis:
dtick: 1000
gridcolor: RGBA(200,200,200,0.15)
zerolinecolor: RGBA(200,200,200,0.15)
scaleanchor: x
scaleratio: 1
fixedrange: true
range:
- 7500
- 0
entities:
- entity: ''
name: Target1
marker:
size: 12
line:
shape: spline
width: 5
x:
- $ex hass.states["sensor.apollo_mtr_1_982da4_target_1_x"].state
'y':
- $ex hass.states["sensor.apollo_mtr_1_982da4_target_1_y"].state
- entity: ''
name: Target2
marker:
size: 12
line:
shape: spline
width: 5
x:
- $ex hass.states["sensor.apollo_mtr_1_982da4_target_2_x"].state
'y':
- $ex hass.states["sensor.apollo_mtr_1_982da4_target_2_y"].state
- entity: ''
name: Target3
marker:
size: 12
line:
shape: spline
width: 5
x:
- $ex hass.states["sensor.apollo_mtr_1_982da4_target_3_x"].state
'y':
- $ex hass.states["sensor.apollo_mtr_1_982da4_target_3_y"].state
- entity: ''
name: Zone1
mode: lines
fill: toself
fillcolor: RGBA(20,200,0,0.06)
line:
color: RGBA(20,200,0,0.2)
shape: line
width: 2
x:
- $ex hass.states["number.apollo_mtr_1_982da4_zone_1_x1"].state
- $ex hass.states["number.apollo_mtr_1_982da4_zone_1_x1"].state
- $ex hass.states["number.apollo_mtr_1_982da4_zone_1_x2"].state
- $ex hass.states["number.apollo_mtr_1_982da4_zone_1_x2"].state
- $ex hass.states["number.apollo_mtr_1_982da4_zone_1_x1"].state
'y':
- $ex hass.states["number.apollo_mtr_1_982da4_zone_1_y1"].state
- $ex hass.states["number.apollo_mtr_1_982da4_zone_1_y2"].state
- $ex hass.states["number.apollo_mtr_1_982da4_zone_1_y2"].state
- $ex hass.states["number.apollo_mtr_1_982da4_zone_1_y1"].state
- $ex hass.states["number.apollo_mtr_1_982da4_zone_1_y1"].state
- entity: ''
name: Zone2
mode: lines
fill: toself
fillcolor: RGBA(200,0,255,0.06)
line:
color: RGBA(200,0,255,0.2)
shape: line
width: 2
x:
- $ex hass.states["number.apollo_mtr_1_982da4_zone_2_x1"].state
- $ex hass.states["number.apollo_mtr_1_982da4_zone_2_x1"].state
- $ex hass.states["number.apollo_mtr_1_982da4_zone_2_x2"].state
- $ex hass.states["number.apollo_mtr_1_982da4_zone_2_x2"].state
- $ex hass.states["number.apollo_mtr_1_982da4_zone_2_x1"].state
'y':
- $ex hass.states["number.apollo_mtr_1_982da4_zone_2_y1"].state
- $ex hass.states["number.apollo_mtr_1_982da4_zone_2_y2"].state
- $ex hass.states["number.apollo_mtr_1_982da4_zone_2_y2"].state
- $ex hass.states["number.apollo_mtr_1_982da4_zone_2_y1"].state
- $ex hass.states["number.apollo_mtr_1_982da4_zone_2_y1"].state
- entity: ''
name: Zone3
mode: lines
fill: toself
fillcolor: RGBA(200,120,55,0.06)
line:
color: RGBA(200,120,55,0.2)
shape: line
width: 2
x:
- $ex hass.states["number.apollo_mtr_1_982da4_zone_3_x1"].state
- $ex hass.states["number.apollo_mtr_1_982da4_zone_3_x1"].state
- $ex hass.states["number.apollo_mtr_1_982da4_zone_3_x2"].state
- $ex hass.states["number.apollo_mtr_1_982da4_zone_3_x2"].state
- $ex hass.states["number.apollo_mtr_1_982da4_zone_3_x1"].state
'y':
- $ex hass.states["number.apollo_mtr_1_982da4_zone_3_y1"].state
- $ex hass.states["number.apollo_mtr_1_982da4_zone_3_y2"].state
- $ex hass.states["number.apollo_mtr_1_982da4_zone_3_y2"].state
- $ex hass.states["number.apollo_mtr_1_982da4_zone_3_y1"].state
- $ex hass.states["number.apollo_mtr_1_982da4_zone_3_y1"].state
- entity: ''
name: Coverage
mode: lines
fill: tonexty
fillcolor: rgba(168, 216, 234, 0.15)
line:
shape: line
width: 1
dash: dot
x:
- 0
- $ex 7500 * Math.sin((2 * Math.PI)/360 * 60)
- 4500
- 4000
- 3000
- 2000
- 1000
- 0
- -1000
- -2000
- -3000
- -4000
- -4500
- $ex -7500 * Math.sin((2 * Math.PI)/360 * 60)
- 0
'y':
- 0
- $ex 7500 * Math.cos((2 * Math.PI)/360 * 60)
- $ex Math.sqrt( 7500**2 - 4500**2 )
- $ex Math.sqrt( 7500**2 - 4000**2 )
- $ex Math.sqrt( 7500**2 - 3000**2 )
- $ex Math.sqrt( 7500**2 - 2000**2 )
- $ex Math.sqrt( 7500**2 - 1000**2 )
- 7500
- $ex Math.sqrt( 7500**2 - 1000**2 )
- $ex Math.sqrt( 7500**2 - 2000**2 )
- $ex Math.sqrt( 7500**2 - 3000**2 )
- $ex Math.sqrt( 7500**2 - 4000**2 )
- $ex Math.sqrt( 7500**2 - 4500**2 )
- $ex 7500 * Math.cos((2 * Math.PI)/360 * 60)
- 0
raw_plotly_config: true
4. Open Home Assistant and select Settings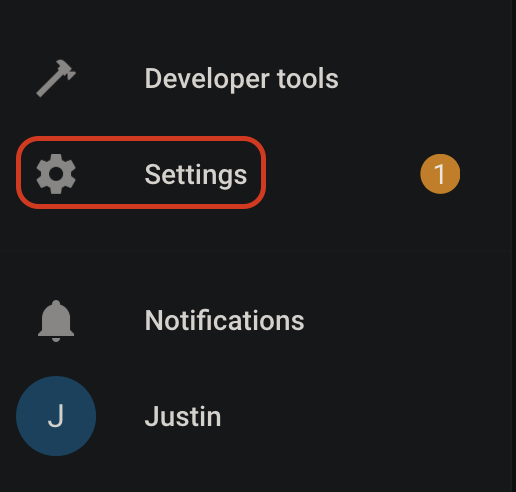
5. Select Devices and services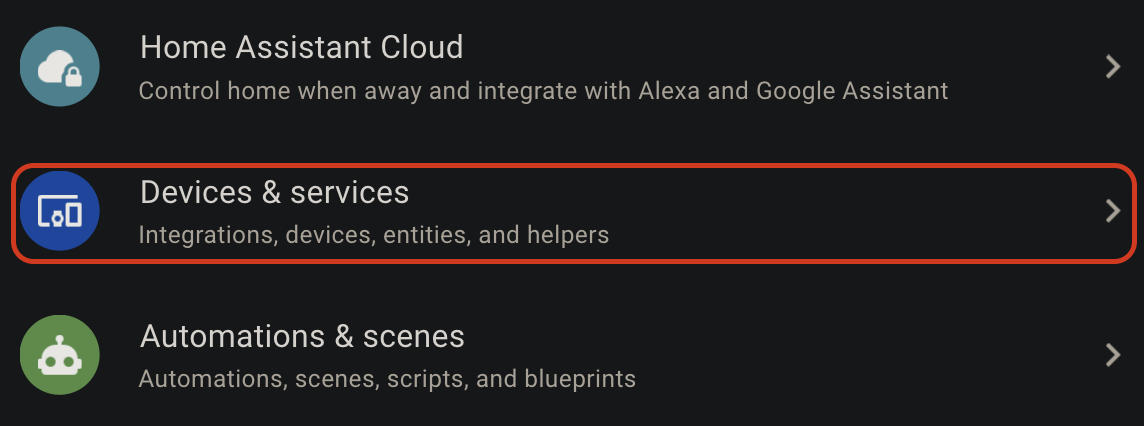
6. Select ESPHome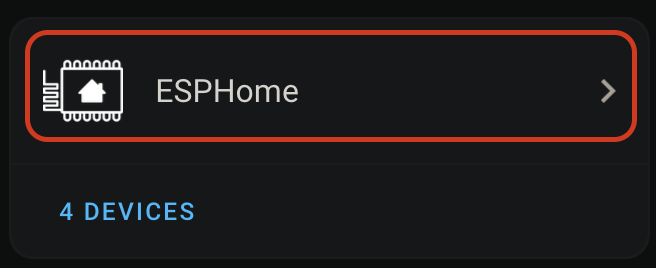
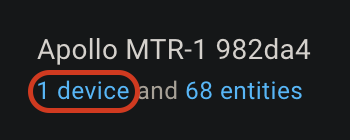
7. Select your MTR-1 device
8. Scroll down to the Configuration section and you should see Zone 1-3 X and Y boxes.
- LD2450 Bluetooth can be turned on if you would like to use the HLKRadarTool App to configure the zones.
- Multi Target Tracking toggled on helps it detect up to three targets better (still trying to figure out "how" this works).
- Zone Type allows you to select Disabled, Detection, or Filter.
- Disabled: Disable zone area detection
- Detection: Only detects targets in the specified zone
- Filter: Excludes a zone from detection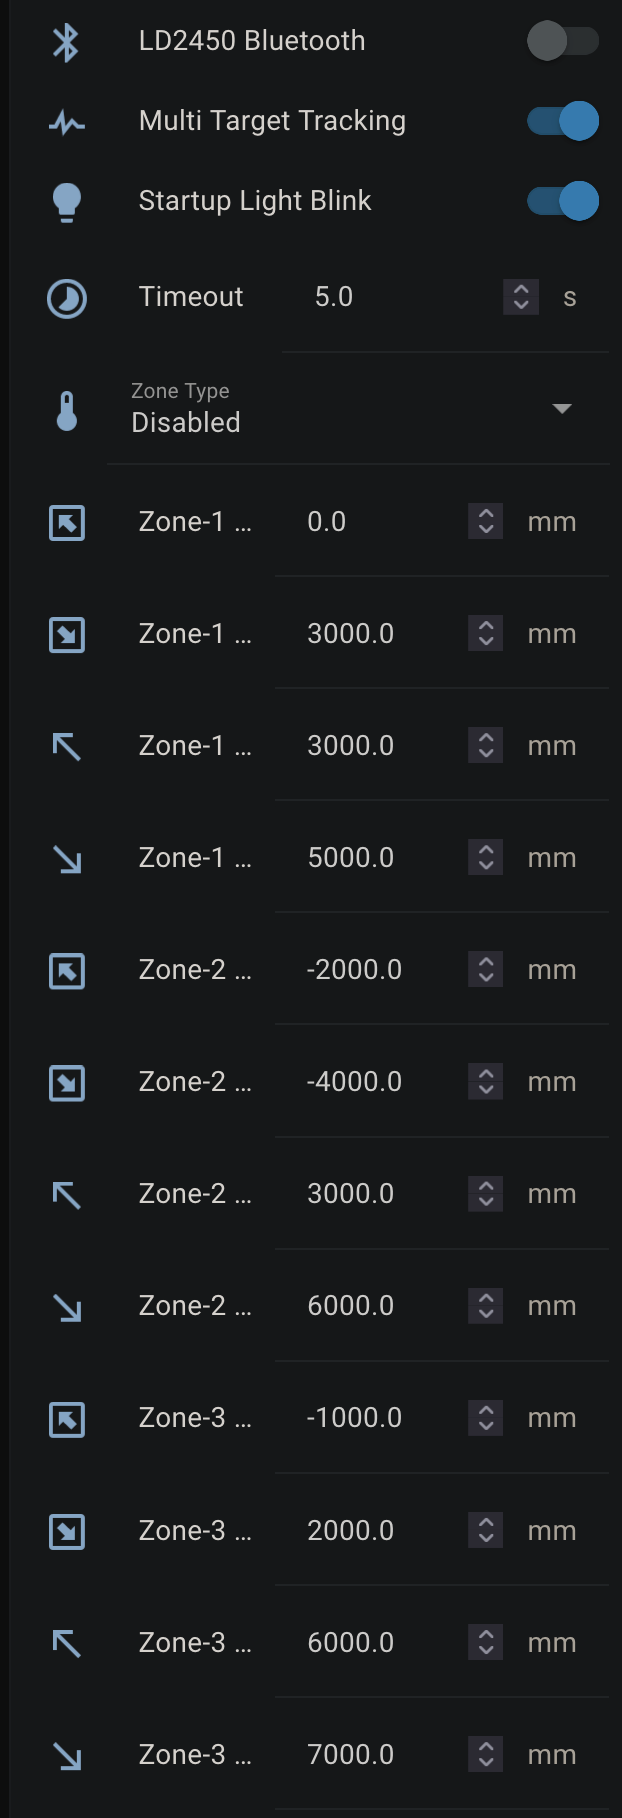
9. Now we can input our Zone 1-3 X and Y values to make our zones. Using the visual card from above, we can walk, sit, or stand in the area where we want to create a detection or non-detection zone. Input values for X are -7000 mm to 7000 mm, and the Y values are 0 mm to 7000 mm.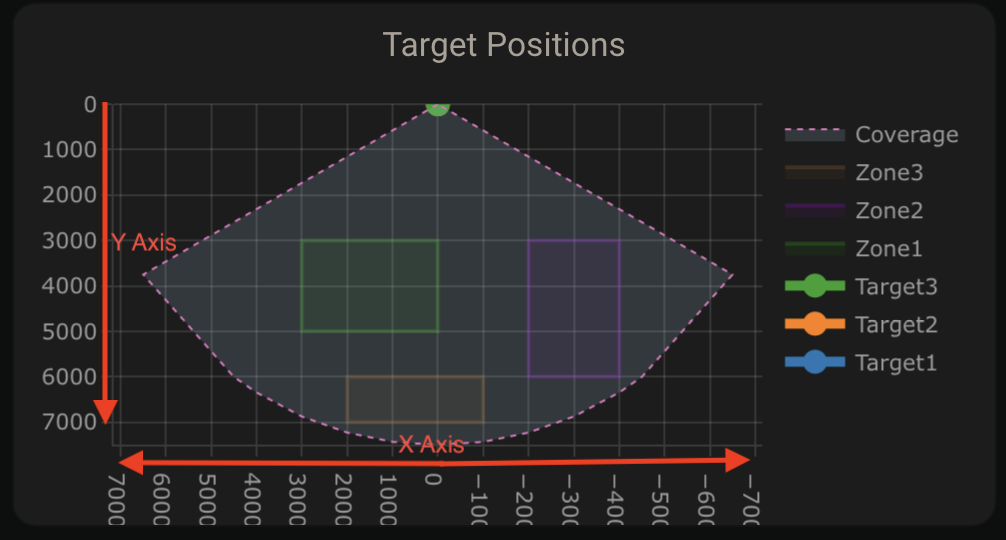
10. If you use the imperial system (Freedom Units) then you will need to do this step. Metric users can skip this. For the targets to show up correctly we first need to update the Target 1-3 X and Y measurements from inches (in) to millimeters (mm). Find Target 1-3 X and Y under the Sensors section and select them. You will want to update all 3 targets X and Y values.
11. Select the Settings cog in the top right.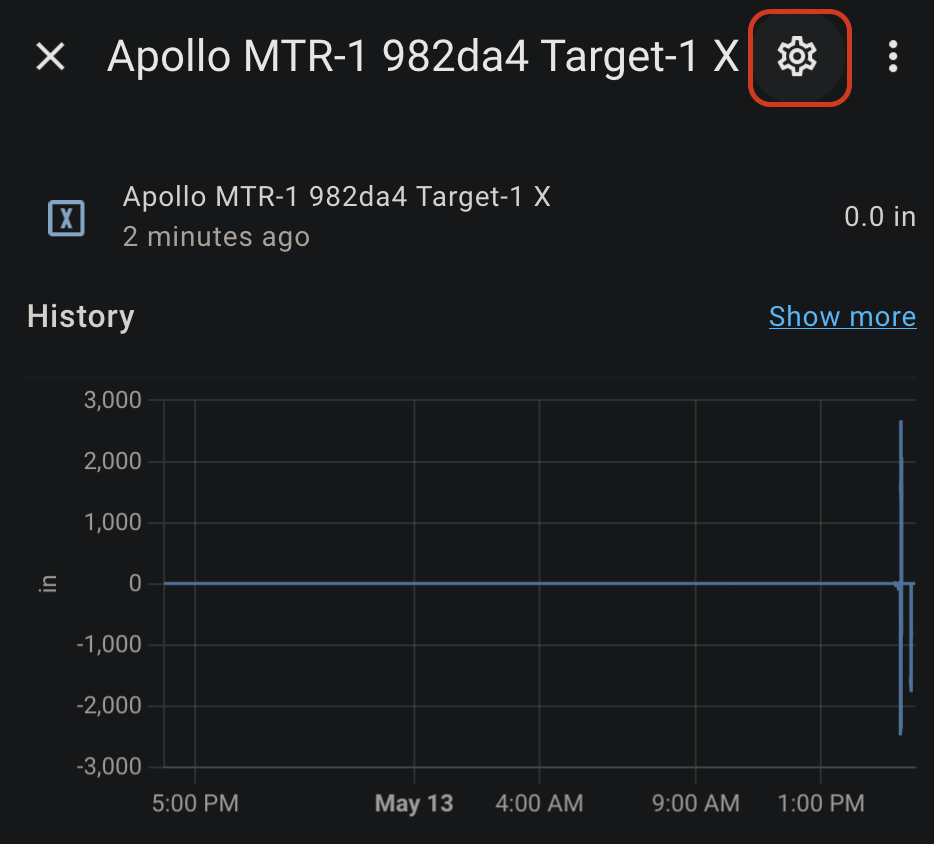
12. Change the unit of measurement to mm and select Update.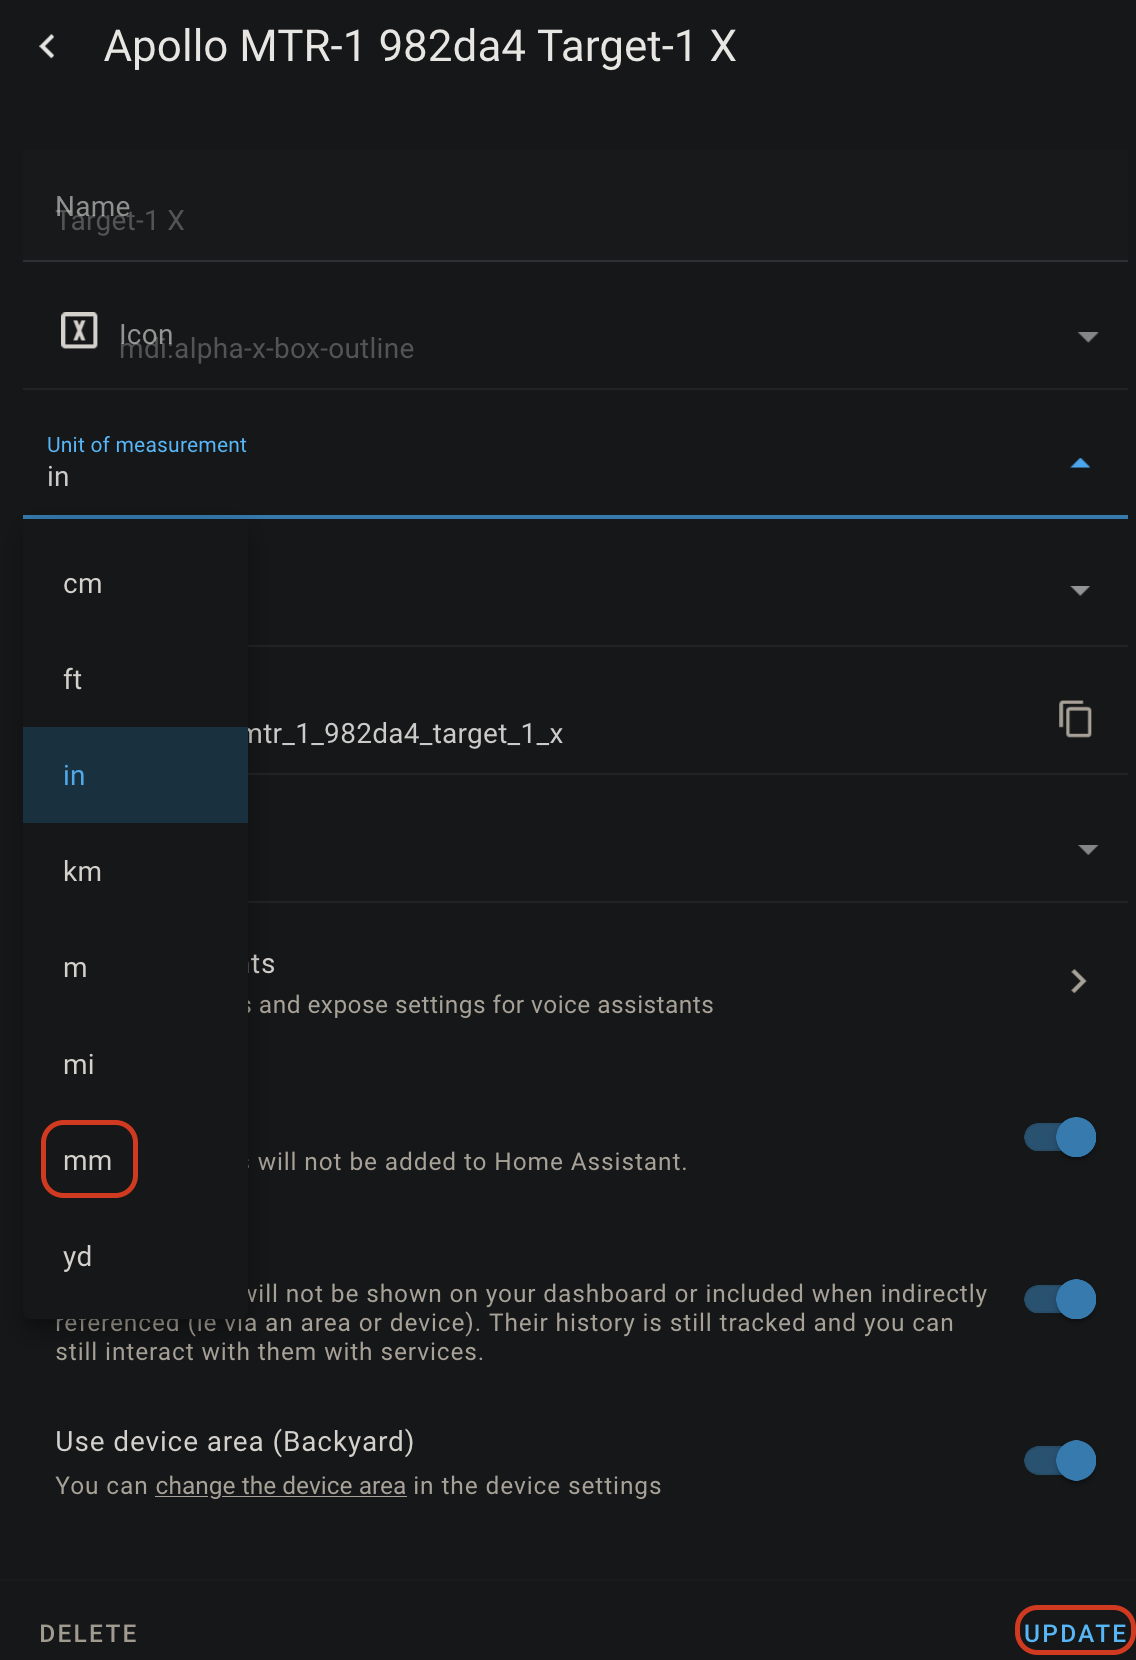
13. Now you should see targets on the card.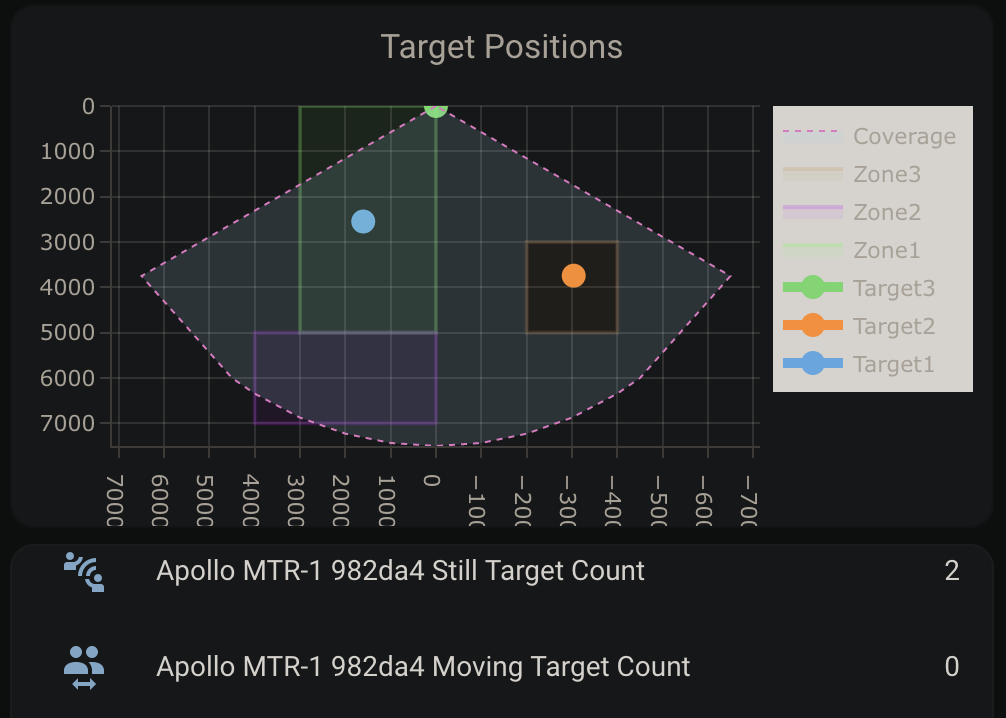
14. Now we can make zones around the targets where you want to Detect presence or filter them out!
15. If your zone configurations are not saved when restarting the device then try turning on the LD2450 Bluetooth for a few seconds and then turning it off again. You can also try to toggle on Multi Target Radar. This should wake up the mmWave module and retrieve your saved zones. (Thanks to our Discord members for helping figure this out)
Zone Configuration Using HLKRadarTool App
1. Download the HLKRadarTool app for either Android or Apple
2. Ensure the mmWave radar you want to configure has Radar Control Bluetooth turned on. Home Assistant > Settings > Devices & services > ESPHome Devices > Select Device > Scroll down and toggle on Radar Control Bluetooth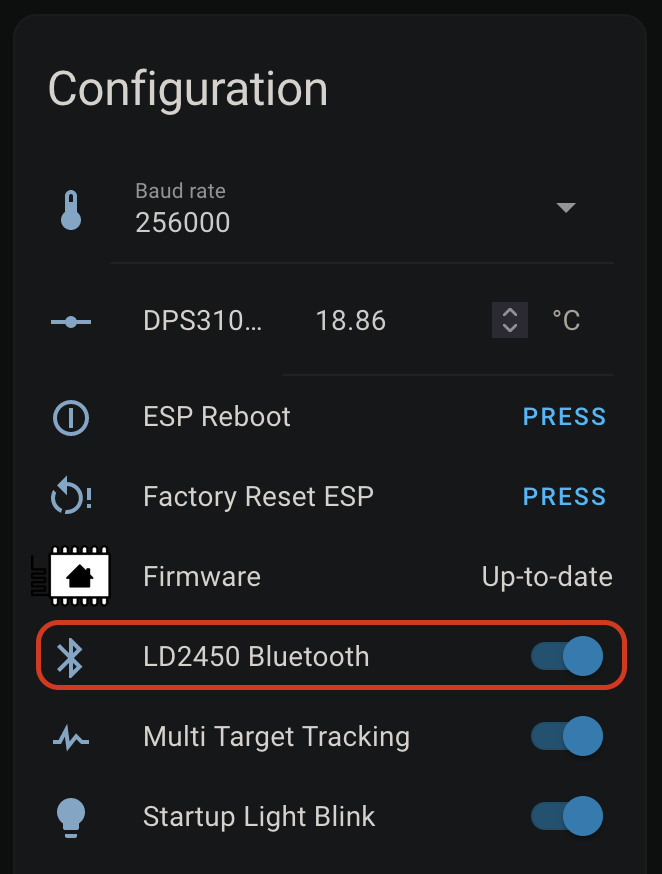
3. Open the HLKRadarTool App and select your device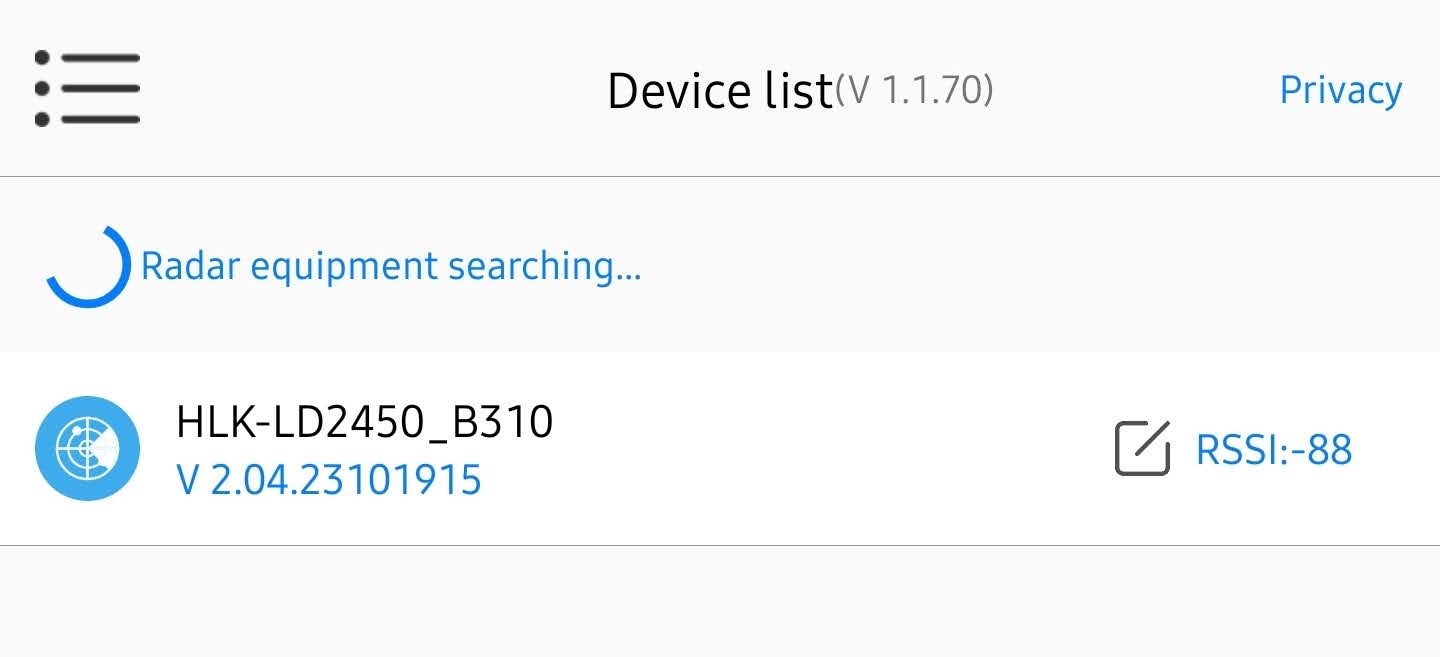
4. Select Set in the top right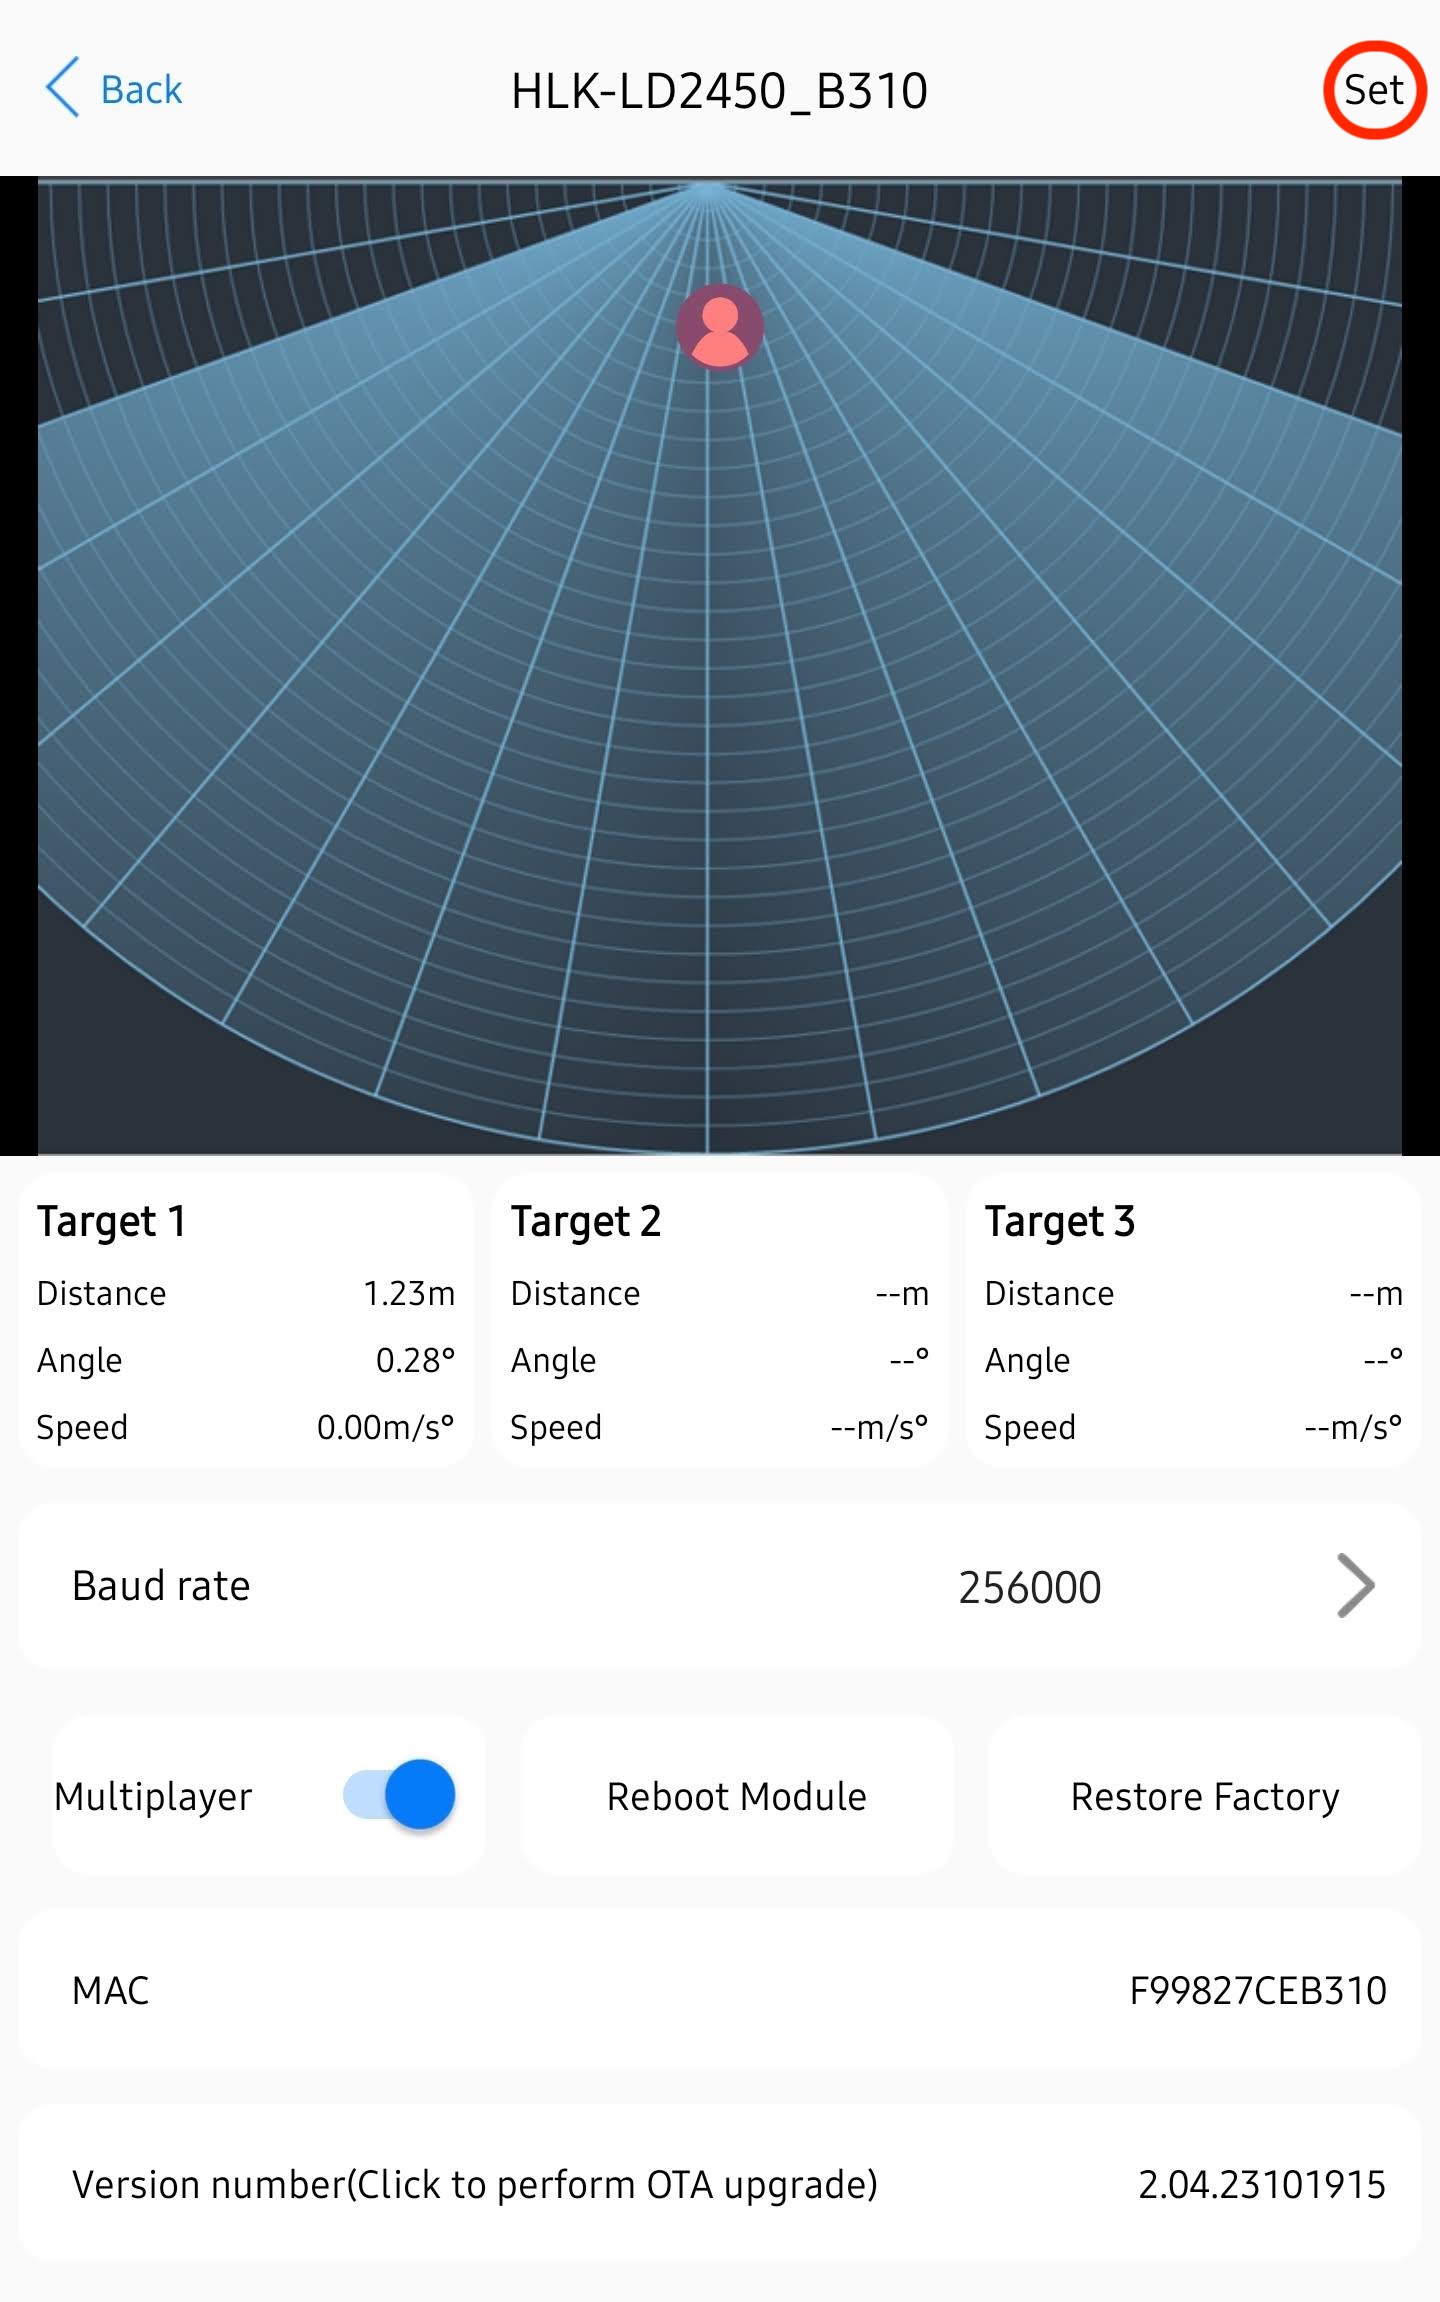
5. Select Close Detection, Area Detection, or Area Filtering. Then toggle Area 1, 2, or 3 and you will see a box with the corresponding number pop up. Then you can press and hold the box to move it and resize it. When your zones are set then select Submit and you should see Setup successfully!
- Close Detection: Disable zone area detection
- Area Detection: Only detects targets in the specified zone
- Area Filtering: Excludes a zone from detection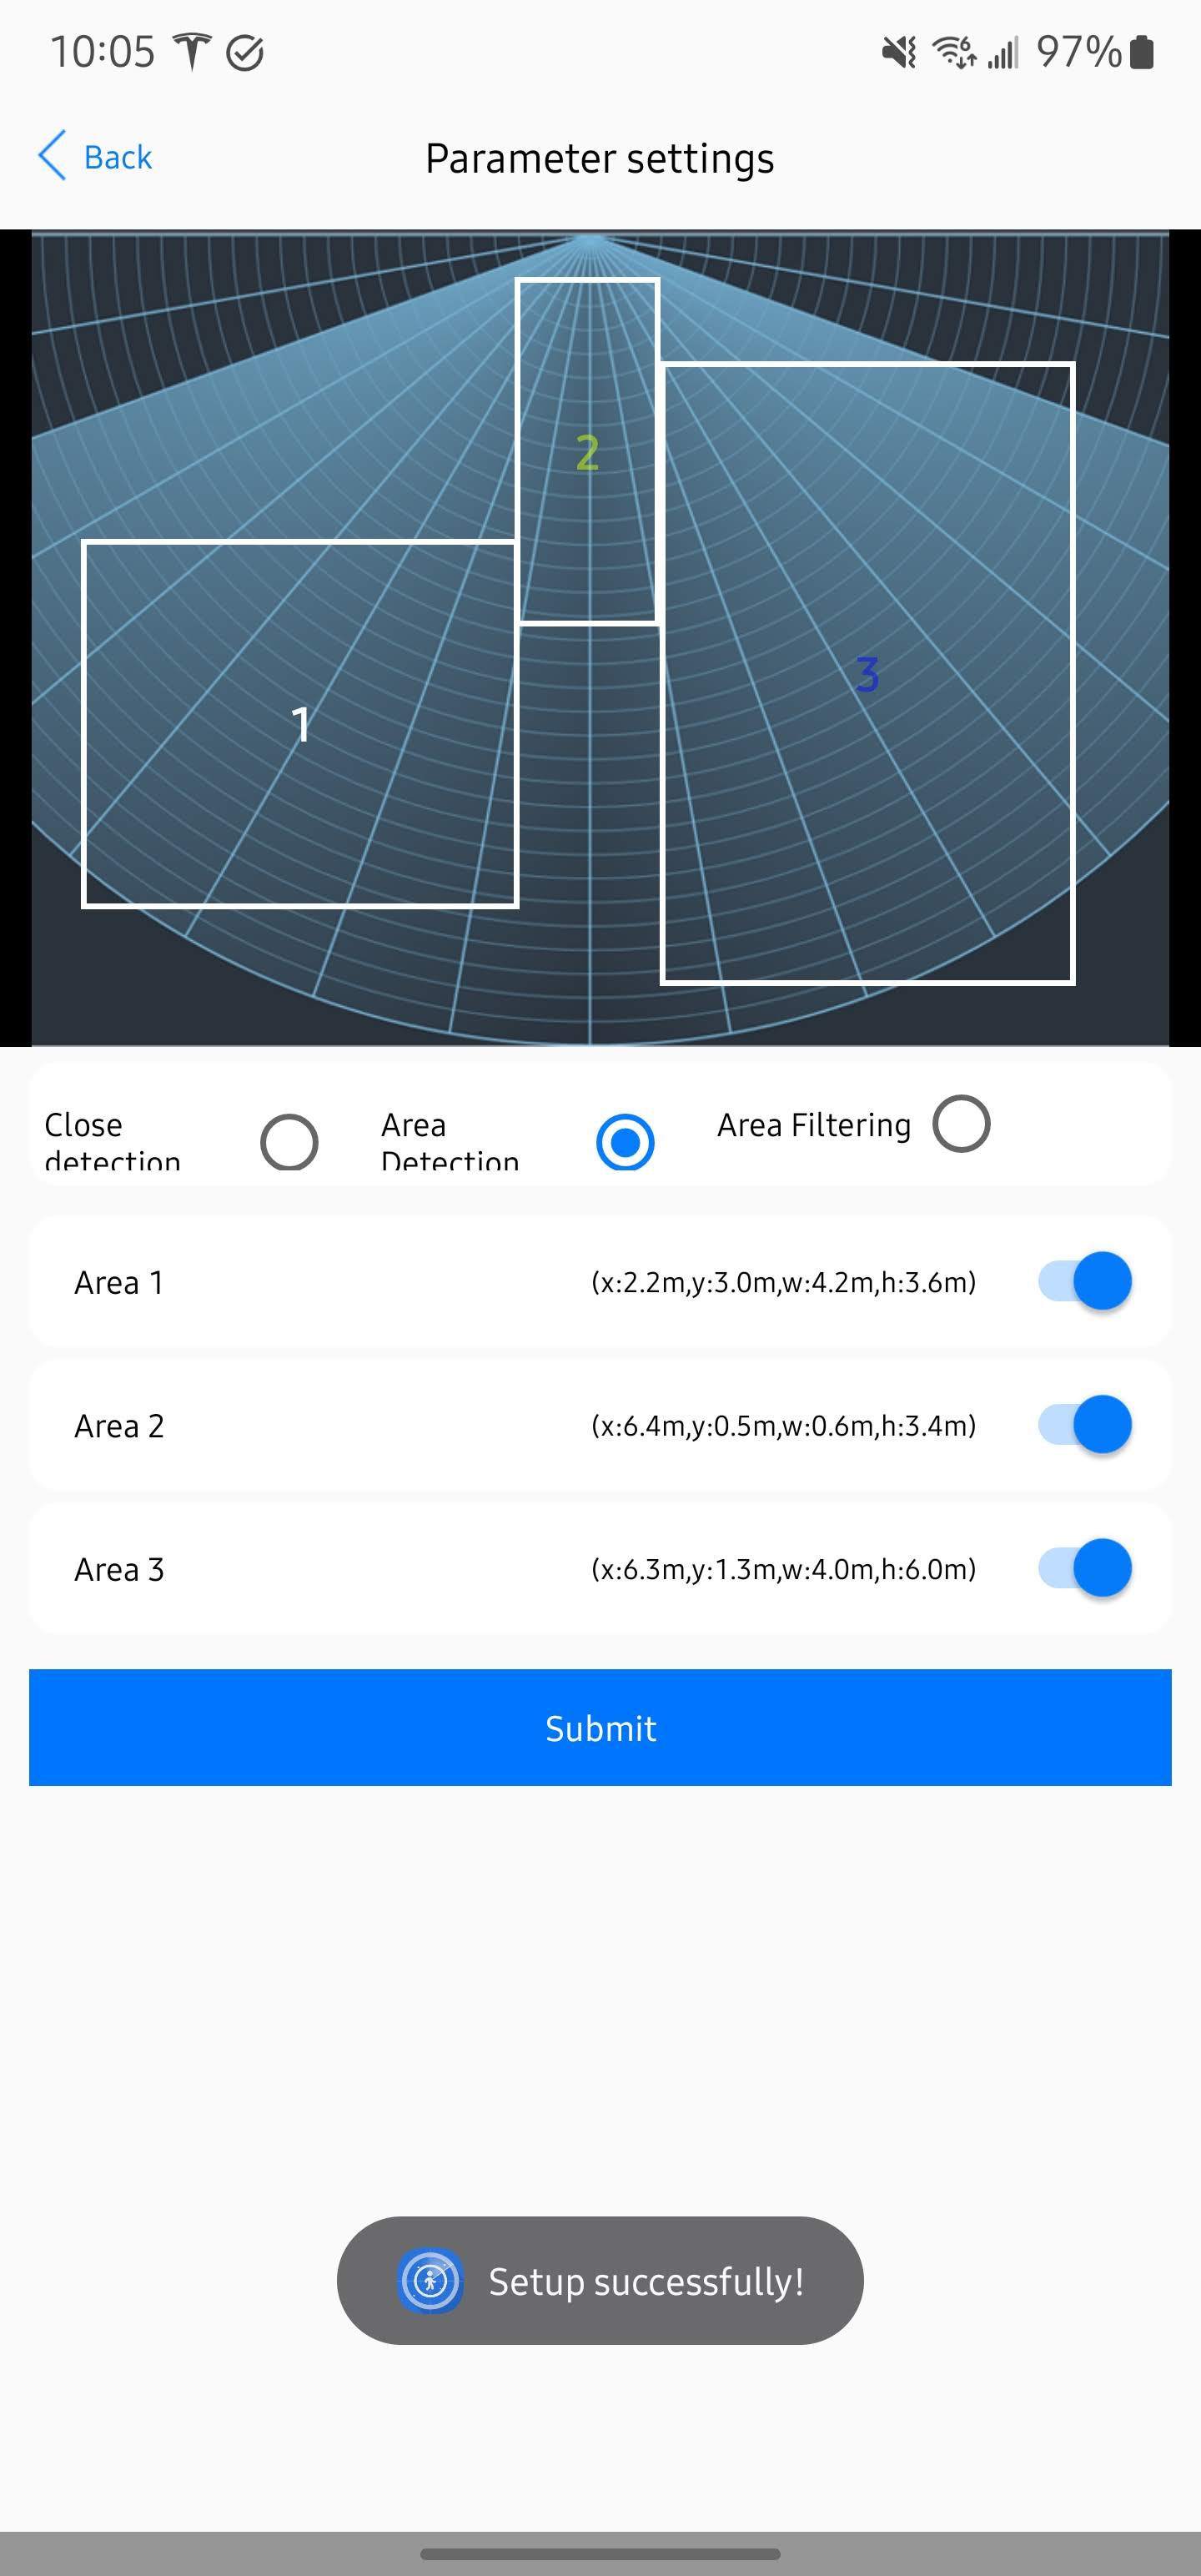
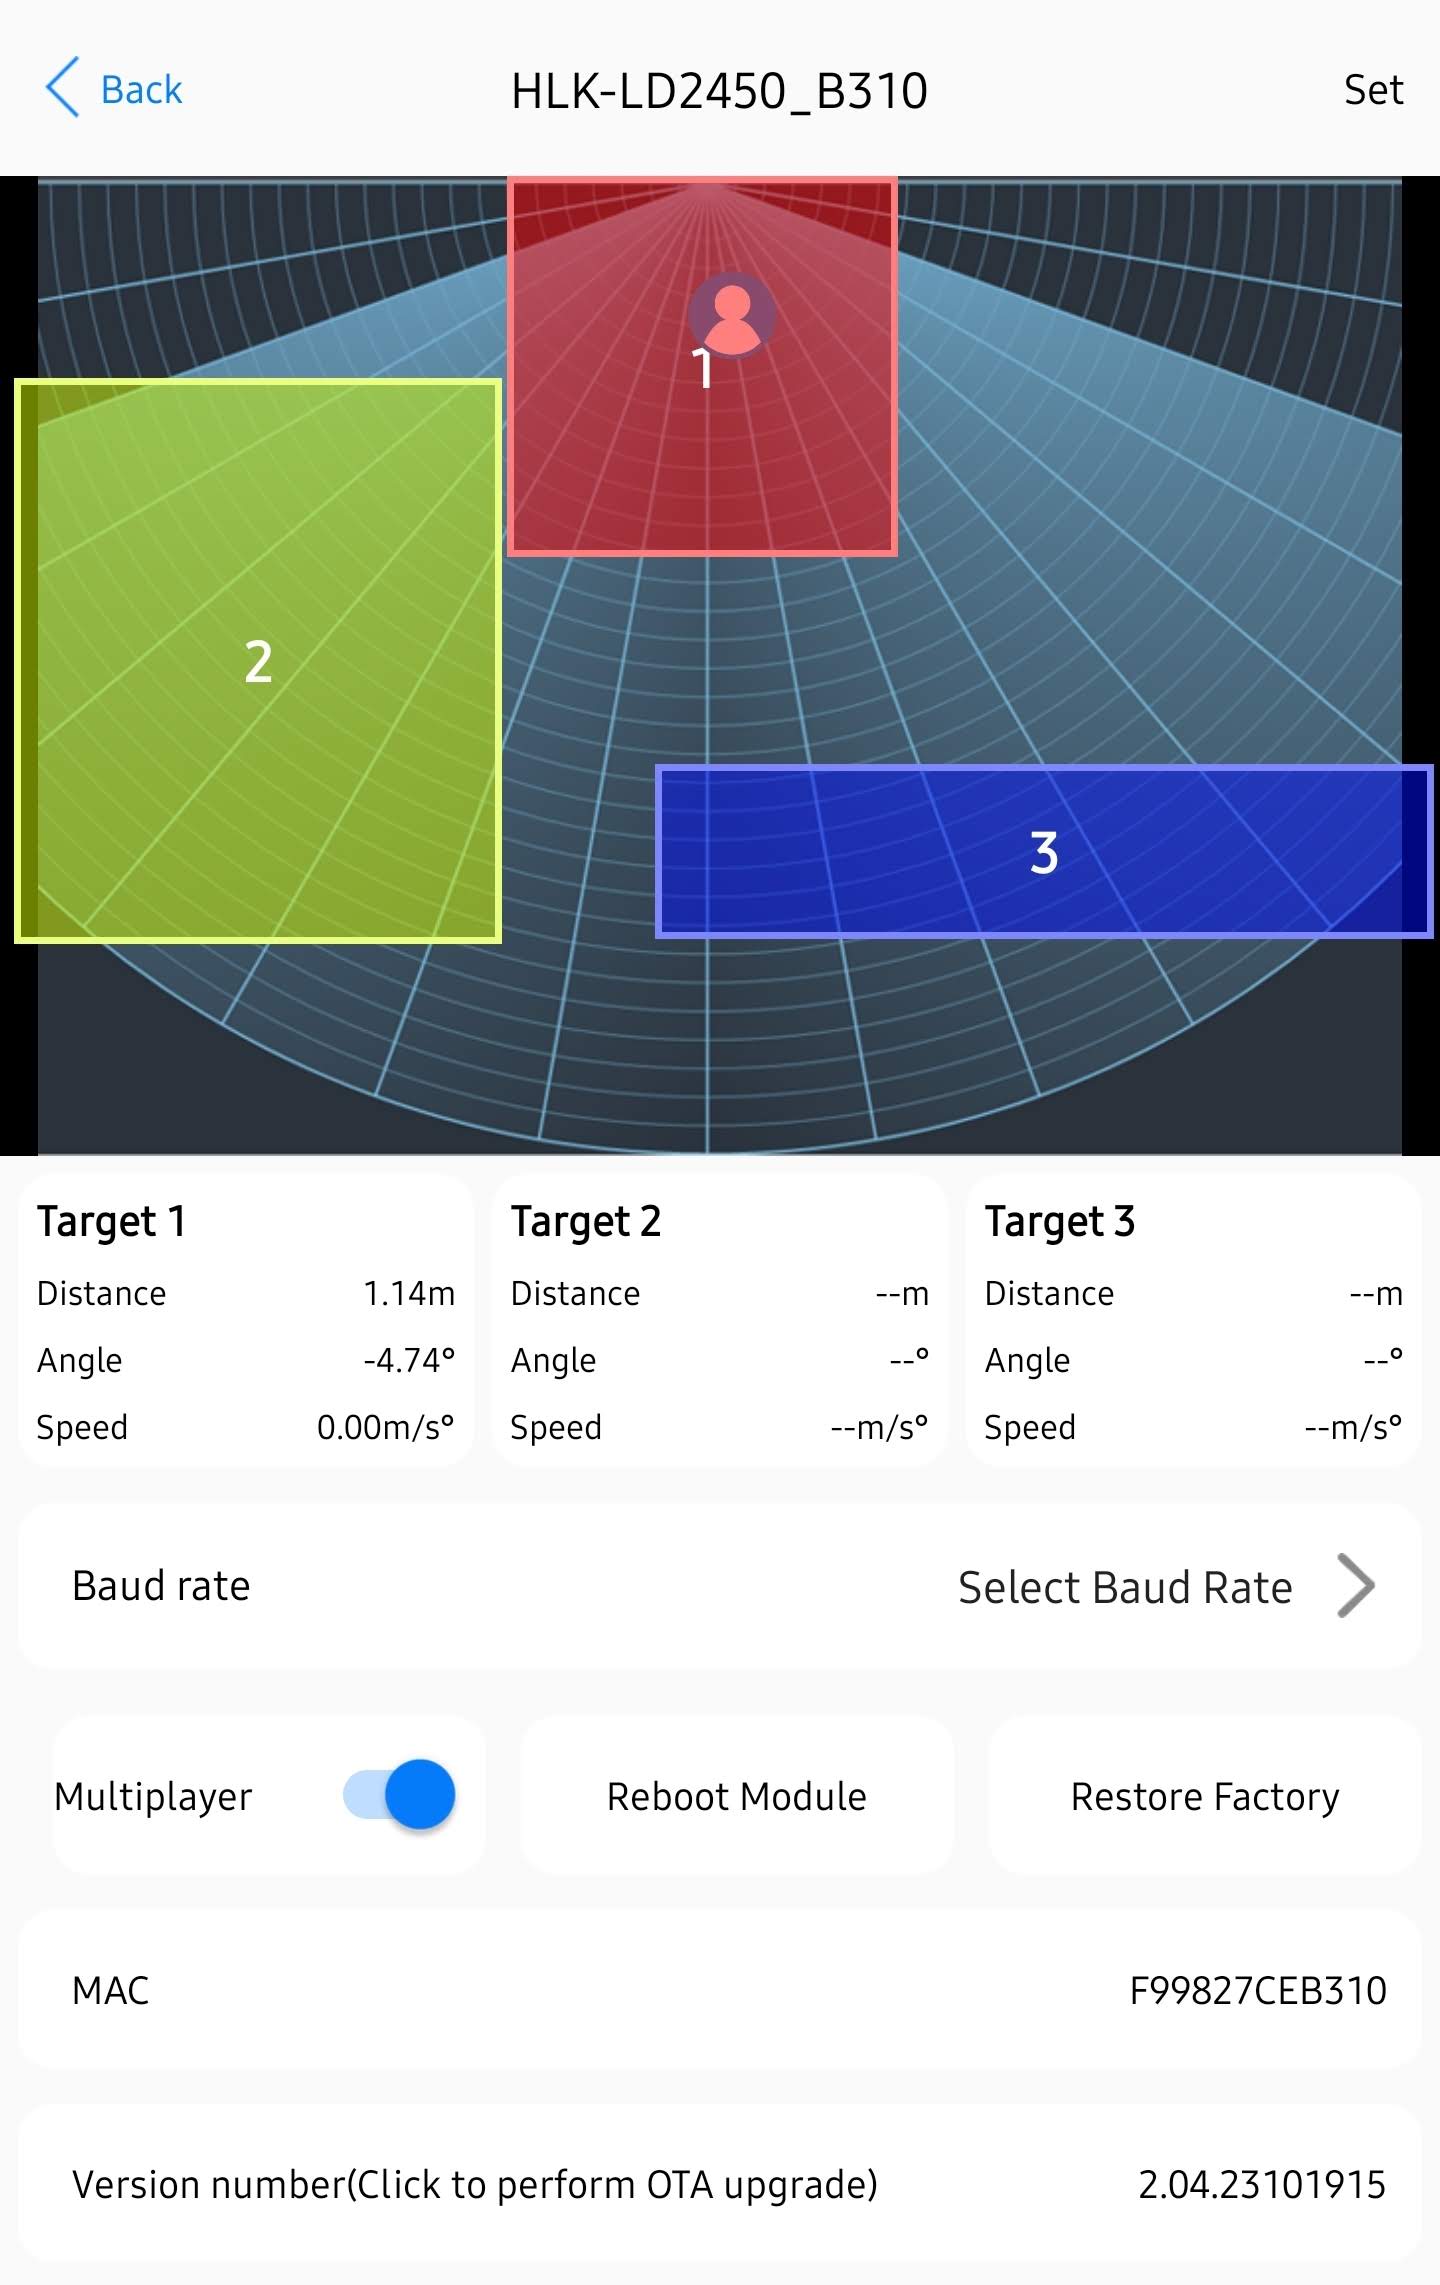
6. If set up correctly the zones should be saved as different colors. You can double-check that the settings are saved by looking at your HA entities (picture below). You should be all set! See below for a nice Home Assistant visualizer card.
7. Copy the code below and add a Home Assistant card to visualize your zones. You will need to change all of the sensor_apollo_mtr_1 entity IDs to match your MTR-1 device. This can be done quickly by using a code editor or ChatGPT.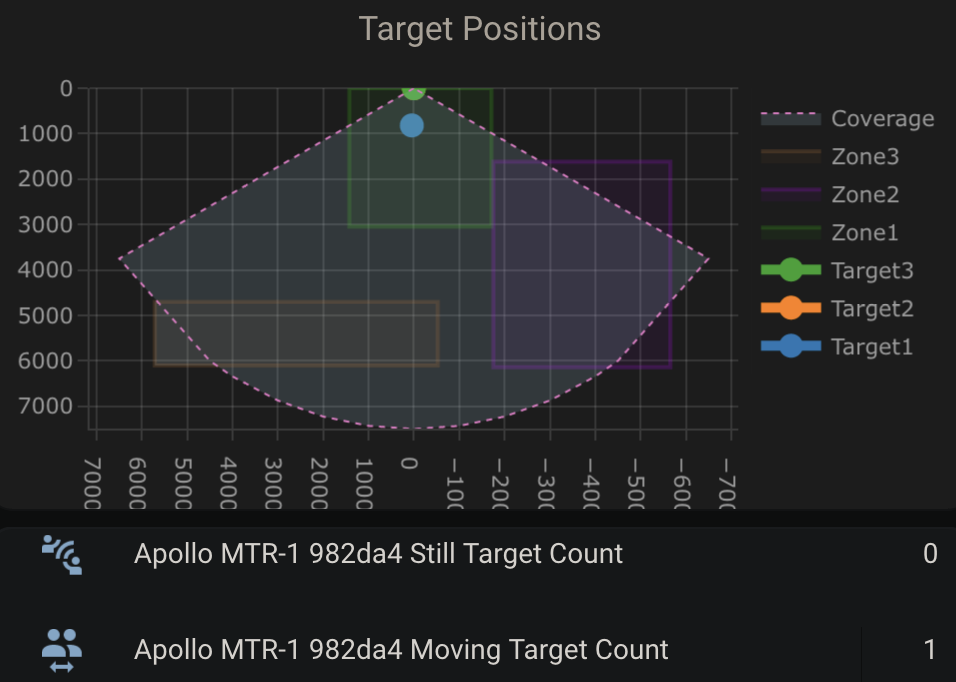
type: custom:plotly-graph
title: Target Positions
refresh_interval: 1
hours_to_show: current_day
layout:
height: 230
margin:
l: 50
r: 20
t: 20
b: 40
showlegend: true
xaxis:
dtick: 1000
gridcolor: RGBA(200,200,200,0.15)
zerolinecolor: RGBA(200,200,200,0.15)
type: number
fixedrange: true
range:
- 4000
- -4000
yaxis:
dtick: 1000
gridcolor: RGBA(200,200,200,0.15)
zerolinecolor: RGBA(200,200,200,0.15)
scaleanchor: x
scaleratio: 1
fixedrange: true
range:
- 7500
- 0
entities:
- entity: ''
name: Target1
marker:
size: 12
line:
shape: spline
width: 5
x:
- $ex hass.states["sensor.apollo_mtr_1_982da4_target_1_x"].state
'y':
- $ex hass.states["sensor.apollo_mtr_1_982da4_target_1_y"].state
- entity: ''
name: Target2
marker:
size: 12
line:
shape: spline
width: 5
x:
- $ex hass.states["sensor.apollo_mtr_1_982da4_target_2_x"].state
'y':
- $ex hass.states["sensor.apollo_mtr_1_982da4_target_2_y"].state
- entity: ''
name: Target3
marker:
size: 12
line:
shape: spline
width: 5
x:
- $ex hass.states["sensor.apollo_mtr_1_982da4_target_3_x"].state
'y':
- $ex hass.states["sensor.apollo_mtr_1_982da4_target_3_y"].state
- entity: ''
name: Zone1
mode: lines
fill: toself
fillcolor: RGBA(20,200,0,0.06)
line:
color: RGBA(20,200,0,0.2)
shape: line
width: 2
x:
- $ex hass.states["number.apollo_mtr_1_982da4_zone_1_x1"].state
- $ex hass.states["number.apollo_mtr_1_982da4_zone_1_x1"].state
- $ex hass.states["number.apollo_mtr_1_982da4_zone_1_x2"].state
- $ex hass.states["number.apollo_mtr_1_982da4_zone_1_x2"].state
- $ex hass.states["number.apollo_mtr_1_982da4_zone_1_x1"].state
'y':
- $ex hass.states["number.apollo_mtr_1_982da4_zone_1_y1"].state
- $ex hass.states["number.apollo_mtr_1_982da4_zone_1_y2"].state
- $ex hass.states["number.apollo_mtr_1_982da4_zone_1_y2"].state
- $ex hass.states["number.apollo_mtr_1_982da4_zone_1_y1"].state
- $ex hass.states["number.apollo_mtr_1_982da4_zone_1_y1"].state
- entity: ''
name: Zone2
mode: lines
fill: toself
fillcolor: RGBA(200,0,255,0.06)
line:
color: RGBA(200,0,255,0.2)
shape: line
width: 2
x:
- $ex hass.states["number.apollo_mtr_1_982da4_zone_2_x1"].state
- $ex hass.states["number.apollo_mtr_1_982da4_zone_2_x1"].state
- $ex hass.states["number.apollo_mtr_1_982da4_zone_2_x2"].state
- $ex hass.states["number.apollo_mtr_1_982da4_zone_2_x2"].state
- $ex hass.states["number.apollo_mtr_1_982da4_zone_2_x1"].state
'y':
- $ex hass.states["number.apollo_mtr_1_982da4_zone_2_y1"].state
- $ex hass.states["number.apollo_mtr_1_982da4_zone_2_y2"].state
- $ex hass.states["number.apollo_mtr_1_982da4_zone_2_y2"].state
- $ex hass.states["number.apollo_mtr_1_982da4_zone_2_y1"].state
- $ex hass.states["number.apollo_mtr_1_982da4_zone_2_y1"].state
- entity: ''
name: Zone3
mode: lines
fill: toself
fillcolor: RGBA(200,120,55,0.06)
line:
color: RGBA(200,120,55,0.2)
shape: line
width: 2
x:
- $ex hass.states["number.apollo_mtr_1_982da4_zone_3_x1"].state
- $ex hass.states["number.apollo_mtr_1_982da4_zone_3_x1"].state
- $ex hass.states["number.apollo_mtr_1_982da4_zone_3_x2"].state
- $ex hass.states["number.apollo_mtr_1_982da4_zone_3_x2"].state
- $ex hass.states["number.apollo_mtr_1_982da4_zone_3_x1"].state
'y':
- $ex hass.states["number.apollo_mtr_1_982da4_zone_3_y1"].state
- $ex hass.states["number.apollo_mtr_1_982da4_zone_3_y2"].state
- $ex hass.states["number.apollo_mtr_1_982da4_zone_3_y2"].state
- $ex hass.states["number.apollo_mtr_1_982da4_zone_3_y1"].state
- $ex hass.states["number.apollo_mtr_1_982da4_zone_3_y1"].state
- entity: ''
name: Coverage
mode: lines
fill: tonexty
fillcolor: rgba(168, 216, 234, 0.15)
line:
shape: line
width: 1
dash: dot
x:
- 0
- $ex 7500 * Math.sin((2 * Math.PI)/360 * 60)
- 4500
- 4000
- 3000
- 2000
- 1000
- 0
- -1000
- -2000
- -3000
- -4000
- -4500
- $ex -7500 * Math.sin((2 * Math.PI)/360 * 60)
- 0
'y':
- 0
- $ex 7500 * Math.cos((2 * Math.PI)/360 * 60)
- $ex Math.sqrt( 7500**2 - 4500**2 )
- $ex Math.sqrt( 7500**2 - 4000**2 )
- $ex Math.sqrt( 7500**2 - 3000**2 )
- $ex Math.sqrt( 7500**2 - 2000**2 )
- $ex Math.sqrt( 7500**2 - 1000**2 )
- 7500
- $ex Math.sqrt( 7500**2 - 1000**2 )
- $ex Math.sqrt( 7500**2 - 2000**2 )
- $ex Math.sqrt( 7500**2 - 3000**2 )
- $ex Math.sqrt( 7500**2 - 4000**2 )
- $ex Math.sqrt( 7500**2 - 4500**2 )
- $ex 7500 * Math.cos((2 * Math.PI)/360 * 60)
- 0
raw_plotly_config: true